SDK Kernel Configuration
menuconfig is a configuration tool for the Linux kernel that provides a terminal graphical interface, making it easy to intuitively modify configuration files while automatically handling configuration dependencies. Other similar configuration interfaces include nconfig and xconfig. Below is an introduction to the basic functions and operations of menuconfig.
1.Configuration Interface
Execute the following commands to open the configuration interface:
./build.sh lunch
./build.sh kernel-config
2. Basic Operations
- The configuration interface displayed after executing the command is as follows:
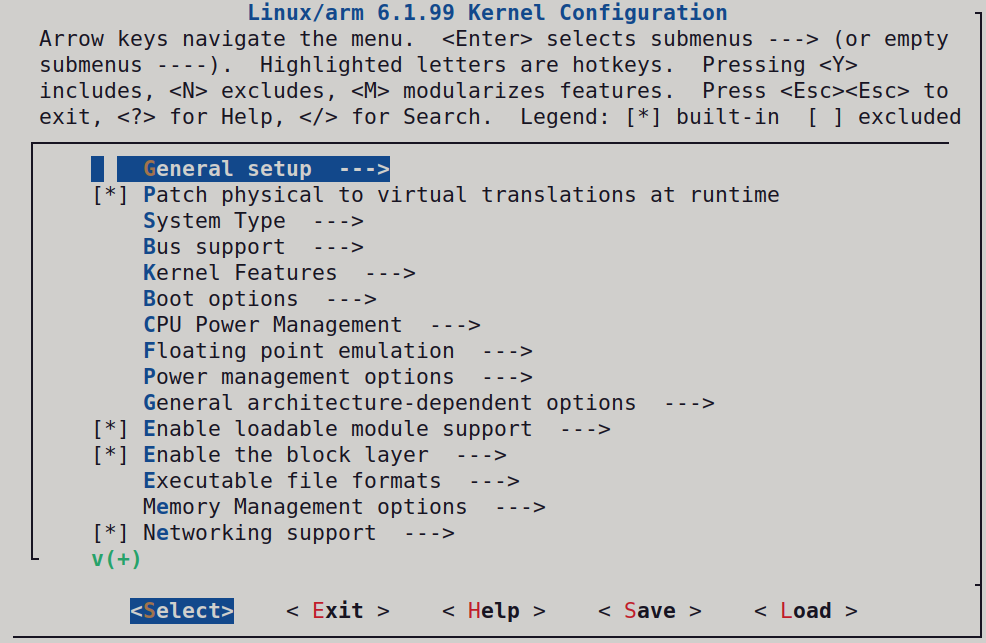
From the top of the interface, we can see the basic operations and instructions for menuconfig.
Key Operations:
- ↑↓PgUpPgDn: Browse and select kernel features.
- ←→: Select actions like Select, Exit, etc.
- Enter: Enter submenus.
- Y: Select this feature.
- N: Exclude this feature.
- M: Select as a module.
- Esc: Press Esc twice to return to the previous menu.
- ?: View help information for this feature.
- /: Search.
Legend Explanation:
[*]: Selected item.[ ]: Unselected item.<M>: Selected item (as a module).< >: Unselected item (as a module).
The middle area is where users select various functionalities. You can navigate using the up and down arrow keys and also directly jump to a line by pressing the corresponding colored letter, e.g., the first letter "K" of Kernel Features will jump directly to that line when the "K" key is pressed.
The bottom area includes some commonly used operation options, providing users with important interaction functionalities. Their roles are as follows:
<Select>: Enter the submenu of the currently highlighted configuration item.<Exit>: Exit the current menu and return to the previous level.<Help>: Provide help information for the currently highlighted configuration item.<Save>: Save the current configuration changes without exiting the configuration tool.<Load>: Load a specified configuration file.
3. Feature Summary
The middle section of the kernel configuration interface is a multi-level menu system. You can navigate using the up and down arrow keys, press Enter to enter submenus, and press Esc to return to the previous menu. Through this interface, users can flexibly configure the kernel according to system needs, selecting necessary features and drivers to build a customized kernel suitable for specific hardware and purposes. Below are the main items in the Linux kernel configuration interface:
- General setup: Basic runtime configuration.
- Kernel Features: Configuration of core functionalities, such as modularization and block device support.
- CPU Power Management: Configure CPU power management options.
- Enable loadable module support: Whether to support kernel modules.
- IO Schedulers: Configure disk I/O schedulers.
- Networking support: Configure network support, including protocols and devices.
- Device Drivers: Configure various device drivers, such as input devices, USB devices, etc.
- File systems: Configure filesystem support and choose supported filesystem types.
- Security options: Configure kernel security-related options.
- Cryptographic API: Configure support for cryptographic APIs.
4. Example: Adding a Driver to the Kernel
The following example demonstrates how to add a USB-to-Audio driver in the Kernel:
- Open the configuration interface. Navigate to the SDK root directory and launch the kernel configuration menu.For SDKs that have not been compiled before, please select the appropriate branch according to your development board.
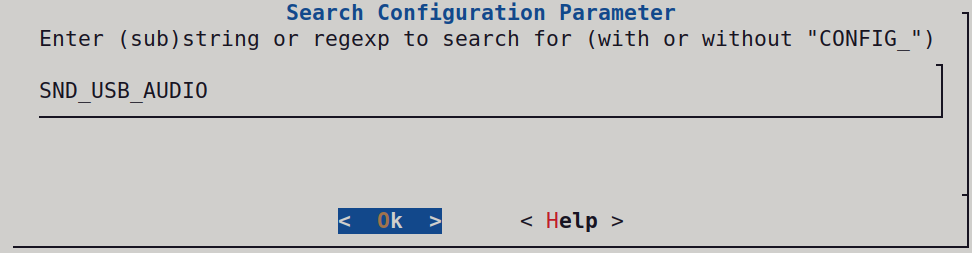
- Press / and enter SND_USB_AUDIO, then press Enter to start searching.
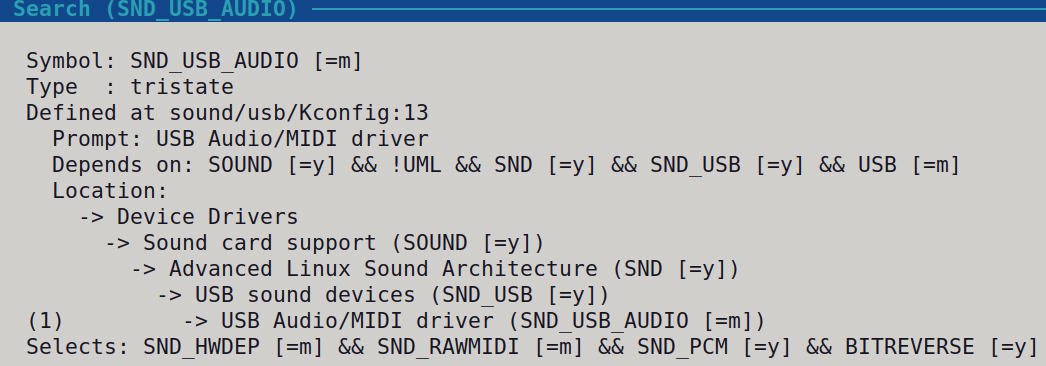
- If only one match is found, press 1 to jump to the configuration location. If multiple matches appear, select the correct component based on the path.
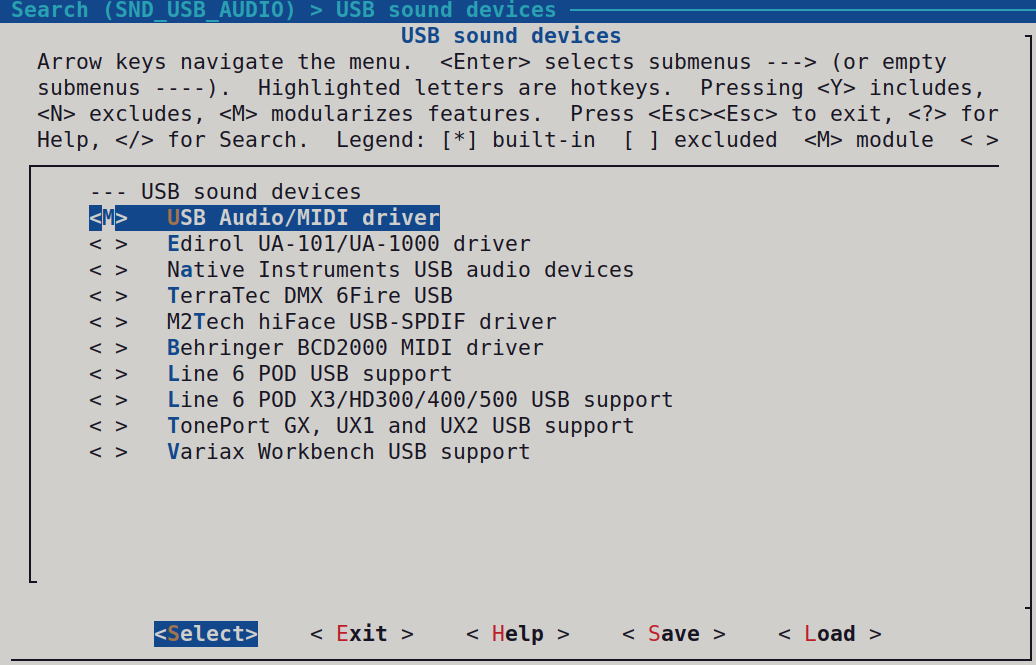
- Press Y or Space to enable SND_USB_AUDIO, then select Save to store the configuration.
- Compile the kernel and root filesystem:
./build.sh kernel
./build.sh rootfs
When a driver in the kernel is configured as =m (module), the build process will generate a .ko file.
These modules are installed in the root filesystem under /lib/modules/<kernel-version>/.
Therefore, in addition to compiling the kernel itself, you must also rebuild the rootfs to properly include these modules in the final system image.
5. Flashing the Kernel and Rootfs Separately
- Open RKDevTool (Rockchip Download Tool) and perform Clear Items first.
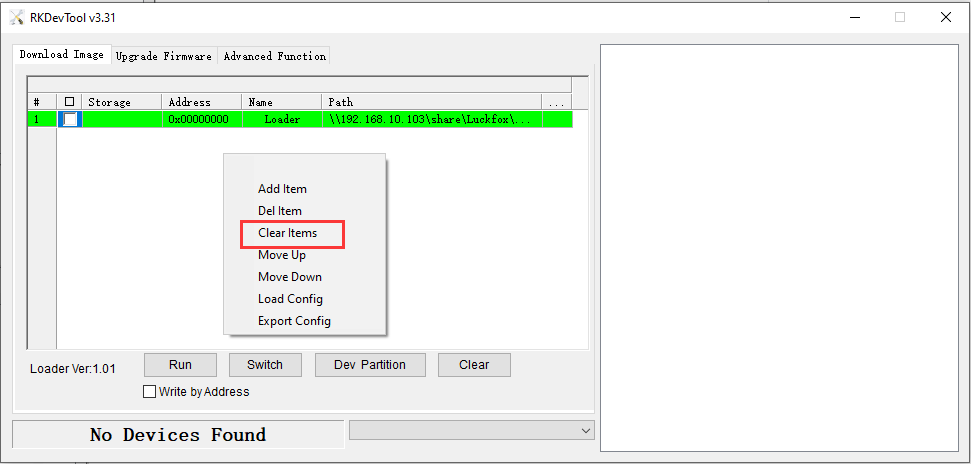
- Right-click on a blank area and select Load Config.

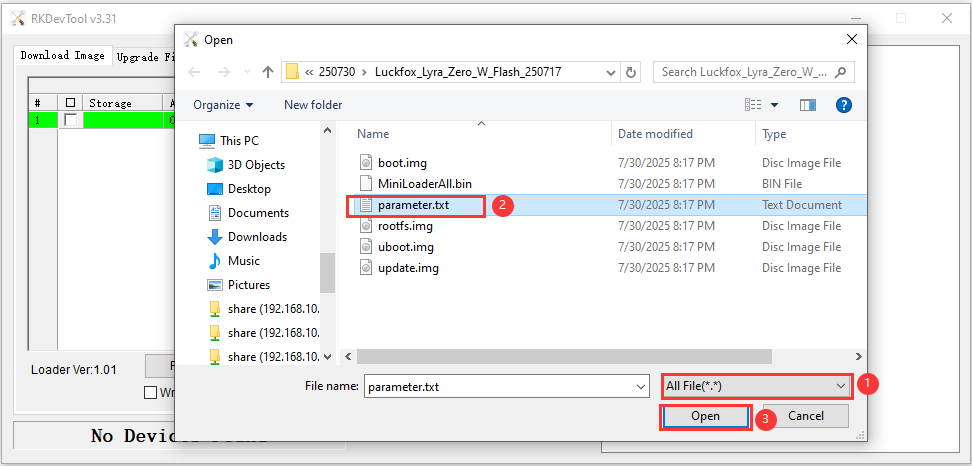
- After selecting all files, double-click parameter.txt and click Open to load the partition configuration automatically.
- Load MiniLoaderAll.bin and rootfs.img, check their boxes, and click Run to start updating the firmware.
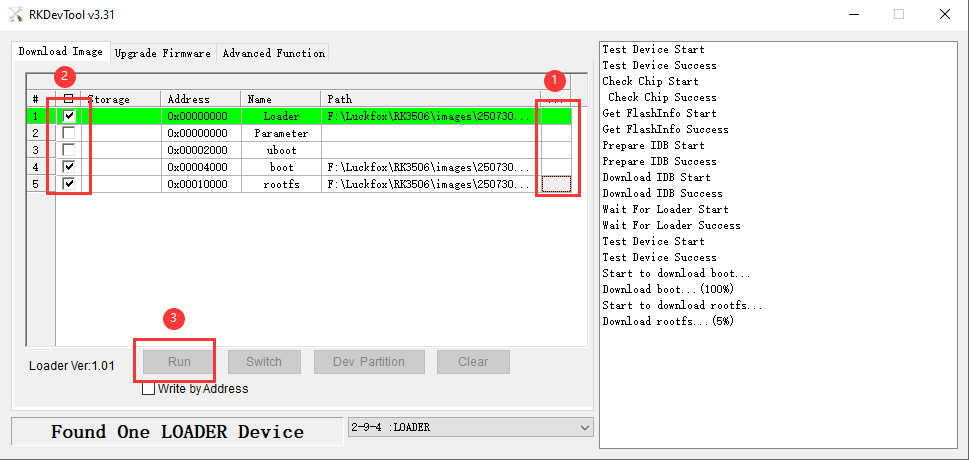
- Log in to the development board to verify the update.

6. Loading KO Driver Modules in Linux
6.1 Introduction to KO Files
In the Linux operating system, .ko files are the extension for kernel module files. Kernel modules are pieces of code that can be loaded and unloaded at runtime, allowing for the extension of Linux kernel functionalities without the need to recompile the entire kernel. Each .ko file contains the module's code and metadata, enabling users to add or remove specific functionalities, such as drivers or filesystem support, without rebooting the system.
6.2 Advantages of KO Files
- Dynamic Loading and Unloading: Kernel modules can be dynamically loaded into the kernel at runtime and can be unloaded at any time without rebooting the system. This allows system administrators and developers to add, test, or fix functionalities without interrupting system operations.
- Resource Efficiency: Kernel modules allow less frequently used functionalities to be loaded as modules, thus reducing the overall size of the system kernel and memory usage. This helps improve resource utilization.
- Customizability: Kernel modules allow users to add or remove specific functionalities as needed, facilitating a customized system. This is especially useful for embedded systems, specific hardware support, and particular application scenarios.
- Reduced Compilation Time: Recompiling the entire kernel can be time-consuming, while using kernel modules avoids this issue. Only the required modules need to be compiled and loaded, saving time and resources.
- Rapid Debugging and Development: Kernel modules can be loaded and unloaded without rebooting the system, making debugging and developing drivers and other kernel code more efficient.
- Ease of Maintenance: The independence of kernel modules allows them to be maintained and upgraded separately from the entire kernel, reducing the complexity of system maintenance.
- Increased Compatibility: Kernel modules can support multiple kernel versions as needed, enhancing software compatibility and flexibility.
6.3 Application Example
Download the project files Click to Download. The entire project contains only two files: helloworld.c and a Makefile for controlling the compilation.
Copy the project files to an Ubuntu host or virtual machine where the Luckfox Lyra SDK has been successfully installed.
Open and modify the
Makefileso that themakecommand can navigate to the specified kernel source code directory, which is thekernel-6.1directory in the Luckfox Lyra SDK. It is recommended to download theMakefiledirectly; if you copy and paste, please adjust the Tab indentation accordingly.obj-m += helloworld.o
KDIR:=/home/xt/zt-ssd/kernel-6.1
PWD?=$(shell pwd)
all:
make -C $(KDIR) M=$(PWD) modules
echo $(PWD)
clean:
rm -f *.ko *.o *.mod *.mod.o *.mod.c *.symvers *.orderCode Section:
#include <linux/module.h>
#include <linux/init.h>

static int helloworld_init(void)
{
    printk("helloworld!\n");
    return 0;
}

static void helloworld_exit(void)
{
    printk("helloworld bye\n");
}

module_init(helloworld_init);
module_exit(helloworld_exit);

MODULE_LICENSE("GPL");
MODULE_AUTHOR("Luckfox");
MODULE_VERSION("V1.0");- Module Load Function: When a kernel module is loaded via the
insmodormodprobecommand, the module's load function is automatically executed by the kernel to complete the module's related initialization tasks. Linux kernel module load functions are generally declared with__initand specified in the formatmodule_init(function_name). It returns an integer value, where 0 indicates successful initialization. In case of failure, an error code should be returned. In the Linux kernel, the error code is a negative value close to 0. - Module Unload Function: When a module is unloaded via the
rmmodcommand, the module's unload function is automatically executed by the kernel to perform the reverse of the module load function. Linux kernel module unload functions are generally declared with__exitand are executed during module unloading, returning no value and specified in the formatmodule_exit(function_name). - Module License Declaration (LICENSE): This describes the licensing rights of the kernel module. If LICENSE is not declared, a warning about kernel pollution (Kernel Tainted) will be issued when the module is loaded. Acceptable LICENSEs in the Linux kernel module realm include “GPL,” “GPL v2,” “GPL and additional rights,” “Dual BSD/GPL,” “Dual MPL/GPL,” and “Proprietary” (the use of non-GPL licensing like “Proprietary” is debated in academic and legal circles). In most cases, kernel modules should adhere to GPL-compatible licenses. The most common declaration in Linux kernel modules is
MODULE_LICENSE("GPL v2"). - Module Author and Other Information Declarations:
MODULE_AUTHOR,MODULE_DESCRIPTION,MODULE_VERSION,MODULE_DEVICE_TABLE, andMODULE_ALIASdeclare the module's author, description, version, device table, and alias, respectively.
- Module Load Function: When a kernel module is loaded via the
Navigate to the project folder and execute the following commands (where the address of
CROSS_COMPILEneeds to be filled in according to the actual path of the SDK):export ARCH=arm CROSS_COMPILE=/home/ubuntu/Luckfox/Luckfox-Lyra-sdk/prebuilts/gcc/linux-x86/arm/gcc-arm-10.3-2021.07-x86_64-arm-none-linux-gnueabihf/bin/arm-none-linux-gnueabihf-
make
$ make
make -C /home/xt/zt-ssd/kernel-6.1 M=/home/xt/ko-test modules
make[1]: Entering directory '/mnt/zitai-ssd/xt/kernel-6.1'
CC [M] /home/xt/ko-test/helloworld.o
MODPOST /home/xt/ko-test/Module.symvers
CC [M] /home/xt/ko-test/helloworld.mod.o
LD [M] /home/xt/ko-test/helloworld.ko
make[1]: Leaving directory '/mnt/zitai-ssd/xt/kernel-6.1'
echo /home/xt/ko-test
/home/xt/ko-testUpload
helloworld.koto the development board using methods like SCP or ADB.scp helloworld.ko root@192.168.10.188:/Execute the following command for verification.
root@luckfox:~# insmod helloworld.ko
root@luckfox:~# rmmod helloworld.ko
Finally, use
dmesgto check the logs.root@luckfox:~# dmesg | grep hello
[13105.396731] helloworld!
[13181.378401] helloworld bye