SDK Kernel Configuration
menuconfig is a configuration tool for the Linux kernel that provides a terminal graphical interface, making it easy to intuitively modify configuration files while automatically handling configuration dependencies. Other similar configuration interfaces include nconfig and xconfig. Below is an introduction to the basic functions and operations of menuconfig.
1.Configuration Interface
Execute the following commands to open the configuration interface:
./build.sh lunch
./build.sh kernelconfig
2. Basic Operations
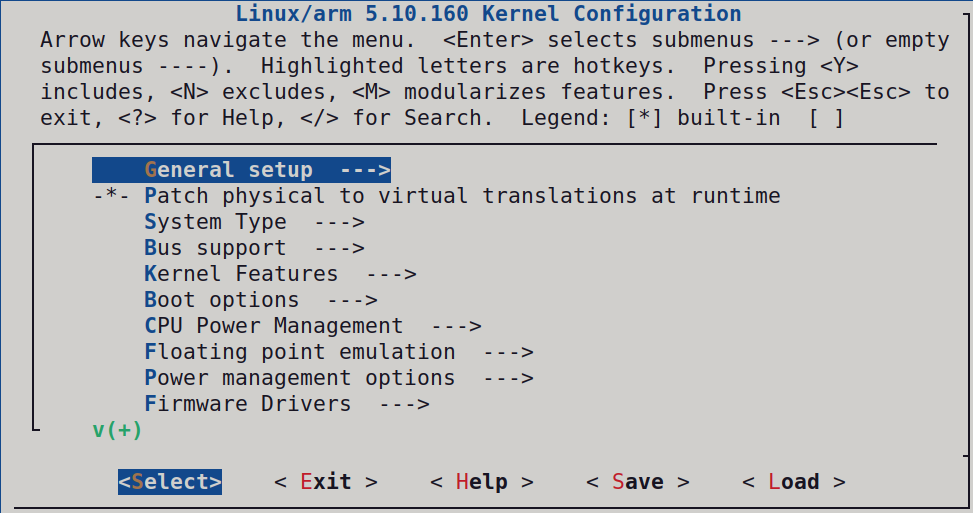
- The configuration interface displayed after executing the command is as follows:

From the top of the interface, we can see the basic operations and instructions for menuconfig.
Key Operations:
- ↑↓PgUpPgDn: Browse and select kernel features.
- ←→: Select actions like Select, Exit, etc.
- Enter: Enter submenus.
- Y: Select this feature.
- N: Exclude this feature.
- M: Select as a module.
- Esc: Press Esc twice to return to the previous menu.
- ?: View help information for this feature.
- /: Search.
Legend Explanation:
[*]: Selected item.[ ]: Unselected item.<M>: Selected item (as a module).< >: Unselected item (as a module).
The middle area is where users select various functionalities. You can navigate using the up and down arrow keys and also directly jump to a line by pressing the corresponding colored letter, e.g., the first letter "K" of Kernel Features will jump directly to that line when the "K" key is pressed.
The bottom area includes some commonly used operation options, providing users with important interaction functionalities. Their roles are as follows:
<Select>: Enter the submenu of the currently highlighted configuration item.<Exit>: Exit the current menu and return to the previous level.<Help>: Provide help information for the currently highlighted configuration item.<Save>: Save the current configuration changes without exiting the configuration tool.<Load>: Load a specified configuration file.
3. Feature Summary
The middle section of the kernel configuration interface is a multi-level menu system. You can navigate using the up and down arrow keys, press Enter to enter submenus, and press Esc to return to the previous menu. Through this interface, users can flexibly configure the kernel according to system needs, selecting necessary features and drivers to build a customized kernel suitable for specific hardware and purposes. Below are the main items in the Linux kernel configuration interface:
- General setup: Basic runtime configuration.
- Kernel Features: Configuration of core functionalities, such as modularization and block device support.
- CPU Power Management: Configure CPU power management options.
- Enable loadable module support: Whether to support kernel modules.
- IO Schedulers: Configure disk I/O schedulers.
- Networking support: Configure network support, including protocols and devices.
- Device Drivers: Configure various device drivers, such as input devices, USB devices, etc.
- File systems: Configure filesystem support and choose supported filesystem types.
- Security options: Configure kernel security-related options.
- Cryptographic API: Configure support for cryptographic APIs.
4. Example: Adding a Driver to the Kernel
The following example demonstrates how to add a USB-to-Audio driver in the Kernel:
- Open the configuration interface. Navigate to the SDK root directory and launch the kernel configuration menu.For SDKs that have not been compiled before, please select the appropriate branch according to your development board.
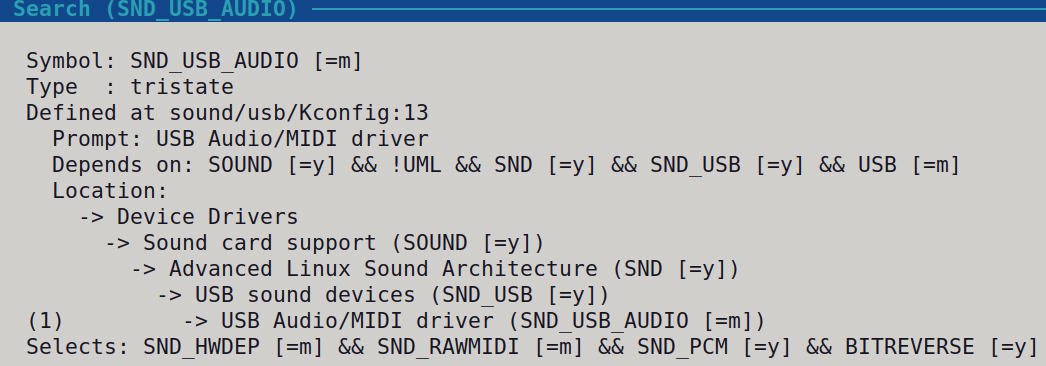
- Press / and enter SND_USB_AUDIO, then press Enter to start searching.

- If only one match is found, press 1 to jump to the configuration location. If multiple matches appear, select the correct component based on the path.

- Press Y or Space to enable SND_USB_AUDIO, then select Save to store the configuration.

- Compile the kernel:
./build.sh kernel
5. Flashing the Kernel Independently
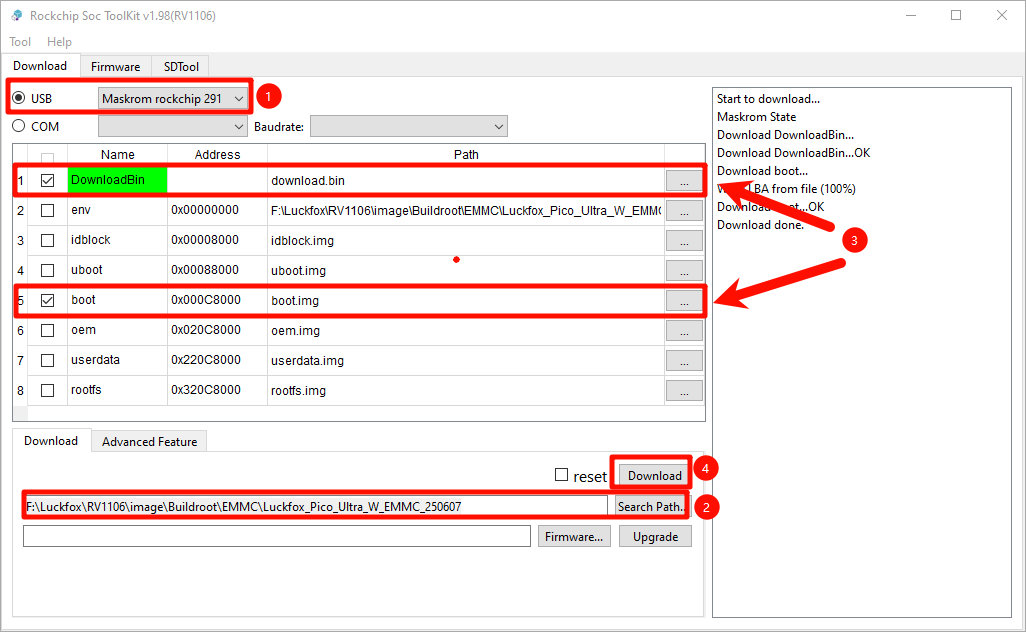
- Hold down the BOOT button while connecting the board to your computer. Once the Rockchip flashing tool detects the MaskRom device (device number may vary), release the BOOT button.
- Click Search Path to select the directory containing the firmware files.
- Check the boot partition and download.bin options.
- Click the Download button to start flashing.

- Log in to the development board to verify the result:

6. Load ko Driver Module on Linux
6.1 ko File Format Overview
In the Linux operating system, the .ko file is the extension used for kernel module files. Kernel modules are pieces of code that can be dynamically loaded and unloaded at runtime to extend the functionality of the Linux kernel without needing to recompile the entire kernel. Each .ko file contains the module's code and metadata, allowing users to add or remove specific features such as drivers or filesystem support without rebooting the system.
6.2 Advantages of ko Files
- Dynamic Loading and Unloading: Kernel modules can be loaded into and unloaded from the kernel at runtime without requiring a system reboot. This enables system administrators and developers to add, test, or fix functionalities without disrupting system operation.
- Resource Efficiency: Kernel modules allow less frequently used features to be loaded as needed, reducing the size of the system kernel and memory footprint. This improves overall resource utilization.
- Customizability: Kernel modules enable users to add or remove specific features as required, facilitating customized system configurations. This is especially useful for embedded systems, specific hardware support, and specialized use cases.
- Reduced Compilation Time: Recompiling the entire kernel can be time-consuming, whereas using kernel modules avoids this issue. Only the necessary modules need to be compiled and loaded, saving time and resources.
- Rapid Debugging and Development: Kernel modules can be loaded and unloaded without system restarts, making debugging and development of drivers and other kernel code more efficient.
- Ease of Maintenance: The modularity of kernel modules allows them to be maintained and upgraded independently of the entire kernel. This helps reduce the complexity of system maintenance.
- Increased Compatibility: Kernel modules can be designed to support multiple kernel versions as needed, enhancing software compatibility and flexibility.
6.3 Application Example
Download the project file Poke me to download, the whole project has only two files, one helloworld.c, one with To control the compiled Makefile.
Copy the project files to a Ubuntu host or virtual machine that has the Luckfox Pico SDK already installed and successfully compiled.
Open and modify the
Makefileto direct themakecommand to the specified kernel source code directory, which is the Luckfox Pico SDK's kernel path. (The provided virtual machine image directory is/home/luckfox/Luckfox-Pico/luckfox-pico/sysdrv/source/kernel.)obj-m += helloworld.o
KDIR:=/home/ubuntu/Luckfox/sdk-1015/luckfox-pico/sysdrv/source/kernel
PWD?=$(shell pwd)
MAKE := make
ARCH := arm
CROSS_COMPILE := /home/ubuntu/Luckfox/sdk-1015/luckfox-pico/tools/linux/toolchain/arm-rockchip830-linux-uclibcgnueabihf/bin/arm-rockchip830-linux-uclibcgnueabihf-
KBUILD_OUTPUT := $(abspath $(dir $(lastword $(KDIR))))/objs_kernel
all:
$(MAKE) O=$(KBUILD_OUTPUT) -C $(KDIR) M=$(PWD) modules \
ARCH=$(ARCH) CROSS_COMPILE=$(CROSS_COMPILE)
echo $(PWD)
clean:
rm -f *.ko *.o *.mod *.mod.o *.mod.c *.symvers *.orderCode Section:
#include <linux/module.h>
#include <linux/init.h>

static int helloworld_init(void)
{
    printk("helloworld!\n");
    return 0;
}

static void helloworld_exit(void)
{
    printk("helloworld bye\n");
}

module_init(helloworld_init);
module_exit(helloworld_exit);

MODULE_LICENSE("GPL");
MODULE_AUTHOR("Luckfox");
MODULE_VERSION("V1.0");- Module Loading Function: When a kernel module is loaded using
insmodormodprobecommands, the module's loading function is automatically executed by the kernel to perform relevant initialization tasks. In the Linux kernel, module loading functions are generally marked with__initand specified in the form ofmodule_init(function_name). It returns an integer value, where 0 indicates successful initialization, and negative values indicate errors. - Module Unloading Function: When a module is unloaded using the
rmmodcommand, the module's unloading function is automatically executed by the kernel to perform functions opposite to those of the loading function. Module unloading functions are typically marked with__exit, and they are executed when the module is being unloaded. They do not return any value and are specified in the form ofmodule_exit(function_name). - Module License Declaration: This describes the licensing permissions for the kernel module. Not declaring a license will result in a kernel tainted warning upon loading the module. Acceptable licenses for Linux kernel modules include "GPL", "GPL v2", "GPL and additional rights", "Dual BSD/GPL", "Dual MPL/GPL", and "Proprietary" (the use of non-GPL licenses like "Proprietary" is a topic of debate in academia and law). In most cases, kernel modules should follow GPL-compatible licenses. The most common license declaration is
MODULE_LICENSE("GPL v2"). - Module Author and Information Declarations:
MODULE_AUTHOR,MODULE_DESCRIPTION,MODULE_VERSION,MODULE_DEVICE_TABLE, andMODULE_ALIASare used to declare the module's author, description, version, device table, and aliases.
- Module Loading Function: When a kernel module is loaded using
Inside the project directory, execute the following command (replace CROSS_COMPILE with the actual SDK path):
export ARCH=arm

export CROSS_COMPILE=/home/luckfox/Luckfox-Pico/luckfox-pico/tools/linux/toolchain/arm-rockchip830-linux-uclibcgnueabihf/bin/arm-rockchip830-linux-uclibcgnueabihf-

make- The effect is as follows:

- The effect is as follows:
Upload the
helloworld.kofile to the development board using methods like TFTP or ADB:tftp 192.168.10.127 -g -r helloworld.koExecute the above command for validation.
# insmod helloworld.ko
[  200.330884] helloworld!
# rmmod helloworld.ko
[  218.624421] helloworld bye
Finally, use “dmesg” to view the logs.
# dmesg | grep hello
[  200.330884] helloworld!
[  218.624421] helloworld bye