LVGL 86 面板设计指南
本教程利用 LVGL 图形库实现 86 面板的屏幕界面设计及控件交互逻辑设计,旨在搭建一个完整的嵌入式 GUI 应用程序。
示例程序:lvgl_project_86panel.tar.gz
1.简介
在智能家居控制场景中,86面板作为全屋设备控制终端,其简易的界面和显眼的按钮满足了人们室内中近距离控制设备的场景。接下来,我们通过 LVGL 图形库设计一套简易的智能终端,包含了三个界面,分别为主界面、wifi配置界面、副界面。其功能清单如下:
| 界面 | 功能 | 描述 |
|---|---|---|
| 主界面 | 显示 CPU 和内存占用 | 实时显示当前设备的 CPU 和内存使用情况,帮助用户了解设备的运行状态。 |
| 主界面 | 显示 WIFI 和 ETH 连接状态 | 显示当前的网络连接状态,包括 WIFI 和以太网(ETH)的 IP 地址信息。如果没有网络连接,显示默认的 --。 |
| 主界面 | 显示时间 | 显示当前时间,支持通过 NTP 服务器每小时校准一次,确保时间的准确性。 |
| 副界面 | 继电器开关 | 提供两个继电器开关,用户可以通过滑动开关控制继电器的开合。 |
| 副界面 | 音频播放器 | 提供音量调整功能,并支持播放/暂停控制。 |
| WiFi 配置界面 | 可配置 WiFi 信息 | 用户可以输入 WiFi 的 SSID 和密码,支持保存和连接操作。 |
| WiFi 配置界面 | WiFi 控制按键 | 用户可以控制 WiFi 连接或者断开,扫描附近 WiFi。 |
2.项目架构搭建
-
在界面设计开始前,需要搭建 LVGL 项目的基本依赖库和教程编译环境,完成此部分可参考文档 LVGL 移植教程。假设你完成了 LVGL 库移植,并将工程目录如下分类:
lvgl/lvgl_project_86panel├── lv_conf.h├── lv_drivers├── lv_drv_conf.h├── lvgl├── main.c├── Makefile├── mouse_cursor_icon.c└── source -
进入 source 文件夹,创建自己的子项目,此处项目名以 86panel_demo 为例。
luckfox@luckfox:~/lvgl/lvgl_project_86panel/source$ mkdir 86panel_demoluckfox@luckfox:~/lvgl/lvgl_project_86panel/source$ cd 86panel_demo/luckfox@luckfox:~/lvgl/lvgl_project_86panel/source/86panel_demo$ -
进入项目文件夹,创建 ui.c 和 ui.h 文件用来存放界面 UI 显示函数及其函数声明,创建
ui_custom.c和ui_custom.h文件用来存放应用逻辑函数及其函数声明。luckfox@luckfox:~/lvgl/lvgl_project_86panel/source/86panel_demo$ touch ui.c ui.h ui_custom.c ui_custom.h -
创建 screen 文件夹,存放
ui_ScreenMain.c,ui_ScreenWpa.c,ui_ScreenPlayer.c文件以实现具体界面功能细节。luckfox@luckfox:~/lvgl/lvgl_project_86panel/source/86panel_demo$ mkdir screensluckfox@luckfox:~/lvgl/lvgl_project_86panel/source/86panel_demo$ cd screens/luckfox@luckfox:~/lvgl/lvgl_project_86panel/source/86panel_demo/screens$ touch ui_ScreenMain.c ui_ScreenWpa.c ui_ScreenPlayer.c -
返回上级目录 86panel_demo ,通过创建
images和fonts文件夹来分别存放图像和字体资源,可以使项目结构更加清晰。luckfox@luckfox:~/lvgl/lvgl_project_86panel/source/86panel_demo/screen$ cd ..luckfox@luckfox:~/lvgl/lvgl_project_86panel/source/86panel_demo$ mkdir images fonts -
至此,文件结构搭建完成。
lvgl/lvgl_project_86panel/source/86panel_demo├── fonts├── images├── screens│ ├── ui_ScreenMain.c│ ├── ui_ScreenWpa.c│ └── ui_ScreenPlayer.c├── ui.c├── ui_custom.c├── ui.h└── ui_custom.h -
创建初始界面,在
ui.h头文件中声明ui_init()函数。#ifndef _LCUKFOX_86PANEL_UI_H#define _LCUKFOX_86PANEL_UI_H#include "lvgl/lvgl.h"void ui_init(void);#endif -
在
ui.c文件中实现界面初始化。#include "ui.h"///////////////////// SCREENS ////////////////////void ui_init(void){lv_disp_t * dispp = lv_disp_get_default();lv_theme_t * theme = lv_theme_default_init(dispp, lv_palette_main(LV_PALETTE_BLUE), lv_palette_main(LV_PALETTE_RED), false, LV_FONT_DEFAULT);lv_disp_set_theme(dispp, theme);}lv_disp_get_default()获取当前默认的显示设备。lv_theme_default_init()初始化默认主题。然后使用lv_disp_set_theme(dispp, theme)将初始化的主题应用到显示设备上。
-
在
main.c中包含ui.h头文件和调用屏幕初始化函数ui_init(),并修改disp_drv.hor_res和disp_drv.ver_res适配屏幕分辨率720x720。#include "source/86panel_demo/ui.h"int main(void){/*Initialize and register a display driver*/...disp_drv.hor_res = 720;disp_drv.ver_res = 720;.../*Create a Demo*/ui_init();...}
3.主界面
主界面示例程序如下:lvgl_project_86panel_main.tar.gz
3.1 设置主界面背景图
本节包含屏幕控件设置背景图片样式的介绍。
-
先选择好背景界面图才能更好地为后续控件样式奠定基调。在本教程中,使用暗色主题作为 UI 设计的整体样式导向。在
ui_ScreenMain.c文件中,设置屏幕背景图以及颜色。void ui_ScreenMain_screen_init(void){...ui_ScreenMain = lv_obj_create(NULL);lv_obj_set_style_bg_color(ui_ScreenMain, lv_color_hex(0x0D0D0D), LV_PART_MAIN | LV_STATE_DEFAULT);lv_obj_set_style_bg_img_src(ui_ScreenMain, &ui_img_luckfox_logo_png, LV_PART_MAIN | LV_STATE_DEFAULT);lv_obj_set_style_bg_img_opa(ui_ScreenMain, 15, LV_PART_MAIN | LV_STATE_DEFAULT);...}代码步骤说明:
- 创建屏幕:使用
lv_obj_create(NULL)创建一个新的顶级屏幕对象。 - 设置背景颜色:通过
lv_obj_set_style_bg_color()将背景颜色设置为深灰色 (0x0D0D0D)。 - 设置背景图片:利用
lv_obj_set_style_bg_img_src()设置背景图片为 Luckfox_logo 图像。 - 设置图片透明度:调用
lv_obj_set_style_bg_img_opa()设置背景图片的透明度为15,使其呈现几乎透明的效果。
- 创建屏幕:使用
-
在设置背景图片时,传入了
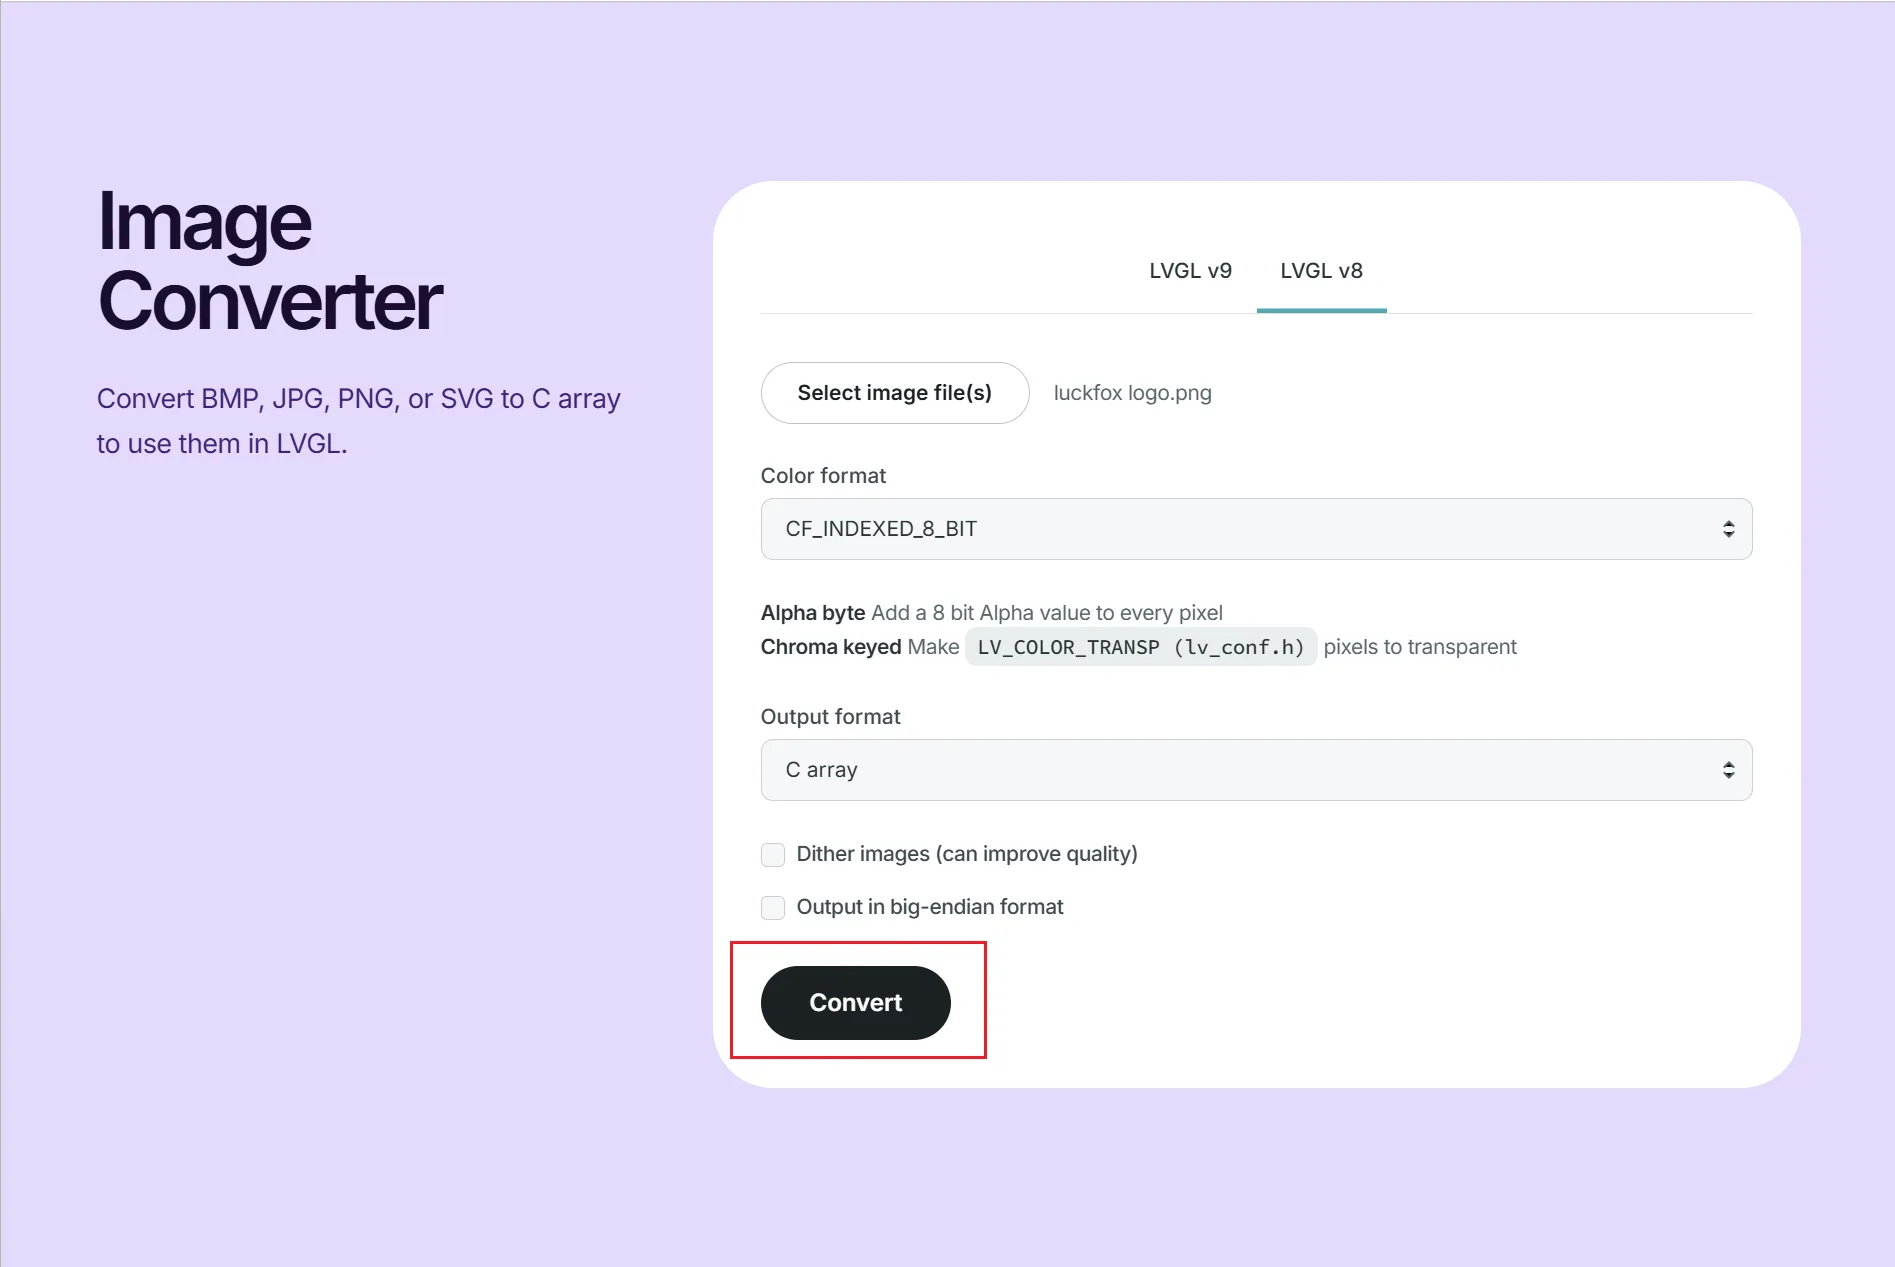
ui_img_luckfox_logo_png参数,这是采用 C 语言数组的方式来显示图片的。转换流程如下: -
随后,将文件移入
images文件夹中。工程文件结构如下:/lvgl/lvgl_project_86panel/source/86panel_demo.├── fonts├── images│ └── luckfox_logo.c├── screens│ ├── ui_screenMain.c│ ├── ui_screenPlayer.c│ └── ui_screenWpa.c├── ui.c├── ui_custom.c├── ui.h└── ui_custom.h -
在
ui.h文件中添加宏声明,让编译器知道一个名为luckfox_logo的图像资源存在。LV_IMG_DECLARE(luckfox_logo); -
在
ui.c文件中调用ui_ScreenMain_screen_init()函数。#include "ui.h"void ui_ScreenMain_screen_init(void);lv_obj_t * ui_ScreenMain;///////////////////// SCREENS ////////////////////void ui_init(void){lv_disp_t * dispp = lv_disp_get_default();lv_theme_t * theme = lv_theme_default_init(dispp, lv_palette_main(LV_PALETTE_BLUE), lv_palette_main(LV_PALETTE_RED),false, LV_FONT_DEFAULT);lv_disp_set_theme(dispp, theme);ui_ScreenMain_screen_init(); //add functionlv_disp_load_scr(ui_ScreenMain); //load ui_ScreenMain}ui_ScreenMain_screen_init()调用自定义的屏幕初始化函数,此时屏幕上尚未有画面,需要通过lv_disp_load_scr(ui_ScreenMain)加载屏幕。
-
至此主界面背景图设置完成,运行图像如下:

3.2 显示 CPU 和内存占用
本节包含文本标签控件的介绍。
-
显示 CPU 和内存占用,此部分直接在
lv_conf.h中将性能参数的宏定义设置为1。/*1: Show CPU usage and FPS count*/#define LV_USE_PERF_MONITOR 1#if LV_USE_PERF_MONITOR#define LV_USE_PERF_MONITOR_POS LV_ALIGN_TOP_LEFT#endif/*1: Show the used memory and the memory fragmentation* Requires LV_MEM_CUSTOM = 0*/#define LV_USE_MEM_MONITOR 1#if LV_USE_MEM_MONITOR#define LV_USE_MEM_MONITOR_POS LV_ALIGN_TOP_RIGHT#endif- 设置后即可在屏幕的系统层(sys)上显示信息,该层的内容总是可见的。
-
开启此宏定义后,在
lv_perf.c中函数_lv_disp_refr_timer()中的内容将会生效,此处主要是标签部件的使用:void _lv_disp_refr_timer(){...lv_obj_t * perf_label = perf_monitor.perf_label;if(perf_label == NULL) {perf_label = lv_label_create(lv_layer_sys());lv_obj_set_style_bg_opa(perf_label, LV_OPA_50, 0);lv_obj_set_style_bg_color(perf_label, lv_color_black(), 0);lv_obj_set_style_text_color(perf_label, lv_color_white(), 0);lv_obj_set_style_pad_top(perf_label, 3, 0);lv_obj_set_style_pad_bottom(perf_label, 3, 0);lv_obj_set_style_pad_left(perf_label, 3, 0);lv_obj_set_style_pad_right(perf_label, 3, 0);lv_obj_set_style_text_align(perf_label, LV_TEXT_ALIGN_RIGHT, 0);lv_label_set_text(perf_label, "?");lv_obj_align(perf_label, LV_USE_PERF_MONITOR_POS, 0, 0);perf_monitor.perf_label = perf_label;}...}代码步骤说明
- 创建标签:若
perf_label变量为空,则调用lv_label_create(lv_layer_sys())创建一个新的标签对象,该对象将在系统层中显示,意味着它是一个全局、跨屏幕的对象。 - 设置标签背景透明度:使用
lv_obj_set_style_bg_opa()设置标签背景的透明度为50%,使其背景呈现半透明效果。 - 设置文字颜色:通过
lv_obj_set_style_text_color()将文字颜色设置为白色(十六进制值0xFFFFFF)。 - 设置内边距:利用
lv_obj_set_style_pad_top(),lv_obj_set_style_pad_bottom(),lv_obj_set_style_pad_left(), 和lv_obj_set_style_pad_right()分别设置顶部、底部、左侧和右侧的内边距为3个像素,以确保文本周围有足够的空间。 - 设置文本对齐方式:调用
lv_obj_set_style_text_align()设置文本对齐方式为右对齐,使得文本在标签内靠右显示。 - 设置标签文本内容:使用
lv_label_set_text()设置标签的文本内容为?。 - 设置控件位置:最后,调用
lv_obj_align(perf_label, LV_ALIGN_TOP_RIGHT, 0, 0)设置控件的位置,使其位于父容器的右上角。
- 创建标签:若
-
创建完控件后,通过
lv_label_set_text_fmt()函数可以使用格式化字符串设置标签的文本内容,对于lv_label_set_text()是直接设置标签的文本内容。lv_label_set_text_fmt(perf_label, "%"LV_PRIu32" FPS\n%"LV_PRIu32"%% CPU", fps, cpu); -
同理,内存占用函数也是如此将获取的信息,内存占用的计算是通过 LVGL 提供的
lv_mem_monitor函数完成的。if(lv_tick_elaps(mem_monitor.mem_last_time) > 300) {mem_monitor.mem_last_time = lv_tick_get();lv_mem_monitor_t mon;lv_mem_monitor(&mon); //Get memory usage statusuint32_t used_size = mon.total_size - mon.free_size;;uint32_t used_kb = used_size / 1024;uint32_t used_kb_tenth = (used_size - (used_kb * 1024)) / 102;lv_label_set_text_fmt(mem_label,"%"LV_PRIu32 ".%"LV_PRIu32 " kB used (%d %%)\n""%d%% frag.",used_kb, used_kb_tenth, mon.used_pct,mon.frag_pct);}
3.3 显示 WiFi 状态
本节包含 LVGL 图片控件,标签控件,定时器控件的使用以及获取 WiFi 状态函数的编写。
-
在
ui.c中定义网络状态显示控件全局变量,定义如下:lv_obj_t * ui_PanelWifi;lv_obj_t * ui_ImageWifi;lv_obj_t * ui_LabelWifiName;lv_obj_t * ui_LabelWifiIP;lv_obj_t * ui_LabelWIP;lv_obj_t * ui_Timer;- 定义了 WiFi 显示容器控件
ui_PanelWifi,WiFi 图标ui_ImageWifi,WiFi 名称ui_LabelWifiName以及 WiFi IP 内容ui_LabelWifiIP,WiFi IP 标识ui_LabelWIP。
- 定义了 WiFi 显示容器控件
-
在
ui.h中外部声明控件变量,可以供ui_ScreenMain.c文件使用,内容如下:extern lv_obj_t * ui_PanelWifi;extern lv_obj_t * ui_ImageWifi;extern lv_obj_t * ui_LabelWifiName;extern lv_obj_t * ui_LabelWifiIP;extern lv_obj_t * ui_LabelWIP;extern lv_obj_t * ui_Timer; -
编写
ui_ScreenMain.c文件,放置 WiFi 信息显示容器。void ui_ScreenMain_screen_init(void){...ui_PanelWifi = lv_obj_create(ui_ScreenMain);lv_obj_set_width(ui_PanelWifi, 320);lv_obj_set_height(ui_PanelWifi, 200);lv_obj_set_x(ui_PanelWifi, 30);lv_obj_set_y(ui_PanelWifi, 490);lv_obj_set_style_radius(ui_PanelWifi, 15, LV_PART_MAIN | LV_STATE_DEFAULT);lv_obj_set_style_bg_color(ui_PanelWifi, lv_color_hex(0x1F1F1F), LV_PART_MAIN | LV_STATE_DEFAULT);lv_obj_set_style_border_color(ui_PanelWifi, lv_color_hex(0x3F3622), LV_PART_MAIN | LV_STATE_DEFAULT);lv_obj_set_style_border_opa(ui_PanelWifi, 255, LV_PART_MAIN | LV_STATE_DEFAULT);lv_obj_set_style_pad_left(ui_PanelWifi, 0, LV_PART_MAIN | LV_STATE_DEFAULT);lv_obj_set_style_pad_right(ui_PanelWifi, 0, LV_PART_MAIN | LV_STATE_DEFAULT);lv_obj_set_style_pad_top(ui_PanelWifi, 0, LV_PART_MAIN | LV_STATE_DEFAULT);lv_obj_set_style_pad_bottom(ui_PanelWifi, 0, LV_PART_MAIN | LV_STATE_DEFAULT);...}代码步骤说明
- 创建面板:调用
lv_obj_create(ui_ScreenMain)创建一个新的面板对象并添加到ui_ScreenMain屏幕中。 - 设置尺寸与位置:
- 使用
lv_obj_set_width()和lv_obj_set_height()分别设置面板的宽度和高度为320像素和200像素。 - 使用
lv_obj_set_x()和lv_obj_set_y()设置面板的位置,分别为X坐标30像素和Y坐标490像素。
- 使用
- 设置样式属性:
- 圆角半径:使用
lv_obj_set_style_radius();设置面板的圆角半径为15像素。 - 背景颜色:使用
lv_obj_set_style_bg_color();设置面板的背景颜色为深灰色(十六进制值0x1F1F1F)。 - 边框颜色:使用
lv_obj_set_style_border_color();设置边框颜色为棕色(十六进制值0x3F3622)。 - 内边距:使用
lv_obj_set_style_pad_left(),lv_obj_set_style_pad_right(),lv_obj_set_style_pad_top(), 和lv_obj_set_style_pad_bottom()分别设置顶部、底部、左侧和右侧的内边距为0像素,以方便后续器件摆放位置对应到外边距。也可以使用lv_obj_set_style_pad_all()同时将上下左右内边距设置为0像素。
- 圆角半径:使用
- 创建面板:调用
-
放置 WiFi 图标显示控件在
ui_PanelWifi容器中,图片源的获取也是通过在线转换为C语言格式进行设置。void ui_ScreenMain_screen_init(void){...ui_ImageWifi = lv_img_create(ui_PanelWifi);lv_img_set_src(ui_ImageWifi, &ui_img_icon_wifi_on_png);lv_obj_set_width(ui_ImageWifi, 72);lv_obj_set_height(ui_ImageWifi, 72);lv_obj_set_x(ui_ImageWifi, 30);lv_obj_set_y(ui_ImageWifi, 36);...}代码步骤说明
- 创建图像对象:使用
lv_img_create(ui_PanelWifi)在ui_PanelWifi面板上创建一个新的图像对象。 - 设置图像源:在创建完图片控件后,使用
lv_img_set_src()函数设置图片源。 - 设置图像的位置与尺寸。
- 相应的,需要将图片转换为C语言格式,并在
ui.h中添加LV_IMG_DECLARE(ui_img_icon_wifi_on_png)。
- 创建图像对象:使用
-
设置 WiFi 标签,用于显示 WiFi 名称,IP 地址,标识IP。
void ui_ScreenMain_screen_init(void){...ui_LabelWifiName = lv_label_create(ui_PanelWifi);lv_obj_set_width(ui_LabelWifiName, LV_SIZE_CONTENT);lv_obj_set_height(ui_LabelWifiName, LV_SIZE_CONTENT);lv_obj_set_x(ui_LabelWifiName, 118);lv_obj_set_y(ui_LabelWifiName, 56);lv_label_set_text(ui_LabelWifiName, "WS-WIFI-5G");lv_obj_set_style_text_color(ui_LabelWifiName, lv_color_hex(0xF6AC05), LV_PART_MAIN | LV_STATE_DEFAULT);lv_obj_set_style_text_font(ui_LabelWifiName, &lv_font_montserrat_28, LV_PART_MAIN | LV_STATE_DEFAULT);ui_LabelWifiIP = lv_label_create(ui_PanelWifi);lv_obj_set_width(ui_LabelWifiIP, LV_SIZE_CONTENT);lv_obj_set_height(ui_LabelWifiIP, LV_SIZE_CONTENT);lv_obj_set_x(ui_LabelWifiIP, 118);lv_obj_set_y(ui_LabelWifiIP, 130);lv_label_set_text(ui_LabelWifiIP, "192.168.100.456");lv_obj_set_style_text_color(ui_LabelWifiIP, lv_color_hex(0xA9A8A8), LV_PART_MAIN | LV_STATE_DEFAULT);lv_obj_set_style_text_font(ui_LabelWifiIP, &lv_font_montserrat_22, LV_PART_MAIN | LV_STATE_DEFAULT);ui_LabelWIP = lv_label_create(ui_PanelWifi);lv_obj_set_width(ui_LabelWIP, LV_SIZE_CONTENT);lv_obj_set_height(ui_LabelWIP, LV_SIZE_CONTENT);lv_obj_set_x(ui_LabelWIP, 54);lv_obj_set_y(ui_LabelWIP, 130);lv_label_set_text(ui_LabelWIP, "IP:");lv_obj_set_style_text_color(ui_LabelWIP, lv_color_hex(0xA9A8A8), LV_PART_MAIN | LV_STATE_DEFAULT);lv_obj_set_style_text_font(ui_LabelWIP, &lv_font_montserrat_22, LV_PART_MAIN | LV_STATE_DEFAULT);...}代码步骤说明
- 创建标签:在
ui_PanelWifi面板上创建了三个标签 (ui_LabelWifiName,ui_LabelWifiIP,ui_LabelWIP) 并设置了它们的文本内容、样式属性(颜色和字体)以及位置。 ui_LabelWifiName用来设置当前 WiFi 的名称。ui_LabelWifiIP用来设置当前 WiFi 的 IP 地址。ui_LabelIP1用来标识 WiFi 的 IP 地址。
- 创建标签:在
-
创建定时器控件,实时获取 wifi 的信息来更新显示标签。
void ui_ScreenMain_screen_init(void){...lv_obj_t * ui_Timer = lv_timer_create(lvgl_taskmain_cb, 1000, 0);// lv_timer_set_repeat_count(ui_Timer, -1);...}定时器创建说明
- 创建定时器需使用
lv_timer_create()函数或者lv_timer_create_basic()函数,使用lv_timer_create()需填入定时器回调函数,定时周期和用户参数。而lv_timer_create_basic()则无需传递参数,但必须调用lv_timer_set_cb()函数,其默认定时周期为DEF_PERIOD。 - 创建完定时器后,默认为无限重复不会自动删除定时器。如果想重复指定次数后,自动删除定时器,可以使用
void lv_timer_set_repeat_count(lv_timer_t * timer, int32_t repeat_count)函数设置定时器重复计数次数,当repeat_count参数设置为 -1 时,则无限重复。
- 创建定时器需使用
-
在
ui_custom.c中编写 wifi 状态更新函数update_wifi_status()以及回调函数lvgl_taskmain_cb()。void lvgl_taskmain_cb(lv_timer_t *timer){if(timer_count % 5 == 0){update_wifi_status();timer_count = 0;}timer_count++;}void update_wifi_status(void){FILE *fp;char command[MAX_LINE_LEN];char result[MAX_LINE_LEN];char ssid[MAX_LINE_LEN] = {0};char ip[MAX_LINE_LEN] = {0};strcpy(command, "wpa_cli status");fp = popen(command, "r");if (fp == NULL) {printf("Failed to run command\n");pclose(fp);return ;}while (fgets(result, sizeof(result)-1, fp) != NULL){if(strstr(result, "wpa_state=SCANNING")){break;}else if (strstr(result, "ssid=")) {sscanf(result, "ssid=%[^ \n]", ssid);}else if (strstr(result, "ip_address=")) {sscanf(result, "ip_address=%[^ \n]", ip);}}if(strlen(ssid) == 0){lv_label_set_text(ui_LabelWifiName, "------");lv_obj_set_style_border_color(ui_PanelWifi, lv_color_hex(0x1F1F1F), LV_PART_MAIN | LV_STATE_DEFAULT);lv_obj_set_style_text_color(ui_LabelWifiName, lv_color_hex(0xA9A8A8), LV_PART_MAIN | LV_STATE_DEFAULT);lv_img_set_src(ui_ImageWifi, &ui_img_icon_wifi_off_png);}else{lv_label_set_text(ui_LabelWifiName, ssid);lv_obj_set_style_border_color(ui_PanelWifi, lv_color_hex(0x3F3622), LV_PART_MAIN | LV_STATE_DEFAULT);lv_obj_set_style_text_color(ui_LabelWifiName, lv_color_hex(0xF6AC05), LV_PART_MAIN | LV_STATE_DEFAULT);lv_img_set_src(ui_ImageWifi, &ui_img_icon_wifi_on_png);}lv_obj_set_style_text_font(ui_LabelWifiName, &lv_font_montserrat_24, LV_PART_MAIN | LV_STATE_DEFAULT);if(strlen(ip) == 0){lv_label_set_text(ui_LabelWifiIP, "No IP");lv_obj_set_style_text_font(ui_LabelWifiIP, &lv_font_montserrat_18, LV_PART_MAIN | LV_STATE_DEFAULT);}else{lv_label_set_text(ui_LabelWifiIP, ip);lv_obj_set_style_text_font(ui_LabelWifiIP, &lv_font_montserrat_24, LV_PART_MAIN | LV_STATE_DEFAULT);}pclose(fp);}代码步骤说明
lvgl_taskmain_cb:定义为LVGL定时器的回调函数,它每隔1秒被调用一次,每隔5秒调用一次 WiFi 状态函数。update_wifi_status:负责获取当前Wi-Fi连接的状态(SSID和IP地址),并调用 LVGL 库中的 API 更新到UI上。- 构造并执行命令:构造一个字符串
"wpa_cli status"并使用popen执行该命令并打开管道进行读取。 - 解析输出结果:
- 如果找到包含
wpa_state=SCANNING的行,表示设备正在扫描可用网络,此时直接跳出循环。 - 如果找到包含
ssid=的行,则提取出SSID名称。 - 如果找到包含
ip_address=的行,则提取出IP地址。
- 如果找到包含
- 更新 UI 元素:处理 WiFi 连接和未连接时的 UI 显示标识。
- 构造并执行命令:构造一个字符串
-
至此,显示 WiFi 状态部分完成,运行图像如下:

3.4 显示 ETH 状态
本节包含LVGL 图片控件,标签控件的使用以及获取 ETH 状态函数的编写。
-
在
ui.c中定义网络状态显示控件全局变量,定义如下:lv_obj_t * ui_PanelEth;lv_obj_t * ui_ImageEth;lv_obj_t * ui_LabelEth;lv_obj_t * ui_LabelEthIP;lv_obj_t * ui_LabelNetIP;- 定义了 ETH 显示容器控件
ui_PanelEth,ETH 图标ui_ImageEth,ETH 接口名称ui_LabelEth以及 ETH IP 内容ui_LabelEthIP,ETH IP 标识ui_LabelNetIP。
- 定义了 ETH 显示容器控件
-
在
ui.h中外部声明控件变量,可以供ui_ScreenMain.c文件使用,内容如下:extern lv_obj_t * ui_PanelEth;extern lv_obj_t * ui_ImageEth;extern lv_obj_t * ui_LabelEth;extern lv_obj_t * ui_LabelEthIP;extern lv_obj_t * ui_LabelNetIP; -
编写
ui_ScreenMain.c文件,配置 ETH 信息显示主件。void ui_ScreenMain_screen_init(void){....ui_PanelEth = lv_obj_create(ui_ScreenMain);lv_obj_set_width(ui_PanelEth, 320);lv_obj_set_height(ui_PanelEth, 200);lv_obj_set_x(ui_PanelEth, 370);lv_obj_set_y(ui_PanelEth, 490);lv_obj_set_style_radius(ui_PanelEth, 15, LV_PART_MAIN | LV_STATE_DEFAULT);lv_obj_set_style_bg_color(ui_PanelEth, lv_color_hex(0x1F1F1F), LV_PART_MAIN | LV_STATE_DEFAULT);lv_obj_set_style_bg_opa(ui_PanelEth, 255, LV_PART_MAIN | LV_STATE_DEFAULT);lv_obj_set_style_border_color(ui_PanelEth, lv_color_hex(0x1F1F1F), LV_PART_MAIN | LV_STATE_DEFAULT);lv_obj_set_style_border_opa(ui_PanelEth, 255, LV_PART_MAIN | LV_STATE_DEFAULT);lv_obj_set_style_pad_left(ui_PanelEth, 0, LV_PART_MAIN | LV_STATE_DEFAULT);lv_obj_set_style_pad_right(ui_PanelEth, 0, LV_PART_MAIN | LV_STATE_DEFAULT);lv_obj_set_style_pad_top(ui_PanelEth, 0, LV_PART_MAIN | LV_STATE_DEFAULT);lv_obj_set_style_pad_bottom(ui_PanelEth, 0, LV_PART_MAIN | LV_STATE_DEFAULT);ui_ImageEth = lv_img_create(ui_PanelEth);lv_img_set_src(ui_ImageEth, &ui_img_icon_eth_off_png);lv_obj_set_width(ui_ImageEth, LV_SIZE_CONTENT);lv_obj_set_height(ui_ImageEth, LV_SIZE_CONTENT);lv_obj_set_x(ui_ImageEth, 30);lv_obj_set_y(ui_ImageEth, 36);ui_LabelEth = lv_label_create(ui_PanelEth);lv_obj_set_width(ui_LabelEth, LV_SIZE_CONTENT);lv_obj_set_height(ui_LabelEth, LV_SIZE_CONTENT);lv_obj_set_x(ui_LabelEth, 118);lv_obj_set_y(ui_LabelEth, 56);lv_label_set_text(ui_LabelEth, "------------");lv_obj_set_style_text_color(ui_LabelEth, lv_color_hex(0xA9A8A8), LV_PART_MAIN | LV_STATE_DEFAULT);lv_obj_set_style_text_opa(ui_LabelEth, 255, LV_PART_MAIN | LV_STATE_DEFAULT);lv_obj_set_style_text_font(ui_LabelEth, &lv_font_montserrat_28, LV_PART_MAIN | LV_STATE_DEFAULT);ui_LabelEthIP = lv_label_create(ui_PanelEth);lv_obj_set_width(ui_LabelEthIP, LV_SIZE_CONTENT);lv_obj_set_height(ui_LabelEthIP, LV_SIZE_CONTENT);lv_obj_set_x(ui_LabelEthIP, 118);lv_obj_set_y(ui_LabelEthIP, 130);lv_label_set_text(ui_LabelEthIP, "---.---.---.---");lv_obj_set_style_text_color(ui_LabelEthIP, lv_color_hex(0xA9A8A8), LV_PART_MAIN | LV_STATE_DEFAULT);lv_obj_set_style_text_opa(ui_LabelEthIP, 255, LV_PART_MAIN | LV_STATE_DEFAULT);lv_obj_set_style_text_font(ui_LabelEthIP, &lv_font_montserrat_22, LV_PART_MAIN | LV_STATE_DEFAULT);ui_LabelNetIP = lv_label_create(ui_PanelEth);lv_obj_set_width(ui_LabelNetIP, LV_SIZE_CONTENT);lv_obj_set_height(ui_LabelNetIP, LV_SIZE_CONTENT);lv_obj_set_x(ui_LabelNetIP, 54);lv_obj_set_y(ui_LabelNetIP, 130);lv_label_set_text(ui_LabelNetIP, "IP:");lv_obj_set_style_text_color(ui_LabelNetIP, lv_color_hex(0xA9A8A8), LV_PART_MAIN | LV_STATE_DEFAULT);lv_obj_set_style_text_opa(ui_LabelNetIP, 255, LV_PART_MAIN | LV_STATE_DEFAULT);lv_obj_set_style_text_font(ui_LabelNetIP, &lv_font_montserrat_22, LV_PART_MAIN | LV_STATE_DEFAULT);....}- 与 WiFi 状态显示主件一致,通过创建容器、图标以及文本标签配置UI主件。
-
在
ui_custom.c中添加 ETH 信息获取函数。void lvgl_task1_cb(lv_timer_t *timer){if(timer_count % 5 == 0){update_wifi_status();update_eth_status();timer_count = 1;}timer_count++;}void update_eth_status(void){FILE *fp;char command[MAX_LINE_LEN];char result[MAX_LINE_LEN];char eth_name[MAX_LINE_LEN] = {0};char eth_ip_address[MAX_LINE_LEN] = {0};strcpy(command, "ifconfig");fp = popen(command, "r");if (fp == NULL) {printf("Failed to run command\n");return;}int in_eth_block = 0;int has_ip = 0;while (fgets(result, sizeof(result) - 1, fp) != NULL){if (strstr(result, "eth0")) {in_eth_block = 1;sscanf(result, "%s", eth_name);lv_label_set_text(ui_LabelEth, eth_name);continue;}if (in_eth_block && result[0] == '\n') {in_eth_block = 0;break;}if (in_eth_block && strstr(result, "inet addr:")) {char *ip_start = strstr(result, "inet addr:");if (ip_start) {ip_start += 10;char *ip_end = strchr(ip_start, ' ');if (ip_end) {*ip_end = '\0';}strncpy(eth_ip_address, ip_start, MAX_LINE_LEN - 1);eth_ip_address[MAX_LINE_LEN - 1] = '\0';has_ip = 1;}break;}}pclose(fp);if (has_ip) {lv_label_set_text(ui_LabelEthIP, eth_ip_address);lv_obj_set_style_border_color(ui_PanelEth, lv_color_hex(0x3F3622), LV_PART_MAIN | LV_STATE_DEFAULT);lv_obj_set_style_text_color(ui_LabelEth, lv_color_hex(0xF6AC05), LV_PART_MAIN | LV_STATE_DEFAULT);lv_img_set_src(ui_ImageEth, &ui_img_icon_eth_on_png);} else {lv_label_set_text(ui_LabelEthIP, "No IP");lv_obj_set_style_border_color(ui_PanelEth, lv_color_hex(0x1F1F1F), LV_PART_MAIN | LV_STATE_DEFAULT);lv_obj_set_style_text_color(ui_LabelEth, lv_color_hex(0xA9A8A8), LV_PART_MAIN | LV_STATE_DEFAULT);lv_img_set_src(ui_ImageEth, &ui_img_icon_eth_off_png);}}代码步骤说明
-
**命令执行:**使用
popen(command, "r")执行ifconfig命令,其中command被设置为"ifconfig",以获取所有网络接口的状态信息。 -
变量
in_eth_block用于标识当前是否正在处理eth0接口的信息块。 -
变量
has_ip用于标记是否找到了有效的IP地址。 -
**解析输出:**循环读取
ifconfig的每一行输出:- 如果发现包含
"eth0"的行,设置in_eth_block为1,并尝试从该行中提取eth0接口的名称。 - 如果在eth0信息块内遇到空行,认为eth0接口的信息已经结束,退出循环。
- 如果在eth0信息块内并且行中包含
"inet addr:",则进一步解析出IP地址,并设置has_ip为1。
- 如果发现包含
-
关闭文件指针:使用
pclose(fp)关闭由popen打开的文件指针。 -
更新UI:根据
has_ip的值判断是否有找到有效的IP地址。- 如果IP有效,则调用
lv_label_set_text函数更新标签,lv_obj_set_style_border_color修改边框颜色,lv_obj_set_style_text_color修改文本颜色,lv_img_set_src修改图标。 - 如果没有找到有效的IP地址,则设置默认文本
"No IP"并打印一条消息到控制台。
- 如果IP有效,则调用
-
-
至此,显示 ETH 状态部分完成,运行图像如下:

3.5 显示时间
本节主要介绍自定义字体和如何通过 Socket 套接字获取 NTP服务器时间。
-
在
ui.c中定义时间显示控件全局变量,定义如下:lv_obj_t * ui_LabelTime;lv_obj_t * ui_LabelDate;- 定义了当前时间标签
ui_LabelTime,日期标签ui_LabelDate。
- 定义了当前时间标签
-
在
ui.h中外部声明控件变量,可以供ui_ScreenMain.c文件使用,内容如下:extern lv_obj_t * ui_LabelTime;extern lv_obj_t * ui_LabelDate; -
在
ui_SrceenMain.c中编写时间显示控件:void ui_ScreenMain_screen_init(void){...ui_LabelTime = lv_label_create(ui_ScreenMain);lv_obj_set_width(ui_LabelTime, LV_SIZE_CONTENT);lv_obj_set_height(ui_LabelTime, LV_SIZE_CONTENT);lv_obj_set_x(ui_LabelTime, -5);lv_obj_set_y(ui_LabelTime, -150);lv_obj_set_align(ui_LabelTime, LV_ALIGN_CENTER);lv_label_set_text(ui_LabelTime, "20:38");lv_obj_set_style_text_color(ui_LabelTime, lv_color_hex(0xFFFFFF), LV_PART_MAIN | LV_STATE_DEFAULT);lv_obj_set_style_text_opa(ui_LabelTime, 255, LV_PART_MAIN | LV_STATE_DEFAULT);lv_obj_set_style_text_font(ui_LabelTime, &ui_font_HarmonyOS200, LV_PART_MAIN | LV_STATE_DEFAULT);ui_LabelDate = lv_label_create(ui_ScreenMain);lv_obj_set_width(ui_LabelDate, LV_SIZE_CONTENT);lv_obj_set_height(ui_LabelDate, LV_SIZE_CONTENT);lv_obj_set_align(ui_LabelDate, LV_ALIGN_CENTER);lv_label_set_text(ui_LabelDate, "2024-12-25 WED");lv_obj_set_style_text_color(ui_LabelDate, lv_color_hex(0xFFFFFF), LV_PART_MAIN | LV_STATE_DEFAULT);lv_obj_set_style_text_opa(ui_LabelDate, 255, LV_PART_MAIN | LV_STATE_DEFAULT);lv_obj_set_style_text_font(ui_LabelDate, &lv_font_montserrat_36, LV_PART_MAIN | LV_STATE_DEFAULT);}- 这些代码段创建并配置了两个标签
ui_LabelTime和ui_LabelDate,分别用于显示时间和日期,并设置了它们的文本内容、颜色、透明度和字体,之前已详细介绍过相关函数的使用。
- 这些代码段创建并配置了两个标签
-
其中,
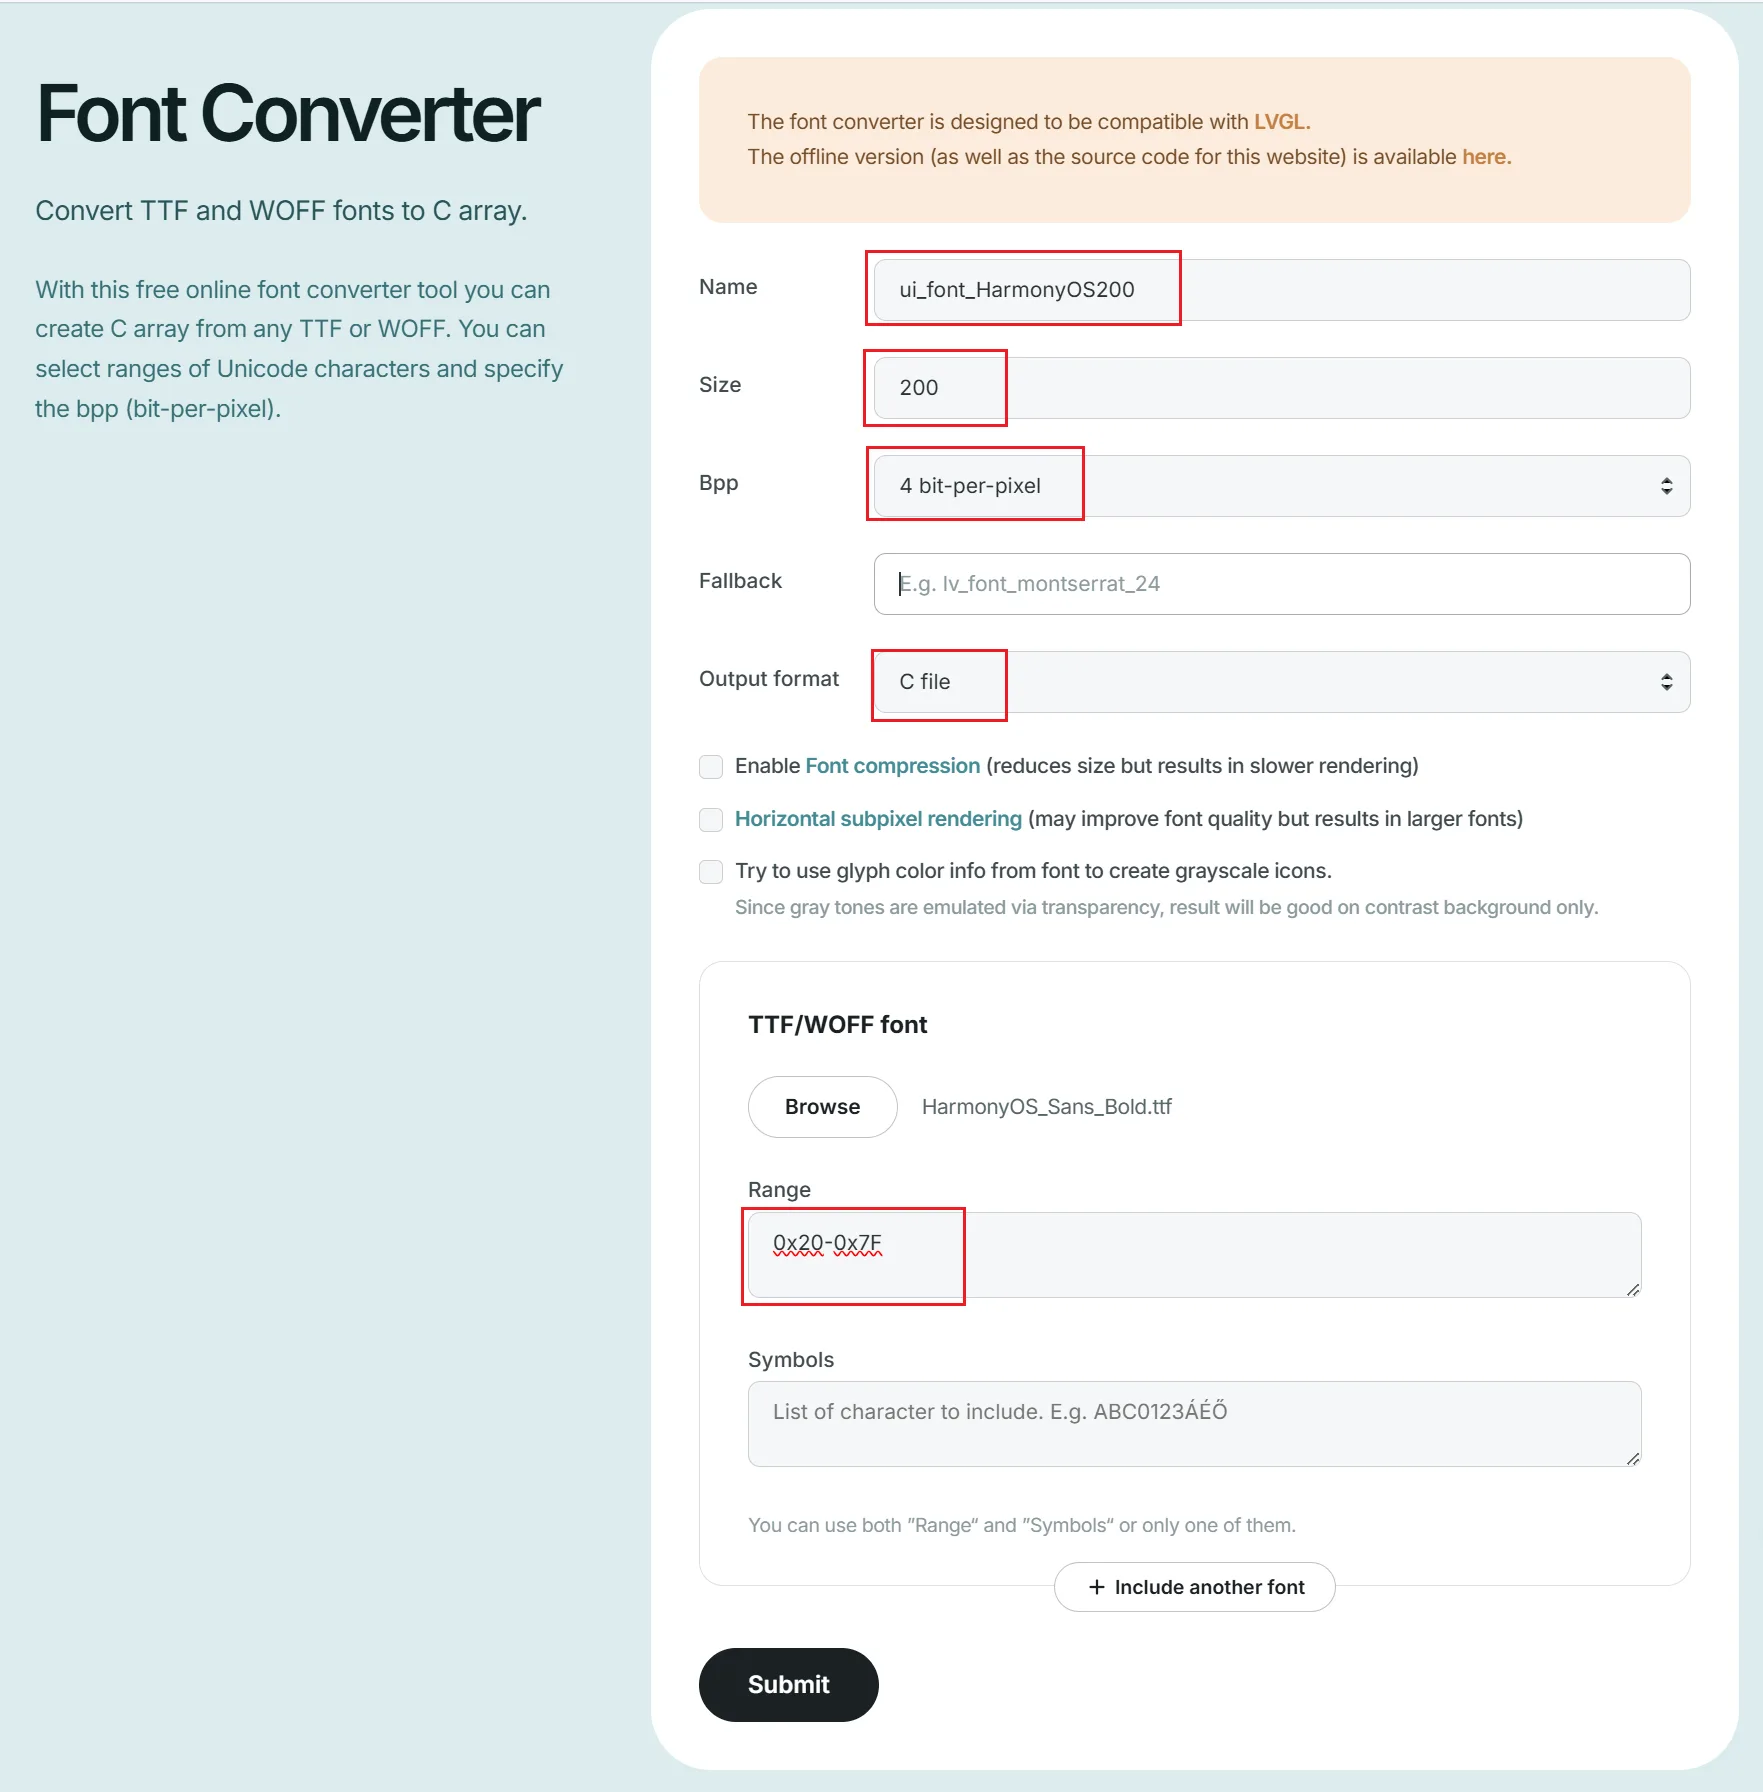
ui_font_HarmonyOS200是自定义字体,LVGL库中提供的字体大小范围有限,所以需要调用自定义字体。添加自定义字体流程如下:-
首先,点击在线字体转换工具,将字库文件转换成 C 语言数组字体文件。
-
随后,将文件移入
fonts文件夹中。工程目录如下:/lvgl/lvgl_project_86panel/source/86panel_demo.├── fonts│ └── ui_font_HarmonyOS200.c├── images│ └── luckfox_logo.c├── screens│ ├── ui_screenMain.c│ ├── ui_screenPlayer.c│ └── ui_screenWpa.c├── ui.c└── ui.h -
在
ui.h中声明字体变量。LV_FONT_DECLARE(ui_font_HarmonyOS200);
-
-
在
ui_custom.c中实现时间校准处理函数update_time()通过NTP协议与服务器同步时间,并更新系统时钟和UI显示。char* update_time(void){static char time_str[20];const char *ntp_server = "202.120.2.101";int sockfd = socket(AF_INET, SOCK_DGRAM, IPPROTO_UDP);if (sockfd == -1){perror("socket error");return NULL;}struct timeval timeout = {5, 0};setsockopt(sockfd, SOL_SOCKET, SO_RCVTIMEO, (char *)&timeout, sizeof(timeout));struct addrinfo hints,*results;memset(&hints, 0, sizeof(hints));hints.ai_family = AF_INET;hints.ai_socktype = SOCK_DGRAM;hints.ai_protocol = IPPROTO_UDP;int status = getaddrinfo(ntp_server, "123", &hints, &results);if (status != 0){printf("getaddrinfo error: %s" ,gai_strerror(status));return NULL;}struct sockaddr_in ntp_addr;memcpy(&ntp_addr, results->ai_addr, sizeof(struct sockaddr_in));freeaddrinfo(results);ntp_addr.sin_port = htons(123);char ntp_pkt[48];memset(ntp_pkt, 0, sizeof(ntp_pkt));ntp_pkt[0] = 0x1b;if (sendto(sockfd, ntp_pkt, sizeof(ntp_pkt), 0, (struct sockaddr *)&ntp_addr, sizeof(ntp_addr)) == -1){perror("sendto error");close(sockfd);return NULL;}int nbytes;char buf[1024];struct sockaddr_in srv_addr;socklen_t srv_addr_len = sizeof(srv_addr);while ((nbytes = recvfrom(sockfd, buf, sizeof(buf), 0, (struct sockaddr *)&srv_addr, &srv_addr_len)) == -1){if (errno == EAGAIN){printf("Timeout occurred while waiting for NTP response.\n");}else{perror("recvfrom error");}close(sockfd);return NULL;}if (nbytes == sizeof(ntp_pkt)){char command[64];unsigned long long *timestamp = (unsigned long long *)&buf[40];time_t linux_time = ntohl(*timestamp) - 2208988800UL;linux_time = linux_time + 8*3600;struct tm *tm_ntp = localtime(&linux_time);char temp_time_str[20];strftime(temp_time_str, sizeof(temp_time_str), "%Y-%m-%d %H:%M:%S", tm_ntp);strftime(time_str, sizeof(time_str), "%Y-%m-%d %b %H:%M:%S", tm_ntp);printf("time_str:%s\n",time_str);snprintf(command, sizeof(command), "date -s \"%s\"", temp_time_str);system(command);system("hwclock -w");system("sync");}else{printf("Received invalid NTP packet.");}close(sockfd);return time_str;}void format_and_update_labels(const char *time_str) {char date_part[30];char time_part[20];printf("Formatted time: %s\n", time_str);const char *space1 = strchr(time_str, ' ');const char *space2 = strchr(space1 + 1, ' ');if (space1 && space2) {snprintf(date_part, sizeof(date_part), "%.10s %.3s",time_str,space1 + 1);snprintf(time_part, sizeof(time_part), "%.*s", 5,space2 + 1);lv_label_set_text(ui_LabelDate, date_part);lv_label_set_text(ui_LabelTime, time_part);} else {fprintf(stderr, "Invalid time string format.\n");}}代码步骤说明
update_time()函数- 创建UDP套接字:初始化与NTP服务器通信所需的UDP套接字。
- 设置超时选项:配置套接字接收超时时间为5秒。
- 解析NTP服务器地址:使用
getaddrinfo()解析NTP服务器的地址信息。 - 构建NTP请求包:构造标准的NTP请求数据包并发送给NTP服务器。
- 接收NTP响应:接收来自NTP服务器的响应,并检查是否成功接收到正确的数据包。
- 解析时间戳:从NTP响应数据包中提取时间戳,转换为本地时间。
- 更新系统时间:通过系统命令更新操作系统的时间,并同步硬件时钟。
- 返回格式化的时间字符串:返回格式化后的当前时间字符串。
format_and_update_labels()函数- 分割时间字符串:从完整的NTP时间字符串中提取日期和时间部分。
- 更新LVGL标签:使用
lv_label_set_text()函数更新LVGL界面上的日期和时间标签。
-
在定时器回调函数
lvgl_taskmain_cb()添加NTP时间更新函数与实时时间更新函数。void lvgl_taskmain_cb(lv_timer_t *timer){if(timer_count % 5 == 0){update_wifi_status();update_eth_status();}if(timer_count / 3600 == 1){timer_count = 1;char* update = update_time();if(update == NULL){perror("update_time return NULL");}else{format_and_update_labels(update);}}time_t now = time(NULL);struct tm *tm_now = localtime(&now);char current_time_str[30];strftime(current_time_str, sizeof(current_time_str), "%Y-%m-%d %b %H:%M:%S", tm_now);format_and_update_labels(current_time_str);timer_count++;}代码步骤说明
-
Wi-Fi和以太网状态更新: 每5次调用时(即每隔5个定时器周期),调用
update_wifi_status()和update_eth_status()函数来更新网络状态。 -
时间信息更新: 每3600次调用时(假设定时器间隔是1秒,则大约每小时),调用
update_time()获取新的时间信息,并通过format_and_update_labels()更新到UI上。 -
当前时间字符串生成与更新: 使用
time()和localtime()获取当前时间,并通过strftime()格式化成字符串。调用format_and_update_labels(current_time_str)更新UI上的时间显示。
-
-
至此,显示时间部分完成,运行图像如下:

3.6 切换界面功能
本节介绍切换界面标识和如何通过事件切换不同界面。
-
LVGL 的事件处理机制,能够监听事件,识别事件源,并完成事件处理,其事件类型可以分为:输入设备事件、绘图事件、自定义事件、其他事件、特别事件,例如短按、长按为输入设备事件。
-
在
ui_SrceenMain.c中添加切换界面事件。lv_obj_add_event_cb(ui_PanelWifi, ui_event_PanelWifi, LV_EVENT_ALL, NULL);lv_obj_add_event_cb(ui_ScreenMain, ui_event_ScreenMain, LV_EVENT_ALL, NULL);- 用户可以通过
lv_obj_add_event_cb函数来添加事件,例如:ui_PanelWifi为指向对象的指针,ui_event_PanelWifi为事件回调函数,LV_EVENT_ALL是事件类型,NULL为用户传输的参数。
- 用户可以通过
-
在
ui.c中实现事件回调函数。void _ui_screen_change(lv_obj_t ** target, lv_scr_load_anim_t fademode, int spd, int delay, void (*target_init)(void)){if(*target == NULL)target_init();lv_scr_load_anim(*target, fademode, spd, delay, false);}void ui_event_PanelWifi(lv_event_t * e){lv_event_code_t event_code = lv_event_get_code(e);lv_obj_t * target = lv_event_get_target(e);if(event_code == LV_EVENT_CLICKED) {_ui_screen_change(&ui_ScreenWpa, LV_SCR_LOAD_ANIM_FADE_ON, 0, 0, &ui_ScreenWpa_screen_init);}}void ui_event_ScreenMain(lv_event_t * e){lv_event_code_t event_code = lv_event_get_code(e);lv_obj_t * target = lv_event_get_target(e);if(event_code == LV_EVENT_GESTURE && lv_indev_get_gesture_dir(lv_indev_get_act()) == LV_DIR_BOTTOM) {lv_indev_wait_release(lv_indev_get_act());_ui_screen_change(&ui_ScreenPlayer, LV_SCR_LOAD_ANIM_MOVE_BOTTOM, 0, 0, &ui_ScreenPlayer_screen_init);}}代码步骤说明
-
_ui_screen_change函数实现显示屏幕的切换,并可选择带动画效果- 检查目标屏幕是否已创建: 如果
*target是 NULL,表示目标屏幕还没有被创建或初始化,此时将调用target_init()函数来初始化并创建目标屏幕。 - 加载新屏幕并应用动画:
*target已经创建好的目标屏幕对象,fademode动画模式,决定如何从当前屏幕切换到目标屏幕,spd动画的速度(以毫秒为单位),delay在执行动画之前的延迟时间(以毫秒为单位),false:表示是否删除旧的屏幕。设置为 false,意味着不会自动删除旧的屏幕对象。
- 检查目标屏幕是否已创建: 如果
-
ui_event_PanelWifi函数实现点击 WiFi 信息面板触发 WiFi 配置界面切换,并初始化该界面。-
获取事件类型:使用
lv_event_get_code(e)获取当前事件的类型。 -
获取事件目标对象:使用
lv_event_get_target(e)获取触发事件的对象。 -
判断是否为点击事件:如果事件类型是
LV_EVENT_CLICKED,则执行后续的操作。 -
屏幕切换及初始化:调用
_ui_screen_change函数切换到Wi-Fi配置界面,并使用淡入动画效果。
-
-
ui_event_ScreenMain函数实现手势事件的处理,当检测到下滑手势时,将切换到播放器界面。 -
判断是否为下滑手势事件: 判断事件类型是
LV_EVENT_GESTURE并且通过lv_indev_get_gesture_dir(lv_indev_get_act())检测到的方向是LV_DIR_BOTTOM。 -
等待输入设备释放:调用
lv_indev_wait_release(lv_indev_get_act())确保输入设备(如触摸屏)完成释放动作,避免重复触发。 -
切换 WiFi 配置界面时为短按事件触发,切换副界面是为下滑事件触发。
-
4.WiFi 配置界面
WiFi 配置界面示例程序如下:lvgl_project_86panel_wifi.tar.gz
4.1 账号密码设置功能
本节介绍文本框控件的使用以及账号密码信息的设置。
-
为了在不同场景下可以更换 WiFi ,需要提供输入控件来配置 WiFi 信息以至于可以联网登录,在
ui_ScreenWpa.c添加文本框控件。void ui_ScreenWpa_screen_init(void){ui_LabelSSID = lv_label_create(ui_ScreenWpa);...ui_TextAreaSSID = lv_textarea_create(ui_ScreenWpa);lv_obj_set_width(ui_TextAreaSSID, 440);lv_obj_set_height(ui_TextAreaSSID, LV_SIZE_CONTENT);lv_obj_set_x(ui_TextAreaSSID, 240);lv_obj_set_y(ui_TextAreaSSID, 146);lv_textarea_set_text(ui_TextAreaSSID, "Waceshare-WiFI-5G");lv_textarea_set_one_line(ui_TextAreaSSID, true);lv_obj_set_style_text_color(ui_TextAreaSSID, lv_color_hex(0xA9A8A8), LV_PART_MAIN | LV_STATE_DEFAULT);lv_obj_set_style_text_opa(ui_TextAreaSSID, 255, LV_PART_MAIN | LV_STATE_DEFAULT);lv_obj_set_style_text_font(ui_TextAreaSSID, &lv_font_montserrat_32, LV_PART_MAIN | LV_STATE_DEFAULT);lv_obj_set_style_bg_color(ui_TextAreaSSID, lv_color_hex(0xFFFFFF), LV_PART_MAIN | LV_STATE_DEFAULT);lv_obj_set_style_bg_opa(ui_TextAreaSSID, 15, LV_PART_MAIN | LV_STATE_DEFAULT);lv_obj_set_style_border_color(ui_TextAreaSSID, lv_color_hex(0xFFFFFF), LV_PART_MAIN | LV_STATE_DEFAULT);lv_obj_set_style_border_opa(ui_TextAreaSSID, 25, LV_PART_MAIN | LV_STATE_DEFAULT);lv_obj_set_style_border_side(ui_TextAreaSSID, LV_BORDER_SIDE_FULL, LV_PART_MAIN | LV_STATE_DEFAULT);ui_LabelPW = lv_label_create(ui_ScreenWpa);...ui_TextAreaPW = lv_textarea_create(ui_ScreenWpa);lv_obj_set_width(ui_TextAreaPW, 440);lv_obj_set_height(ui_TextAreaPW, LV_SIZE_CONTENT);lv_obj_set_x(ui_TextAreaPW, 240);lv_obj_set_y(ui_TextAreaPW, 265);lv_textarea_set_text(ui_TextAreaPW, "123456");lv_textarea_set_one_line(ui_TextAreaPW, true);lv_obj_set_style_text_color(ui_TextAreaPW, lv_color_hex(0xA9A8A8), LV_PART_MAIN | LV_STATE_DEFAULT);lv_obj_set_style_text_opa(ui_TextAreaPW, 255, LV_PART_MAIN | LV_STATE_DEFAULT);lv_obj_set_style_text_font(ui_TextAreaPW, &lv_font_montserrat_32, LV_PART_MAIN | LV_STATE_DEFAULT);lv_obj_set_style_bg_color(ui_TextAreaPW, lv_color_hex(0xFFFFFF), LV_PART_MAIN | LV_STATE_DEFAULT);lv_obj_set_style_bg_opa(ui_TextAreaPW, 15, LV_PART_MAIN | LV_STATE_DEFAULT);lv_obj_set_style_border_color(ui_TextAreaPW, lv_color_hex(0xFFFFFF), LV_PART_MAIN | LV_STATE_DEFAULT);lv_obj_set_style_border_opa(ui_TextAreaPW, 25, LV_PART_MAIN | LV_STATE_DEFAULT);lv_obj_set_style_pad_left(ui_TextAreaPW, 20, LV_PART_MAIN | LV_STATE_DEFAULT);lv_obj_set_style_pad_right(ui_TextAreaPW, 0, LV_PART_MAIN | LV_STATE_DEFAULT);lv_obj_set_style_pad_top(ui_TextAreaPW, 10, LV_PART_MAIN | LV_STATE_DEFAULT);lv_obj_set_style_pad_bottom(ui_TextAreaPW, 10, LV_PART_MAIN | LV_STATE_DEFAULT);lv_obj_set_style_text_color(ui_TextAreaPW, lv_color_hex(0xFFFFFF), LV_PART_CURSOR | LV_STATE_DEFAULT);lv_obj_set_style_text_opa(ui_TextAreaPW, 255, LV_PART_CURSOR | LV_STATE_DEFAULT);}代码步骤说明
- 创建文本框:通过
lv_textarea_create()函数创建一个新的文本框对象,并将其添加到指定的父容器(ui_ScreenWpa屏幕)中。 - 设置文本内容:使用
lv_textarea_set_text()函数为文本框设定初始文本 。 - 单行模式:调用
lv_textarea_set_one_line(true)将文本框设置为单行模式,限制输入或显示的内容不超过一行。
- 创建文本框:通过
-
在
ui_custom.c中定义wifi_scr_init函数以及wifi_conf_get函数。static void wifi_conf_get(char* ssid, char* passwd){FILE *file = fopen(WPA_FILE_PATH, "r");if (file == NULL) {printf("Failed to open file.\n");return ;}char line[MAX_LINE_LEN];int inside_network_block = 0;while (fgets(line, MAX_LINE_LEN, file)) {// Enter network={} blockif (strstr(line, "network={")) {inside_network_block = 1;continue;}// Exit network={} blockif (strstr(line, "}")) {inside_network_block = 0;}// Inside network={} blockif (inside_network_block) {if (strstr(line, "ssid=")) {sscanf(line, " ssid=\"%[^\"]\"", ssid);}if (strstr(line, "psk=")) {sscanf(line, " psk=\"%[^\"]\"", passwd);}}}fclose(file);return ;}void wifi_scr_init(){char ssid[MAX_CONF_LEN];char passwd[MAX_CONF_LEN];memset(ssid, 0, MAX_CONF_LEN);memset(passwd, 0, MAX_CONF_LEN);wifi_conf_get(ssid,passwd);if (strlen(ssid) == 0) {ssid[0] = '\0';}if (strlen(passwd) == 0) {passwd[0] = '\0';}lv_textarea_set_text(ui_TextAreaSSID, ssid);lv_textarea_set_text(ui_TextAreaPW, passwd);}代码步骤说明
-
wifi_conf_get函数主要功能是从指定路径的配置文件(wpa_supplicant)中读取 WiFi 的 SSID 和密码,并将它们存储到提供的缓冲区中。- 打开配置文件,循环读取文件中的每一行,寻找包含网络配置的部分(即
network={}块)。 - 在找到的网络配置块内,查找
ssid=和psk=对应的行,并使用sscanf解析出 SSID 和密码值。 - 关闭文件。
- 打开配置文件,循环读取文件中的每一行,寻找包含网络配置的部分(即
-
wifi_scr_init函数负责将配置信息显示在 LVGL 的文本框控件上。- 通过调用
wifi_conf_get获取 SSID 和密码。 - 检查
ssid和passwd是否为空字符串,如果是,则确保它们至少包含终止符\0。 - 使用
lv_textarea_set_text函数更新LVGL界面上相应的文本框控件内容,分别对应于SSID和密码。
- 通过调用
-
-
在
ui_ScreenWpa_screen_init函数中调用wifi_scr_init函数使初始化界面时自动填充/etc/wpa_supplicant.conf文件的信息到文本框中。void ui_ScreenWpa_screen_init(void){...wifi_scr_init();...} -
至此,账号密码显示部分完成,运行图像如下:

4.2 虚拟键盘功能
本节介绍虚拟键盘控件的使用。
-
在 wifi 配置界面时,常常需要不同 WiFi 的名称(SSID)和密码(passward)来配置信息,此时就需要给文本框添加输入事件并且可以弹出虚拟键盘以供使用。首先在
ui_ScreenWpa.c中添加虚拟键盘控件。#include "../ui.h"void ui_ScreenWpa_screen_init(void){...ui_Keyboard1 = lv_keyboard_create(ui_ScreenWpa);lv_obj_set_width(ui_Keyboard1, 720);lv_obj_set_height(ui_Keyboard1, 365);lv_obj_set_x(ui_Keyboard1, 0);lv_obj_set_y(ui_Keyboard1, 171);lv_obj_set_align(ui_Keyboard1, LV_ALIGN_CENTER);lv_obj_add_flag(ui_Keyboard1, LV_OBJ_FLAG_HIDDEN); /// Flagslv_obj_set_style_bg_color(ui_Keyboard1, lv_color_hex(0x3D3D3D), LV_PART_MAIN | LV_STATE_DEFAULT);lv_obj_set_style_bg_opa(ui_Keyboard1, 255, LV_PART_MAIN | LV_STATE_DEFAULT);lv_obj_set_style_border_color(ui_Keyboard1, lv_color_hex(0x333333), LV_PART_MAIN | LV_STATE_DEFAULT);lv_obj_set_style_border_opa(ui_Keyboard1, 255, LV_PART_MAIN | LV_STATE_DEFAULT);lv_obj_set_style_bg_color(ui_Keyboard1, lv_color_hex(0x7A7A7A), LV_PART_ITEMS | LV_STATE_DEFAULT);lv_obj_set_style_bg_opa(ui_Keyboard1, 255, LV_PART_ITEMS | LV_STATE_DEFAULT);lv_obj_set_style_text_color(ui_Keyboard1, lv_color_hex(0xFFFFFF), LV_PART_ITEMS | LV_STATE_DEFAULT);lv_obj_set_style_text_opa(ui_Keyboard1, 255, LV_PART_ITEMS | LV_STATE_DEFAULT);lv_obj_set_style_text_font(ui_Keyboard1, &lv_font_montserrat_28, LV_PART_ITEMS | LV_STATE_DEFAULT);...}- 虚拟键盘控件创建通过
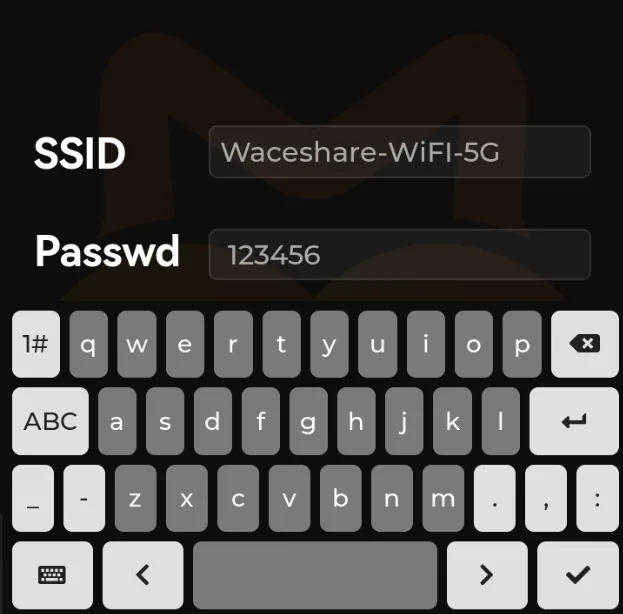
lv_keyboard_create(),函数中设置了控件的位置大小并且将样式设置为暗色调,在默认情况下隐藏键盘。
- 虚拟键盘控件创建通过
-
添加点击文本框弹出虚拟键盘事件,在
ui_SrceenWpa.c中添加事件回调函数。void ui_ScreenWpa_screen_init(void){...lv_obj_add_event_cb(ui_Keyboard1, ui_event_keyboard, LV_EVENT_ALL, NULL);lv_obj_add_event_cb(ui_TextAreaSSID, ui_event_TextAreaSSID, LV_EVENT_ALL, ui_Keyboard1);lv_obj_add_event_cb(ui_TextAreaPW, ui_event_TextAreaPW, LV_EVENT_ALL, ui_Keyboard1);...} -
在
ui.c中实现事件回调函数。void ui_event_TextAreaSSID(lv_event_t * e){lv_event_code_t event_code = lv_event_get_code(e);lv_obj_t * target = lv_event_get_target(e);if(event_code == LV_EVENT_CLICKED) {lv_keyboard_set_textarea(ui_Keyboard1, ui_TextAreaSSID);lv_obj_clear_flag(ui_Keyboard1, LV_OBJ_FLAG_HIDDEN); /// Flags}}void ui_event_TextAreaPW(lv_event_t * e){lv_event_code_t event_code = lv_event_get_code(e);lv_obj_t * target = lv_event_get_target(e);if(event_code == LV_EVENT_CLICKED) {lv_keyboard_set_textarea(ui_Keyboard1, ui_TextAreaPW);lv_obj_clear_flag(ui_Keyboard1, LV_OBJ_FLAG_HIDDEN); /// Flags}}void ui_event_keyboard1(lv_event_t * e){lv_event_code_t event_code = lv_event_get_code(e);lv_obj_t *target = lv_event_get_target(e);if(event_code == LV_EVENT_READY || event_code == LV_EVENT_CANCEL){lv_obj_add_flag(target, LV_OBJ_FLAG_HIDDEN);}}- 在函数
ui_event_TextAreaSSID()与ui_event_TextAreaPW()中,点击文本框清除虚拟键盘隐藏标志,并使用lv_keyboard_set_textarea()函数设置虚拟键盘关联的对象。 - 在虚拟键盘回调事件
ui_event_keyboard()中,按下回车按键与取消按键时隐藏虚拟键盘,达到关闭键盘的效果。
- 在函数
-
至此,显示虚拟键盘完成,运行图像如下:
4.3 WiFi 扫描功能
本节主要介绍如何通过按键启动 WiFi 扫描并填充信息到下拉列表中。
-
创建下拉列表,以便显示扫描信息。
void ui_ScreenWpa_screen_init(void){...ui_PanelList = lv_obj_create(ui_ScreenWpa);...ui_DropdownSSID = lv_dropdown_create(ui_PanelList);lv_dropdown_set_options(ui_DropdownSSID,"Waceshare-WiFI-5G\nWaceshare-WiFI-5G\nWaceshare-WiFI-5G\nWaceshare-WiFI-5G\nWaceshare-WiFI-5G\nWaceshare-WiFI-5G");lv_obj_set_width(ui_DropdownSSID, 440);lv_obj_set_height(ui_DropdownSSID, 64);lv_obj_set_x(ui_DropdownSSID, 240);lv_obj_set_y(ui_DropdownSSID, 18);lv_obj_add_flag(ui_DropdownSSID, LV_OBJ_FLAG_SCROLL_ON_FOCUS); /// Flagslv_obj_set_style_text_color(ui_DropdownSSID, lv_color_hex(0x545454), LV_PART_MAIN | LV_STATE_DEFAULT);lv_obj_set_style_text_opa(ui_DropdownSSID, 255, LV_PART_MAIN | LV_STATE_DEFAULT);lv_obj_set_style_text_font(ui_DropdownSSID, &lv_font_montserrat_32, LV_PART_MAIN | LV_STATE_DEFAULT);lv_obj_set_style_radius(ui_DropdownSSID, 10, LV_PART_MAIN | LV_STATE_DEFAULT);lv_obj_set_style_bg_color(ui_DropdownSSID, lv_color_hex(0x000000), LV_PART_MAIN | LV_STATE_DEFAULT);lv_obj_set_style_bg_opa(ui_DropdownSSID, 255, LV_PART_MAIN | LV_STATE_DEFAULT);lv_obj_set_style_border_color(ui_DropdownSSID, lv_color_hex(0x333333), LV_PART_MAIN | LV_STATE_DEFAULT);lv_obj_set_style_border_opa(ui_DropdownSSID, 255, LV_PART_MAIN | LV_STATE_DEFAULT);lv_obj_set_style_text_color(lv_dropdown_get_list(ui_DropdownSSID), lv_color_hex(0x545454),LV_PART_MAIN | LV_STATE_DEFAULT);lv_obj_set_style_text_opa(lv_dropdown_get_list(ui_DropdownSSID), 255, LV_PART_MAIN | LV_STATE_DEFAULT);lv_obj_set_style_text_font(lv_dropdown_get_list(ui_DropdownSSID), &lv_font_montserrat_30,LV_PART_MAIN | LV_STATE_DEFAULT);lv_obj_set_style_bg_color(lv_dropdown_get_list(ui_DropdownSSID), lv_color_hex(0x000000),LV_PART_MAIN | LV_STATE_DEFAULT);lv_obj_set_style_bg_opa(lv_dropdown_get_list(ui_DropdownSSID), 255, LV_PART_MAIN | LV_STATE_DEFAULT);lv_obj_set_style_border_color(lv_dropdown_get_list(ui_DropdownSSID), lv_color_hex(0x333333),LV_PART_MAIN | LV_STATE_DEFAULT);lv_obj_set_style_border_opa(lv_dropdown_get_list(ui_DropdownSSID), 255, LV_PART_MAIN | LV_STATE_DEFAULT);lv_obj_set_style_text_color(lv_dropdown_get_list(ui_DropdownSSID), lv_color_hex(0x808080),LV_PART_SELECTED | LV_STATE_DEFAULT);lv_obj_set_style_text_opa(lv_dropdown_get_list(ui_DropdownSSID), 255, LV_PART_SELECTED | LV_STATE_DEFAULT);ui_LabelWLAN = lv_label_create(ui_PanelList);......}代码步骤说明
- **创建下拉列表控件:**使用
lv_dropdown_create()函数创建一个新的下拉列表对象,并将其添加到指定的父容器中。 - **设置下拉列表选项:**使用
lv_dropdown_set_options()方法为下拉列表设定多个选项。每个选项之间用换行符\n分隔。 - 调整尺寸与位置
- 设置下拉列表的宽度和高度,以适应您的设计需求。
- 设置下拉列表在屏幕上的具体位置(X, Y坐标),确保它正确地放置在其父容器内。
- 设置标志位
- 添加
LV_OBJ_FLAG_SCROLL_ON_FOCUS标志,以便在焦点移动时能够自动滚动到选中的项目。
- 添加
- 自定义样式
- 文本颜色与透明度:设置下拉列表文本的颜色及透明度,以确保良好的可读性。
- 字体大小与类型:选择合适的字体大小和类型,以增强用户体验。
- 圆角半径:通过设置圆角半径来调整下拉列表的外观,使其更加现代化或符合特定的设计规范。
- 背景颜色与透明度:设置背景颜色及其透明度,这里特别提到将背景设为黑色以匹配黑色主题。
- 边框颜色与透明度:定义边框的颜色和透明度,增加视觉上的层次感。
- **创建下拉列表控件:**使用
-
创建 WiFi 信息显示文本框,标识信号强度与加密方式。
void ui_ScreenWpa_screen_init(void){...ui_LabelRSSI = lv_label_create(ui_ScreenWpa);lv_label_set_text(ui_LabelRSSI, "RSSI");...ui_TextAreaRSSI = lv_textarea_create(ui_ScreenWpa);lv_textarea_set_text(ui_TextAreaRSSI, "--dbm");...ui_LabelMGMT = lv_label_create(ui_ScreenWpa);lv_label_set_text(ui_LabelMGMT, "PSK");...ui_TextAreaMgnt = lv_textarea_create(ui_ScreenWpa);lv_textarea_set_text(ui_TextAreaMgnt, "------");...} -
创建扫描按键。
void ui_ScreenWpa_screen_init(void){...ui_ButtonScan = lv_btn_create(ui_PanelBtn);lv_obj_set_width(ui_ButtonScan, 150);lv_obj_set_height(ui_ButtonScan, 80);lv_obj_set_x(ui_ButtonScan, 30);lv_obj_set_y(ui_ButtonScan, 24);lv_obj_set_style_radius(ui_ButtonScan, 20, LV_PART_MAIN | LV_STATE_DEFAULT);lv_obj_set_style_bg_color(ui_ButtonScan, lv_color_hex(0x404040), LV_PART_MAIN | LV_STATE_DEFAULT);lv_obj_set_style_bg_opa(ui_ButtonScan, 255, LV_PART_MAIN | LV_STATE_DEFAULT);lv_obj_set_style_shadow_width(ui_ButtonScan, 0, LV_PART_MAIN | LV_STATE_DEFAULT);// lv_obj_set_style_shadow_spread(ui_ButtonScan, 0, LV_PART_MAIN | LV_STATE_DEFAULT);ui_ImageScan = lv_img_create(ui_ButtonScan);lv_img_set_src(ui_ImageScan, &ui_img_scan_png);lv_obj_set_width(ui_ImageScan, LV_SIZE_CONTENT);lv_obj_set_height(ui_ImageScan, LV_SIZE_CONTENT);lv_obj_set_align(ui_ImageScan, LV_ALIGN_CENTER);...}代码步骤说明
- 创建按钮:使用
lv_btn_create()函数在指定的父容器ui_PanelBtn中创建一个新的按钮对象ui_ButtonScan。 - 设置按钮的尺寸和位置。
- 设置样式:使用
lv_obj_set_style_shadow_width()函数将按钮阴影宽度设置为0,默认的按钮会有一点阴影增加立体感,但此时 UI 整体为平面,故设置为0。lv_obj_set_style_shadow_spread()函数为阴影向外扩散的程度,如果阴影宽度为0,即使设置了阴影扩散值,也不会有任何实际效果。 - 创建图像:使用
lv_img_create()函数在按钮ui_ButtonScan内部创建一个新的图像对象ui_ImageScan。 - 设置图像源:调用
lv_img_set_src()方法为图像对象设置具体的图片资源,这里使用的是&ui_img_scan_png,表示一个预先定义好的PNG格式图像资源。 - 自动调整尺寸:通过
lv_obj_set_width()和lv_obj_set_height()方法分别设置图像的宽度和高度为LV_SIZE_CONTENT,这意味着图像将根据其原始尺寸自动调整大小,不会被拉伸或压缩。 - 对齐方式:最后,使用
lv_obj_set_align()方法将图像在其父对象(即按钮ui_ButtonScan)内居中对齐,确保图像位于按钮的中央位置。
- 创建按钮:使用
-
在
ui_SrceenWpa.c中添加扫描按键事件回调函数。#include "../ui.h"void ui_ScreenWpa_screen_init(void){...lv_obj_add_event_cb(ui_DropdownSSID, ui_event_DropdownSSID, LV_EVENT_ALL, NULL);lv_obj_add_event_cb(ui_ButtonScan, ui_event_ButtonScan, LV_EVENT_ALL, NULL);...} -
在
ui.c中实现事件回调函数。void ui_event_DropdownSSID(lv_event_t * e){lv_event_code_t event_code = lv_event_get_code(e);lv_obj_t * target = lv_event_get_target(e);if (event_code == LV_EVENT_VALUE_CHANGED){char ssid[MAX_CONF_LEN];memset(ssid, 0, MAX_CONF_LEN);lv_dropdown_get_selected_str(ui_DropdownSSID, ssid, MAX_CONF_LEN);lv_textarea_set_text(ui_TextAreaSSID, ssid);for (int i = 0; i < network_count; i++){// printf("ui_id:[%s] len:%zu\n", networks[i].ssid, strlen(networks[i].ssid));// printf("ui_ssid:[%s] len:%zu\n", ssid, strlen(ssid));if (strstr(networks[i].ssid, ssid) != NULL) {char signal_level_str[20];snprintf(signal_level_str, sizeof(signal_level_str), "%d dbm", networks[i].signal_level);lv_textarea_set_text(ui_TextAreaMgnt,networks[i].flags);printf("ui_TextAreaMgnt:%s\n",networks[i].flags);lv_textarea_set_text(ui_TextAreaRSSI,signal_level_str);printf("ui_TextAreaRSSI:%s\n",signal_level_str);break;}}}}void ui_event_ButtonScan(lv_event_t * e){lv_event_code_t event_code = lv_event_get_code(e);lv_obj_t * target = lv_event_get_target(e);if (event_code == LV_EVENT_RELEASED && scan_is_button_pressed == false){scan_is_button_pressed = true;wifi_scanning_ssid();scan_is_button_pressed = false;}}代码步骤说明
ui_event_DropdownSSID函数:当用户更改下拉列表选项时,更新文本区域显示的SSID,并根据选择的SSID更新信号强度和标志信息标签。ui_event_ButtonScan函数:监听按钮点击事件,一旦检测到按钮被释放且 没有被重复点击,则启动Wi-Fi扫描。
-
在
ui_custom.c中实现扫描逻辑。int wifi_scanning_ssid(){network_count = 0;char command[] = "wpa_cli -i wlan0 scan_results";FILE *fp = popen(command, "r");if (fp == NULL) {perror("Error opening pipe");return -1;}char line[MAX_LINE_LEN];// Skip the first two lines as they contain header informationfgets(line, MAX_LINE_LEN, fp);// Parse each line to extract the SSIDwhile (fgets(line, MAX_LINE_LEN, fp) != NULL) {char *token = strtok(line, "\t ");int count = 0;while (token != NULL) {if (count == 4) { // SSIDstrncpy(networks[network_count].ssid, token, MAX_CONF_LEN);networks[network_count].ssid[MAX_CONF_LEN - 1] = '\0'; // Ensure null-termination} else if (count == 2) { // Signal levelnetworks[network_count].signal_level = atoi(token);} else if (count == 3) { // Flagsstrncpy(networks[network_count].flags, token, MAX_CONF_LEN);networks[network_count].flags[MAX_CONF_LEN - 1] = '\0'; // Ensure null-termination}token = strtok(NULL, "\t ");count++;}if (strlen(networks[network_count].ssid) > 0) {network_count++;}if (network_count >= MAX_NETWORKS) {break;}}// Create a string with SSIDs separated by '\n'char ssid_string[MAX_NETWORKS * (MAX_CONF_LEN + 1)]; // 1 additional character for '\n'ssid_string[0] = '\0'; // Ensure ssid_string is empty initiallyfor (int i = 0; i < network_count; i++) {if(strcmp(networks[i].ssid,"\n") && strlen(networks[i].ssid) < 16 ){strcat(ssid_string, networks[i].ssid);}}// Print the SSID stringprintf("SSID String:\n%s", ssid_string);if(ssid_string == NULL || *ssid_string == '\0'){if(ui_DropdownSSID != NULL){lv_dropdown_set_options(ui_DropdownSSID, "scanning");}}else{if(ui_DropdownSSID != NULL){strcat(ssid_string, "\n...");lv_dropdown_set_options(ui_DropdownSSID, ssid_string);}}pclose(fp);return 0;}wifi_scanning_ssid函数:执行Wi-Fi网络扫描命令并解析输出结果,提取SSID、信号强度和标志信息。将提取的信息存储在网络结构数组中,构建一个包含所有SSID的字符串并设置为下拉列表的选项。如果扫描未发现任何网络,则设置下拉列表显示“scanning”提示;否则,附加“...”至SSID列表末尾,并更新下拉列表选项。此函数通过管道执行命令并读取结果来实现网络扫描功能。
-
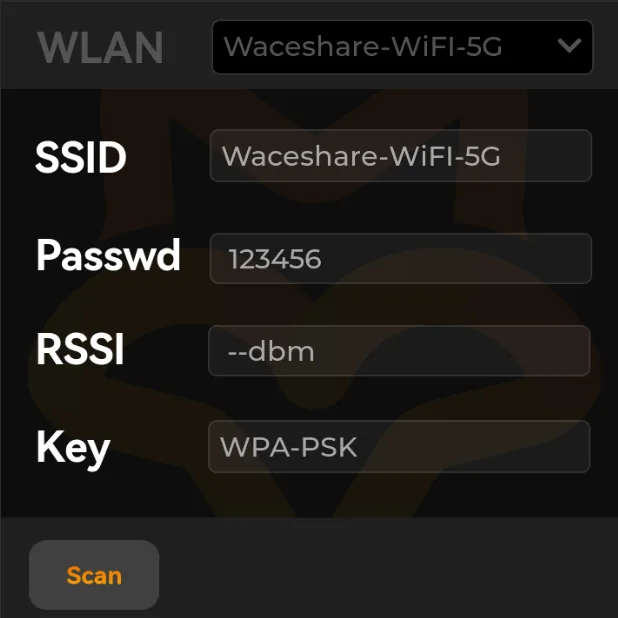
至此,按键扫描功能以及下拉框存储附近 SSID 部分完成,运行图像如下:
4.4 WiFi 连接功能
本节主要介绍如何通过按键启动 WiFi 连接。
-
创建 WiFi 连接按键,启动 WiFi 连接功能。
#include "../ui.h"void ui_ScreenWpa_screen_init(void){...ui_ButtonConnect = lv_btn_create(ui_PanelBtn);lv_obj_set_width(ui_ButtonConnect, 150);lv_obj_set_height(ui_ButtonConnect, 80);lv_obj_set_x(ui_ButtonConnect, 200);lv_obj_set_y(ui_ButtonConnect, 24);lv_obj_set_style_radius(ui_ButtonConnect, 20, LV_PART_MAIN | LV_STATE_DEFAULT);lv_obj_set_style_bg_color(ui_ButtonConnect, lv_color_hex(0x404040), LV_PART_MAIN | LV_STATE_DEFAULT);lv_obj_set_style_bg_opa(ui_ButtonConnect, 255, LV_PART_MAIN | LV_STATE_DEFAULT);lv_obj_set_style_shadow_width(ui_ButtonConnect, 0, LV_PART_MAIN | LV_STATE_DEFAULT);lv_obj_set_style_shadow_spread(ui_ButtonConnect, 0, LV_PART_MAIN | LV_STATE_DEFAULT);ui_ImageConnect = lv_img_create(ui_ButtonConnect);lv_img_set_src(ui_ImageConnect, &ui_img_connect_png);lv_obj_set_width(ui_ImageConnect, LV_SIZE_CONTENT);lv_obj_set_height(ui_ImageConnect, LV_SIZE_CONTENT);lv_obj_set_align(ui_ImageConnect, LV_ALIGN_CENTER);...}- 与 WiFi 扫描按键设置类似
-
在
ui_SrceenWpa.c中添加连接按键事件回调函数。lv_obj_add_event_cb(ui_ButtonConnect, ui_event_ButtonConnect, LV_EVENT_ALL, NULL); -
在
ui.c中实现事件回调函数。void ui_event_ButtonConnect(lv_event_t * e){lv_event_code_t event_code = lv_event_get_code(e);lv_obj_t *obj = lv_event_get_target(e);if (event_code == LV_EVENT_RELEASED){const char *ssid = lv_textarea_get_text(ui_TextAreaSSID);const char *passwd = lv_textarea_get_text(ui_TextAreaPW);if (strlen(ssid) != 0 && strlen(passwd) != 0) {wifi_connect(ssid, passwd);}}}ui_event_ButtonConnect函数:当连接按钮被释放时,获取SSID和密码文本区域的内容,若两者均非空,则调用wifi_connect函数加载Wi-Fi配置以尝试连接网络。
-
在
ui_custom.h中实现 WiFi 连接逻辑。void wifi_connect(const char* ssid, const char* password){FILE *wpa_supplicant_pipe;char buffer[MAX_CONF_LEN];// open wpa_supplicant pipewpa_supplicant_pipe = popen("wpa_cli", "w");if (wpa_supplicant_pipe == NULL) {perror("popen");exit(1);}printf("connect test\n");// set network ssid adn pskmemset(buffer,0,MAX_CONF_LEN);snprintf(buffer, MAX_CONF_LEN, "set_network 0 ssid \"%s\"\n", ssid);fputs(buffer, wpa_supplicant_pipe);memset(buffer,0,MAX_CONF_LEN);snprintf(buffer, MAX_CONF_LEN, "set_network 0 psk \"%s\"\n", password);fputs(buffer, wpa_supplicant_pipe);// save wifi conffputs("save_config\n", wpa_supplicant_pipe);pclose(wpa_supplicant_pipe);// save wifi conf to /etc/wpa_supplicant.confFILE *file = fopen(WPA_FILE_PATH, "r");if (file == NULL) {printf("Failed to open file.\n");return ;}FILE *temp_file = fopen("temp_wpa_supplicant.conf", "w");if (temp_file == NULL) {printf("Failed to create temporary file.\n");fclose(file);return ;}char line[MAX_LINE_LEN];int inside_network_block = 0;while (fgets(line, MAX_LINE_LEN, file)) {// Enter network={} blockif (strstr(line, "network={")) {inside_network_block = 1;fputs(line, temp_file);continue;}// Exit network={} blockif (strstr(line, "}")) {inside_network_block = 0;}// Inside network={} blockif (inside_network_block) {if (strstr(line, "ssid=")) {memset(buffer,0,MAX_CONF_LEN);sprintf(buffer, " ssid=\"%s\"\n",ssid);fputs(buffer, temp_file);}else if (strstr(line, "psk=")) {memset(buffer,0,MAX_CONF_LEN);sprintf(buffer, " psk=\"%s\"\n",password);fputs(buffer, temp_file);}else {fputs(line, temp_file);}}else {fputs(line, temp_file);}}fclose(file);fclose(temp_file);remove(WPA_FILE_PATH);rename("temp_wpa_supplicant.conf", WPA_FILE_PATH);//printf("SSID and PSK replaced successfully.\n");// reconnect wifi// system("killall -9 wpa_cli");system("killall -9 wpa_supplicant");system("killall -9 udhcpc");sleep(1);system("wpa_supplicant -B -i wlan0 -c /etc/wpa_supplicant.conf");sleep(1);system("wpa_cli reconfigure &");sleep(5);system("udhcpc -i wlan0 &");return ;}wifi_connect函数:通过管道与wpa_cli交互设置指定的SSID和密码,并保存配置。接着,打开并读取当前的WPA配置文件,根据输入的SSID和密码更新其中的相关信息,保存至临时文件后替换原配置文件。最后,重启wpa_supplicant和udhcpc服务以应用新的Wi-Fi配置。
4.5 WiFi 断开功能
本节主要介绍如何通过按键断开 WiFi 连接。
-
创建 WiFi 断开按键,启动 WiFi 断开功能。
#include "../ui.h"void ui_ScreenWpa_screen_init(void){...ui_ButtonDiscon = lv_btn_create(ui_PanelBtn);lv_obj_set_width(ui_ButtonDiscon, 150);lv_obj_set_height(ui_ButtonDiscon, 80);lv_obj_set_x(ui_ButtonDiscon, 370);lv_obj_set_y(ui_ButtonDiscon, 24);lv_obj_set_style_radius(ui_ButtonDiscon, 20, LV_PART_MAIN | LV_STATE_DEFAULT);lv_obj_set_style_bg_color(ui_ButtonDiscon, lv_color_hex(0x404040), LV_PART_MAIN | LV_STATE_DEFAULT);lv_obj_set_style_bg_opa(ui_ButtonDiscon, 255, LV_PART_MAIN | LV_STATE_DEFAULT);lv_obj_set_style_shadow_width(ui_ButtonDiscon, 0, LV_PART_MAIN | LV_STATE_DEFAULT);lv_obj_set_style_shadow_spread(ui_ButtonDiscon, 0, LV_PART_MAIN | LV_STATE_DEFAULT);ui_ImageDiscon = lv_img_create(ui_ButtonDiscon);lv_img_set_src(ui_ImageDiscon, &ui_img_discon_png);lv_obj_set_width(ui_ImageDiscon, LV_SIZE_CONTENT);lv_obj_set_height(ui_ImageDiscon, LV_SIZE_CONTENT);lv_obj_set_align(ui_ImageDiscon, LV_ALIGN_CENTER);...}- 与 WiFi 扫描按键设置类似
-
在
ui_SrceenWpa.c中添加连接按键事件回调函数。lv_obj_add_event_cb(ui_ButtonDiscon, ui_event_ButtonDiscon, LV_EVENT_ALL, NULL); -
在
ui.c中实现事件回调函数。void ui_event_ButtonDiscon(lv_event_t * e){lv_event_code_t event_code = lv_event_get_code(e);lv_obj_t *obj = lv_event_get_target(e);if (event_code == LV_EVENT_RELEASED){lv_textarea_set_text(ui_TextAreaSSID,"");lv_textarea_set_text(ui_TextAreaPW,"");disconnect_wifi("wlan0");}}ui_event_ButtonDiscon函数:当断开连接按钮被释放时,清空SSID和密码文本区域的内容,并调用disconnect_wifi函数来断开指定接口(如"wlan0")的Wi-Fi连接。
-
在
ui_custom.c中实现 WiFi 断开逻辑。int wifi_disconnect(const char *interface) {char command[128];snprintf(command, sizeof(command), "wpa_cli -i %s disconnect", interface);int ret = system(command);if (ret == -1) {perror("system");return -1;}snprintf(command, sizeof(command), "ifconfig %s 0.0.0.0", interface);ret = system(command);if (ret == -1) {perror("system");return -1;}return 0;}wifi_disconnect函数:构建并执行一系列命令来断开指定网络接口的Wi-Fi连接,首先通过wpa_cli命令断开连接,然后使用ifconfig命令将该接口的IP地址设置为0.0.0.0,以此确保接口完全断开网络连接。如果任一命令执行失败,则返回错误代码-1;否则,成功断开连接后返回0。此过程保证了Wi-Fi接口能够正确地与当前网络断开连接。
4.6 返回主界面功能
本节介绍如何通过按键返回主界面。
-
创建主界面返回按键。
#include "../ui.h"void ui_ScreenWpa_screen_init(void){...ui_ButtonBack = lv_btn_create(ui_PanelBtn);lv_obj_set_width(ui_ButtonBack, 150);lv_obj_set_height(ui_ButtonBack, 80);lv_obj_set_x(ui_ButtonBack, 257);lv_obj_set_y(ui_ButtonBack, 0);lv_obj_set_align(ui_ButtonBack, LV_ALIGN_CENTER);lv_obj_set_style_radius(ui_ButtonBack, 20, LV_PART_MAIN | LV_STATE_DEFAULT);lv_obj_set_style_bg_color(ui_ButtonBack, lv_color_hex(0x404040), LV_PART_MAIN | LV_STATE_DEFAULT);lv_obj_set_style_bg_opa(ui_ButtonBack, 255, LV_PART_MAIN | LV_STATE_DEFAULT);lv_obj_set_style_shadow_width(ui_ButtonBack, 0, LV_PART_MAIN | LV_STATE_DEFAULT);lv_obj_set_style_shadow_spread(ui_ButtonBack, 0, LV_PART_MAIN | LV_STATE_DEFAULT);ui_ImageBack = lv_img_create(ui_ButtonBack);lv_img_set_src(ui_ImageBack, &ui_img_back_png);lv_obj_set_width(ui_ImageBack, LV_SIZE_CONTENT);lv_obj_set_height(ui_ImageBack, LV_SIZE_CONTENT);lv_obj_set_align(ui_ImageBack, LV_ALIGN_CENTER);...}- 与 WiFi 扫描按键设置类似
-
在
ui_SrceenWpa.c中添加主界面返回按键事件。lv_obj_add_event_cb(ui_ButtonBack, ui_event_ButtonBack, LV_EVENT_ALL, NULL); -
在
ui.c中实现事件回调函数。void ui_event_ButtonBack(lv_event_t * e){lv_event_code_t event_code = lv_event_get_code(e);lv_obj_t * target = lv_event_get_target(e);if(event_code == LV_EVENT_CLICKED) {_ui_screen_change(&ui_ScreenMain, LV_SCR_LOAD_ANIM_FADE_ON, 0, 0, &ui_ScreenMain_screen_init);}}代码步骤说明
-
屏幕切换:如果检测到点击事件,则调用
_ui_screen_change函数来执行屏幕切换操作。_ui_screen_change()函数接受多个参数:- 第一个参数是要切换到的目标屏幕指针(在这个例子中是
&ui_ScreenMain)。 - 第二个参数是屏幕切换动画类型(在这里使用了
LV_SCR_LOAD_ANIM_FADE_ON,表示淡入动画)。 - 第三和第四个参数通常是时间延迟和速度等选项,在此例中都设置为
0。 - 最后一个参数是一个指向初始化函数的指针(
&ui_ScreenMain_screen_init),用于在屏幕加载之前或之后进行必要的初始化操作。
- 第一个参数是要切换到的目标屏幕指针(在这个例子中是
-
-
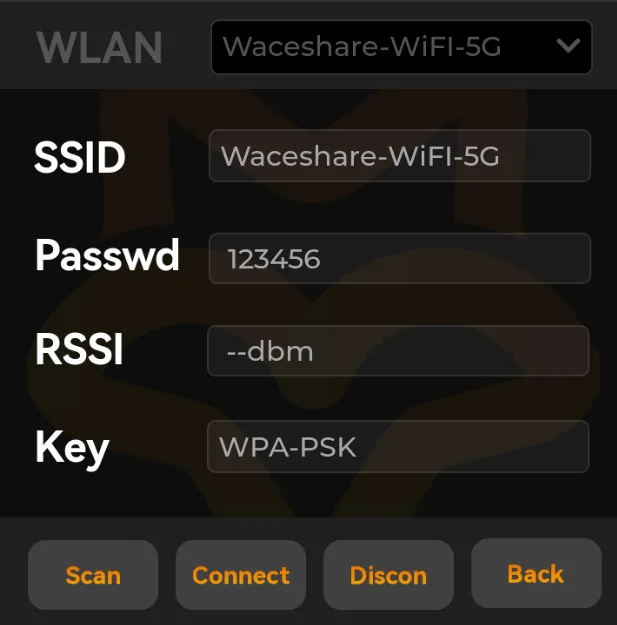
至此,按键功能完成,运行图像如下:
5.副界面
副界面示例程序如下:lvgl_project_86panel_music.tar.gz
5.1 继电器控制功能
本节介绍如何通过按键控制 GPIO 电平通断继电器。
-
创建 GPIO 电平切换功能按键
#include "../ui.h"void ui_ScreenPlayer_screen_init(void){...ui_PanelRelay1 = lv_obj_create(ui_ScreenPlayer);lv_obj_set_width(ui_PanelRelay1, 320);lv_obj_set_height(ui_PanelRelay1, 160);lv_obj_set_x(ui_PanelRelay1, 30);lv_obj_set_y(ui_PanelRelay1, 530);lv_obj_set_style_radius(ui_PanelRelay1, 20, LV_PART_MAIN | LV_STATE_DEFAULT);lv_obj_set_style_bg_color(ui_PanelRelay1, lv_color_hex(0xEC6900), LV_PART_MAIN | LV_STATE_DEFAULT);lv_obj_set_style_bg_opa(ui_PanelRelay1, 255, LV_PART_MAIN | LV_STATE_DEFAULT);lv_obj_set_style_bg_grad_color(ui_PanelRelay1, lv_color_hex(0xF6AC05), LV_PART_MAIN | LV_STATE_DEFAULT);lv_obj_set_style_bg_grad_dir(ui_PanelRelay1, LV_GRAD_DIR_VER, LV_PART_MAIN | LV_STATE_DEFAULT);lv_obj_set_style_border_width(ui_PanelRelay1, 0, LV_PART_MAIN | LV_STATE_DEFAULT);ui_LabelRelay1 = lv_label_create(ui_PanelRelay1);lv_obj_set_width(ui_LabelRelay1, LV_SIZE_CONTENT);lv_obj_set_height(ui_LabelRelay1, LV_SIZE_CONTENT);lv_obj_set_align(ui_LabelRelay1, LV_ALIGN_CENTER);lv_label_set_text(ui_LabelRelay1, "Relay 1");lv_obj_set_style_text_color(ui_LabelRelay1, lv_color_hex(0xFFFFFF), LV_PART_MAIN | LV_STATE_DEFAULT);lv_obj_set_style_text_opa(ui_LabelRelay1, 255, LV_PART_MAIN | LV_STATE_DEFAULT);lv_obj_set_style_text_font(ui_LabelRelay1, &lv_font_montserrat_48, LV_PART_MAIN | LV_STATE_DEFAULT);...}代码步骤说明
- **创建面板:**使用
lv_obj_create()函数在指定的父容器ui_ScreenPlayer中创建一个新的面板对象ui_PanelRelay1。并设置尺寸和位置以及样式。 - 创建标签:使用
lv_obj_create()函数在指定的父容器ui_PanelRelay1中创建一个居中的标签ui_LabelRelay1。并设置尺寸和位置以及样式。
- **创建面板:**使用
-
在
ui_SrceenPlayer.c中添加按键事件回调函数。lv_obj_add_event_cb(ui_PanelRelay1, ui_event_PanelRelay1, LV_EVENT_ALL, NULL); -
在
ui.c中实现事件回调函数。void ui_event_PanelRelay1(lv_event_t * e){lv_event_code_t event_code = lv_event_get_code(e);lv_obj_t * target = lv_event_get_target(e);if(event_code == LV_EVENT_CLICKED) {if(lv_obj_get_style_bg_grad_dir(ui_PanelRelay1,LV_PART_MAIN) == LV_GRAD_DIR_VER){set_gpio(32,0);lv_obj_set_style_bg_color(ui_PanelRelay1, lv_color_hex(0x696969), LV_PART_MAIN | LV_STATE_DEFAULT);lv_obj_set_style_bg_grad_dir(ui_PanelRelay1, LV_GRAD_DIR_NONE, LV_PART_MAIN | LV_STATE_DEFAULT);}else{set_gpio(32,1);lv_obj_set_style_bg_color(ui_PanelRelay1, lv_color_hex(0xEC6900), LV_PART_MAIN | LV_STATE_DEFAULT);lv_obj_set_style_bg_grad_color(ui_PanelRelay1, lv_color_hex(0xF6AC05), LV_PART_MAIN | LV_STATE_DEFAULT);lv_obj_set_style_bg_grad_dir(ui_PanelRelay1, LV_GRAD_DIR_VER, LV_PART_MAIN | LV_STATE_DEFAULT);}}}int set_gpio(int gpio_pin, int val){int len;char buff[10];char filename[64];int ret,result;memset(filename, 0x0, sizeof(filename));sprintf(filename, "/sys/class/gpio/gpio%d/value", gpio_pin);FILE *value_file = fopen(filename, "w");if (value_file == NULL){ret = gpio_export(gpio_pin);if (ret < 0){return ret;}else{result = gpio_out_direction(gpio_pin);if(result < 0)return result;if (value_file == NULL)return ret;}}memset(buff, 0x0, sizeof(buff));len = sprintf(buff, "%s", val ? "1" : "0");fprintf(value_file,buff);if (ret != len){fclose(value_file);return ret;}fclose(value_file);return 0;}代码步骤说明
ui_event_PanelRelay1函数:当面板ui_PanelRelay1被点击时,检查标签ui_LabelStatus1的文本内容。如果当前文本是"ON",则调用set_gpio函数将GPIO引脚32的状态设置为0(关闭状态),并将标签文本更新为"OFF";反之,若文本是"OFF",则将GPIO引脚32的状态设置为1(开启状态),并将标签文本更新为"ON"。set_gpio函数:首先构建目标GPIO值文件的路径,尝试打开该文件以写入新的GPIO状态值(0或1)。如果文件不存在,则先通过gpio_export函数导出GPIO引脚,并使用gpio_out_direction函数设置GPIO的方向为输出模式。然后再次尝试打开GPIO值文件并写入新状态值。如果在任何步骤中发生错误(例如文件无法打开或写入失败),则返回相应的错误代码;否则,在成功写入新状态后返回0,确保GPIO状态被正确设置。此过程保证了能够根据用户交互动态地控制GPIO引脚的状态,并同步更新UI上的状态显示。
-
对于另一继电器控制也是如此,运行图像如下:

5.2 音乐播放器 UI 组件及事件
本节包含图片按键、滑动条、滚轮列表的使用以及 MPV 相关函数 的调用
-
创建图片按键,一共有音乐播放/暂停图片按键,上一首音乐图片按键,下一首音乐图片按键,音乐列表图片按键,音乐播放模式按键。下面以音乐列表图片按键为例。
void ui_ScreenPlayer_screen_init(void){...ui_ImgButtonList = lv_imgbtn_create(ui_PanelMusicPlayer);lv_imgbtn_set_src(ui_ImgButtonList, LV_IMGBTN_STATE_RELEASED, NULL, &ui_img_icon_music_list_png, NULL);lv_imgbtn_set_src(ui_ImgButtonList, LV_IMGBTN_STATE_PRESSED, NULL, &ui_img_icon_music_list_png, NULL);lv_imgbtn_set_src(ui_ImgButtonList, LV_IMGBTN_STATE_DISABLED, NULL, &ui_img_icon_music_list_png, NULL);lv_imgbtn_set_src(ui_ImgButtonList, LV_IMGBTN_STATE_CHECKED_PRESSED, NULL, &ui_img_icon_music_list_png, NULL);lv_imgbtn_set_src(ui_ImgButtonList, LV_IMGBTN_STATE_CHECKED_RELEASED, NULL, &ui_img_icon_music_list_png, NULL);lv_imgbtn_set_src(ui_ImgButtonList, LV_IMGBTN_STATE_CHECKED_DISABLED, NULL, &ui_img_icon_music_list_png, NULL);lv_obj_set_height(ui_ImgButtonList, 50);lv_obj_set_width(ui_ImgButtonList, LV_SIZE_CONTENT);lv_obj_set_x(ui_ImgButtonList, 411);lv_obj_set_y(ui_ImgButtonList, 296);...}代码步骤说明
ui_ScreenPlayer_screen_init函数:在初始化屏幕时,创建了一个图像按钮ui_ImgButtonList并将其添加到名为ui_PanelMusicPlayer的父容器中。为该图像按钮设置了不同状态(如释放、按下、禁用等)下的图标源,所有状态下均使用相同的图标资源&ui_img_icon_music_list_png。设置了按钮的高度为50像素,宽度根据内容自动调整,并将其放置在坐标(411, 296)处。这种配置允许创建一个视觉上一致的图像按钮,其外观不会随交互状态变化而改变,确保了用户界面的简洁性和一致性。此过程展示了如何通过设置不同的状态图像来定义图像按钮的行为和外观,同时根据需要精确地控制其尺寸和位置。
-
创建音量滑动条。
void ui_ScreenPlayer_screen_init(void){...ui_SliderMusic = lv_slider_create(ui_PanelMusicPlayer);lv_slider_set_value(ui_SliderMusic, 65, LV_ANIM_OFF);if(lv_slider_get_mode(ui_SliderMusic) == LV_SLIDER_MODE_RANGE) lv_slider_set_left_value(ui_SliderMusic, 0, LV_ANIM_OFF);lv_obj_set_width(ui_SliderMusic, 500);lv_obj_set_height(ui_SliderMusic, 10);lv_obj_set_x(ui_SliderMusic, 80);lv_obj_set_y(ui_SliderMusic, 421);lv_obj_set_style_bg_color(ui_SliderMusic, lv_color_hex(0x333232), LV_PART_MAIN | LV_STATE_DEFAULT);lv_obj_set_style_bg_opa(ui_SliderMusic, 255, LV_PART_MAIN | LV_STATE_DEFAULT);lv_obj_set_style_bg_color(ui_SliderMusic, lv_color_hex(0x7D7D7D), LV_PART_INDICATOR | LV_STATE_DEFAULT);lv_obj_set_style_bg_opa(ui_SliderMusic, 255, LV_PART_INDICATOR | LV_STATE_DEFAULT);lv_obj_set_style_bg_grad_color(ui_SliderMusic, lv_color_hex(0xC4C4C4), LV_PART_INDICATOR | LV_STATE_DEFAULT);lv_obj_set_style_bg_grad_dir(ui_SliderMusic, LV_GRAD_DIR_HOR, LV_PART_INDICATOR | LV_STATE_DEFAULT);lv_obj_set_style_bg_color(ui_SliderMusic, lv_color_hex(0xC4C4C4), LV_PART_KNOB | LV_STATE_DEFAULT);lv_obj_set_style_bg_opa(ui_SliderMusic, 255, LV_PART_KNOB | LV_STATE_DEFAULT);lv_obj_set_style_pad_left(ui_SliderMusic, 12, LV_PART_KNOB | LV_STATE_DEFAULT);lv_obj_set_style_pad_right(ui_SliderMusic, 12, LV_PART_KNOB | LV_STATE_DEFAULT);lv_obj_set_style_pad_top(ui_SliderMusic, 12, LV_PART_KNOB | LV_STATE_DEFAULT);lv_obj_set_style_pad_bottom(ui_SliderMusic, 12, LV_PART_KNOB | LV_STATE_DEFAULT);...}代码步骤说明
- 创建滑块控件:使用
lv_slider_create()函数在指定的父容器ui_PanelMusicPlayer中创建一个新的滑块控件ui_SliderMusic。 - 设置初始值:通过
lv_slider_set_value()方法将滑块的值设置为65,并关闭动画效果(LV_ANIM_OFF)。如果滑块模式是范围模式(LV_SLIDER_MODE_RANGE),则使用lv_slider_set_left_value()方法将左侧值设置为0,同样关闭动画效果。 - 调整尺寸和位置:
- 设置滑块的宽度为500像素,高度为10像素。
- 设置滑块的位置,X坐标为80像素,Y坐标为421像素,以确定其在父容器中的具体位置。
- 最后,按需设置样式配置。
- 创建滑块控件:使用
-
创建音乐选择列表。
void ui_ScreenPlayer_screen_init(void){...ui_PanelBoard = lv_obj_create(ui_ScreenPlayer);lv_obj_set_width(ui_PanelBoard, 720);lv_obj_set_height(ui_PanelBoard, 720);lv_obj_set_align(ui_PanelBoard, LV_ALIGN_CENTER);lv_obj_clear_flag(ui_PanelBoard, LV_OBJ_FLAG_SCROLLABLE); /// Flagslv_obj_set_style_bg_color(ui_PanelBoard, lv_color_hex(0x0D0D0D), LV_PART_MAIN | LV_STATE_DEFAULT);lv_obj_set_style_bg_opa(ui_PanelBoard, 255, LV_PART_MAIN | LV_STATE_DEFAULT);lv_obj_set_style_border_color(ui_PanelBoard, lv_color_hex(0x000000), LV_PART_MAIN | LV_STATE_DEFAULT);lv_obj_set_style_border_opa(ui_PanelBoard, 255, LV_PART_MAIN | LV_STATE_DEFAULT);lv_obj_set_style_pad_left(ui_PanelBoard, 0, LV_PART_MAIN | LV_STATE_DEFAULT);lv_obj_set_style_pad_right(ui_PanelBoard, 0, LV_PART_MAIN | LV_STATE_DEFAULT);lv_obj_set_style_pad_top(ui_PanelBoard, 0, LV_PART_MAIN | LV_STATE_DEFAULT);lv_obj_set_style_pad_bottom(ui_PanelBoard, 0, LV_PART_MAIN | LV_STATE_DEFAULT);lv_obj_add_flag(ui_PanelBoard, LV_OBJ_FLAG_HIDDEN); /// Flagsui_RollerMusic = lv_roller_create(ui_PanelBoard);lv_roller_set_options(ui_RollerMusic,"1.Music List click to Play 001.mp3\n2.Music List click to Play 001.mp3\n3.Music List click to Play 001.mp3\n4.Music List click to Play 001.mp3\n5.Music List click to Play 001.mp3\n6.Music List click to Play 001.mp3",LV_ROLLER_MODE_NORMAL);lv_obj_set_width(ui_RollerMusic, 720);lv_obj_set_height(ui_RollerMusic, 576);lv_obj_set_x(ui_RollerMusic, 0);lv_obj_set_y(ui_RollerMusic, 144);lv_obj_add_flag(ui_RollerMusic, LV_OBJ_FLAG_HIDDEN);lv_obj_set_style_text_color(ui_RollerMusic, lv_color_hex(0xFFFFFF), LV_PART_MAIN | LV_STATE_DEFAULT);lv_obj_set_style_text_opa(ui_RollerMusic, 255, LV_PART_MAIN | LV_STATE_DEFAULT);lv_obj_set_style_text_font(ui_RollerMusic, &lv_font_montserrat_30, LV_PART_MAIN | LV_STATE_DEFAULT);lv_obj_set_style_radius(ui_RollerMusic, 10, LV_PART_MAIN | LV_STATE_DEFAULT);lv_obj_set_style_bg_color(ui_RollerMusic, lv_color_hex(0x1F1F1F), LV_PART_MAIN | LV_STATE_DEFAULT);lv_obj_set_style_bg_opa(ui_RollerMusic, 255, LV_PART_MAIN | LV_STATE_DEFAULT);lv_obj_set_style_border_width(ui_RollerMusic, 0, LV_PART_MAIN | LV_STATE_DEFAULT);lv_obj_set_style_text_color(ui_RollerMusic, lv_color_hex(0xFFA300), LV_PART_SELECTED | LV_STATE_DEFAULT);lv_obj_set_style_text_opa(ui_RollerMusic, 255, LV_PART_SELECTED | LV_STATE_DEFAULT);...}代码步骤说明
- 创建滚轮控件:使用
lv_roller_create()函数在指定的父容器ui_PanelBoard中创建一个新的滚轮控件ui_RollerMusic。 - 设置选项:通过
lv_roller_set_options()方法为滚轮设置了多个选项,每个选项代表一个音乐列表项,使用换行符\n分隔。这里所有选项文本相同,仅为示例目的。 - 调整尺寸和位置:
- 设置滚轮的宽度为720像素,高度为576像素。
- 设置滚轮的位置,X坐标为0像素,Y坐标为144像素,以确定其在父容器中的具体位置。
- 隐藏标志:添加
LV_OBJ_FLAG_HIDDEN标志,使滚轮初始状态下不可见,直到需要显示时再取消此标志。 - 最后,按需设置样式配置。
- 创建滚轮控件:使用
-
在
ui_SrceenPlayer.c中添加各个控件事件。void ui_ScreenPlayer_screen_init(void){...lv_obj_add_event_cb(ui_ImgButtonPrev, ui_event_ImgButtonPrev, LV_EVENT_ALL, NULL);lv_obj_add_event_cb(ui_ImgButtonNext, ui_event_ImgButtonNext, LV_EVENT_ALL, NULL);lv_obj_add_event_cb(ui_SliderMusic, ui_event_SliderMusic, LV_EVENT_ALL, NULL);lv_obj_add_event_cb(ui_ImgButtonList, ui_event_ImgButtonList, LV_EVENT_ALL, NULL);lv_obj_add_event_cb(ui_ImagePlay, ui_event_ImagePlay, LV_EVENT_ALL, NULL);lv_obj_add_event_cb(ui_ImageMusicMode, ui_event_ImageMusicMode, LV_EVENT_ALL, NULL);lv_obj_add_event_cb(ui_RollerMusic, ui_event_RollerMusic, LV_EVENT_ALL, NULL);lv_obj_add_event_cb(ui_ImageMusicClose, ui_event_ImageMusicClose, LV_EVENT_ALL, NULL);lv_obj_add_event_cb(ui_ScreenPlayer, ui_event_ScreenPlayer, LV_EVENT_ALL, NULL);lv_obj_add_event_cb(ui_PanelBoard, ui_event_PanelBoard, LV_EVENT_ALL, NULL);...} -
在
ui.c中实现事件回调函数。void ui_event_ImgButtonPrev(lv_event_t * e){lv_event_code_t event_code = lv_event_get_code(e);lv_obj_t * target = lv_event_get_target(e);if(event_code == LV_EVENT_CLICKED && playing_music_node != NULL) {if(!CycleFlag){playing_music_node = playing_music_node->prev;lv_roller_set_selected(ui_RollerMusic, playing_music_node->id, LV_ANIM_OFF);music_set_pos(playing_music_node->id);}else{music_set_pos(playing_music_node->id);}}}void ui_event_ImgButtonNext(lv_event_t * e){lv_event_code_t event_code = lv_event_get_code(e);lv_obj_t * target = lv_event_get_target(e);if(event_code == LV_EVENT_PRESSED && playing_music_node != NULL) {if(!CycleFlag){playing_music_node = playing_music_node->next;lv_roller_set_selected(ui_RollerMusic, playing_music_node->id, LV_ANIM_OFF);music_set_pos(playing_music_node->id);}else{music_set_pos(playing_music_node->id);}}}void ui_event_SliderMusic(lv_event_t * e){lv_event_code_t event_code = lv_event_get_code(e);lv_obj_t * target = lv_event_get_target(e);if(event_code == LV_EVENT_VALUE_CHANGED) {int volume = lv_slider_get_value(target);music_set_volume(volume);}}void ui_event_ImgButtonList(lv_event_t * e){lv_event_code_t event_code = lv_event_get_code(e);lv_obj_t * target = lv_event_get_target(e);if(event_code == LV_EVENT_RELEASED) {// lv_obj_clear_flag(ui_RollerMusic, LV_OBJ_FLAG_HIDDEN);lv_obj_clear_flag(ui_PanelBoard, LV_OBJ_FLAG_HIDDEN);GestureFlag = false;}}void ui_event_ImagePlay(lv_event_t * e){lv_event_code_t event_code = lv_event_get_code(e);lv_obj_t * target = lv_event_get_target(e);if(event_code == LV_EVENT_PRESSED) {lv_state_t btn_state = lv_obj_get_state(target);if(btn_state &= LV_STATE_CHECKED){music_pause(1);}else{music_pause(0);}}}void ui_event_ImageMusicMode(lv_event_t * e){lv_event_code_t event_code = lv_event_get_code(e);lv_obj_t * target = lv_event_get_target(e);if(event_code == LV_EVENT_PRESSED) {lv_state_t btn_state = lv_obj_get_state(target);if(btn_state &= LV_STATE_CHECKED){music_set_mode(0);CycleFlag = false;}else{music_set_mode(1);CycleFlag = true;}}}void ui_event_RollerMusic(lv_event_t * e){lv_event_code_t event_code = lv_event_get_code(e);lv_obj_t * target = lv_event_get_target(e);if(event_code == LV_EVENT_VALUE_CHANGED && playing_music_node != NULL) {char buf[32];lv_roller_get_selected_str(target, buf, sizeof(buf));while(strcmp(playing_music_node->filename, buf)){playing_music_node = playing_music_node->next;}music_set_pos(playing_music_node->id);}}void ui_event_ImageMusicClose(lv_event_t *e){lv_event_code_t event_code = lv_event_get_code(e);lv_obj_t * target = lv_event_get_target(e);if(event_code == LV_EVENT_CLICKED){lv_obj_add_flag(ui_RollerMusic,LV_OBJ_FLAG_HIDDEN);GestureFlag = true;}}void ui_event_PanelBoard(lv_event_t * e){lv_event_code_t event_code = lv_event_get_code(e);lv_obj_t * target = lv_event_get_target(e);if(event_code == LV_EVENT_CLICKED){lv_obj_add_flag(ui_PanelBoard,LV_OBJ_FLAG_HIDDEN);GestureFlag = true;}}代码步骤说明
ui_event_ImgButtonNext()和ui_event_ImgButtonPrev()分别处理下一曲和上一曲按钮的点击事件。ui_event_SliderMusic()处理音量滑块的变化事件,调整音乐播放的音量。ui_event_ImgButtonList()处理列表按钮的点击事件,用于显示或隐藏音乐选择滚轮。ui_event_ImgPlay()处理播放/暂停按钮的点击事件。ui_event_ImageMusicMode()处理音乐播放模式按钮的点击事件,切换循环播放模式和顺序播放模式。ui_event_RollerMusic()处理音乐选择滚轮的选择变化事件,更新当前播放的音乐文件。ui_event_ImageMusicClose()通过点击图标处理音乐列表的关闭事件,隐藏当前列表。ui_event_PanelBoard()通过点击列表外的界面处理音乐列表的关闭事件,隐藏当前列表。
-
至此,音乐播放器 UI 组件完成,运行图像如下:

5.3 音乐播放器逻辑功能
本节主要介绍 MPV 相关函数的具体实现。
-
上一节介绍了 UI 组件的函数调用,以下介绍音乐播放器逻辑函数的具体实现,在
ui.c中,添加music_player_thread_init()函数,以便进入副界面时启动mpv工具。int music_player_thread_init(){pid = vfork();if (pid == 0) // child thread{char cmd[256];prctl(PR_SET_PDEATHSIG, SIGKILL);execlp("mpv", "mpv", "--quiet", "--no-terminal", "--no-video", "--idle=yes", "--term-status-msg=", "--input-ipc-server=/tmp/mpvsocket", NULL);return 0;}else if (pid > 0) // parent thread{sleep(1);close(0);act.sa_handler = sigaction_exit_handler;sigfillset(&act.sa_mask);act.sa_flags = SA_RESTART; /* don't fiddle with EINTR */sigaction(SIGUSR1, &act, NULL);addr.sun_family = AF_UNIX;strcpy(addr.sun_path, "/tmp/mpvsocket");fd_mpv = socket(AF_UNIX, SOCK_STREAM, 0);if (fd_mpv == -1){perror("Create socket failed\n");return -1;}sleep(0.1);// socket connectif (connect(fd_mpv, (struct sockaddr *)&addr, sizeof(addr)) == -1){perror("Cannot connect to socket \n");return -1;}}else{perror("fork error:\n");return -1;}}void custom_init(){system("mpv 2>&1 >/dev/null");music_player_thread_init();}///////////////////// SCREENS ////////////////////void ui_init(void){lv_disp_t * dispp = lv_disp_get_default();lv_theme_t * theme = lv_theme_default_init(dispp, lv_palette_main(LV_PALETTE_BLUE), lv_palette_main(LV_PALETTE_RED),false, LV_FONT_DEFAULT);lv_disp_set_theme(dispp, theme);custom_init();ui_ScreenMain_screen_init();ui_ScreenWpa_screen_init();ui_ScreenPlayer_screen_init();ui____initial_actions0 = lv_obj_create(NULL);lv_disp_load_scr(ui_ScreenPlayer);}代码步骤说明
- 使用
vfork()创建一个新的子进程。 - 子进程操作时,使用
prctl()函数设置父进程的死亡信号,如果父进程终止,子进程将立即被强制终止。使用execlp()函数执行当前进程映像为mpv命令行媒体播放器,并传递一系列参数以配置其行为。 - 父进程操作时,执行
sleep(1)确保子进程有足够的时间初始化,后使用close(0)关闭标准输入释放资源。设置信号处理函数sigaction_exit_handler处理SIGUSR1信号。配置 Unix 域套接字地址结构 addr,并创建一个 Unix 域套接字用于连接到 mpv 的 IPC 服务器。
- 使用
-
设置界面初始化时的
mpv控制命令函数,如暂停/继续播放、设置音乐列表、调整音量和切换循环模式。void music_pause(int sta){char cmd[256];sprintf(cmd, "{ \"command\": [\"set_property\", \"pause\",%s] }\n", sta ? "true" : "false");//printf("%s\n", cmd);write(fd_mpv, cmd, strlen(cmd));}void music_set_pos(int music_id){int read_flag = 0;char cmd[256];sprintf(cmd, "{ \"command\": [\"set_property\", \"playlist-pos\", %d] }\n",music_id);//printf("%s\n", cmd);write(fd_mpv, cmd, strlen(cmd));// set namelv_label_set_text(ui_LabelMusicPlayer, playing_music_node->filename);}void music_set_volume(int volume){char cmd[256];sprintf(cmd, "{ \"command\": [\"set_property\", \"volume\", %d] }\n",volume);//printf("%s\n", cmd);write(fd_mpv, cmd, strlen(cmd));}void music_set_mode(int mode){char cmd[256];sprintf(cmd, "{ \"command\": [\"set_property\", \"loop\",%s] }\n", mode ? "true" : "false");//printf("%s\n", cmd);write(fd_mpv, cmd, strlen(cmd));}代码步骤说明
music_pause(int sta)使用sprintf构造一个 JSON 命令字符串,指示 mpv 暂停 ("true") 或恢复 ("false") 播放。music_set_pos(int music_id)使用sprintf构造一个 JSON 命令字符串,指定"playlist-pos"属性和目标music_id。music_set_volume(int volume)使用sprintf构造一个 JSON 命令字符串,指定 "volume" 属性和新的音量值。music_set_mode(int mode)使用sprintf构造一个 JSON 命令字符串,指示 mpv 是否启用循环播放 ("true" 或 "false")。
-
音乐扫描列表,此函数主要是扫描指定目录下的所有
mp3文件,将这些文件信息填写到链表中。int music_scan_list(char* mp3_string){DIR *dir;struct dirent *entry;int id_num = 0;int i;init_music_node_list(&head);dir = opendir(MUSIC_DIR_PATH);if (dir == NULL) {perror("opendir error: ");lv_label_set_text(ui_LabelMusicList, "Music List(0)");return -1;}// Read files from music dirwhile ((entry = readdir(dir)) != NULL) {if (entry->d_type == DT_REG) { // common file// check .mp3char *ext = strrchr(entry->d_name, '.');if (ext != NULL && strcmp(ext, ".mp3") == 0) {// insert Music Nodeinsert_music_node(&head, entry->d_name,id_num);id_num++;//add to mpv listchar cmd[256];sprintf(cmd, "{ \"command\": [\"loadfile\", \"/music/%s\",\"append\"] }\n",entry->d_name);// printf("%s\n", cmd);write(fd_mpv, cmd, strlen(cmd));}}}closedir(dir);// Create roller strmp3_string[0] = '\0';if (head != NULL) {struct Music_Node* current = head;playing_music_node = head;for(i = 0;i < id_num;i++) {if(i != 0)strcat(mp3_string,"\n");strcat(mp3_string, current->filename);// printf("%s\n", current->filename);current = current->next;}}char MusicList[20];snprintf(MusicList,sizeof(MusicList),"Music List(%d)",id_num);lv_label_set_text(ui_LabelMusicList,MusicList);// printf("idnum:%d\n",id_num);return 0;}
代码步骤说明
- 使用
init_music_node_list(&head);初始化音乐节点链表的头指针。 - 使用
opendir(MUSIC_DIR_PATH);打开指定的音乐文件目录,若返回参数为空,则证明无此目录。 - 循环调用
readdir(dir)遍历目录中的文件,如果是mp3文件,则分配id_num并将文件信息插入到节点链表中,使用sprintf格式化命令,指示mpv加载该文件并将其追加到播放列表中。 - 最后将获取到的
id_num变量格式化到字符数组中,用于显示当前列表mp3文件个数。
5.4 返回主界面功能
本节介绍如何通过屏幕上滑返回主界面。
-
在
ui_SrceenPlayer.c中添加主界面返回事件。lv_obj_add_event_cb(ui_ScreenPlayer, ui_event_ScreenPlayer, LV_EVENT_ALL, NULL); -
在
ui.c中实现事件回调函数。void ui_event_ScreenPlayer(lv_event_t * e){lv_event_code_t event_code = lv_event_get_code(e);lv_obj_t * target = lv_event_get_target(e);if(event_code == LV_EVENT_GESTURE && lv_indev_get_gesture_dir(lv_indev_get_act()) == LV_DIR_TOP && GestureFlag == true) {lv_indev_wait_release(lv_indev_get_act());_ui_screen_change(&ui_ScreenMain, LV_SCR_LOAD_ANIM_MOVE_TOP, 300, 0, &ui_ScreenMain_screen_init);}}代码步骤说明
- 获取事件代码和目标对象:使用
lv_event_get_code(e)获取事件类型,使用lv_event_get_target(e)获取触发事件的对象。 - 手势处理:检查手势方向是否为上滑,同时检查全局标志
GestureFlag是否为true。如果条件都满足,则执行以下操作:- 调用
lv_indev_wait_release(lv_indev_get_act())等待当前输入设备释放,确保在手势结束前不会触发其他事件。 - 调用
_ui_screen_change(&ui_ScreenMain, LV_SCR_LOAD_ANIM_MOVE_TOP, 300, 0, &ui_ScreenMain_screen_init)来切换到主屏幕,并使用从底部向上移动的动画效果。
- 调用
- 点击处理:如果事件代码是
LV_EVENT_CLICKED,则将GestureFlag设置为true。这表示用户已经点击了屏幕,允许后续的手势识别。
- 获取事件代码和目标对象:使用
6.编译运行
-
执行
make指令,将生成可执行文件到/build/bin目录下。make -
将可执行文件上传到 Luckfox Pico 上(可使用 adb ssh等方式),板端进入所上传的目录运行。
# 在 Luckfox Pico 板端运行,<Demo Target> 是部署文件夹中的可执行程序chmod a+x <Demo Target>./<Demo Target>