7″ DSI Touchscreen
1. Introduce
7'' DSI Touchscreen is a capacitive touchscreen with a resolution of 800x480 and a viewing angle of 170°. It supports multiple operating systems and does not require driver installation, meeting various application needs.
2. Product parameters
| Project | Describe | Unit |
|---|---|---|
| Model | 7'' DSI Touchscreen | / |
| Size | 7.0 | Inch |
| Viewing Angle | 170 | Deg |
| Resolution | 800x480 | Pixels |
| Product Size | 192.96 (H) × 110.76 (V) | mm |
| Display Area | 154.88 (H) × 86.72 (V) | mm |
| Color Gamut | 50% | NTSC |
| Maximum Brightness | 350 | cd/m² |
| Constrast | 1000:1 | / |
| Backlight Control | Software Dimming | / |
| Refresh Rate | 60 | Hz |
| Power | 2.5 | Watt |
3. Use with Raspberry Pi
3.1 Hardware Connection
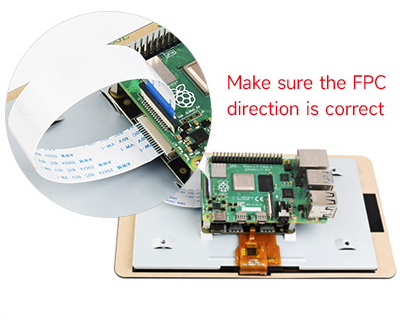
- Connect FPC cable to the display.
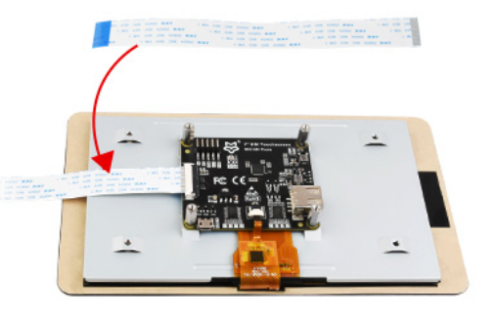
- Fix the Raspberry Pi by screws,connect the FPC cable.
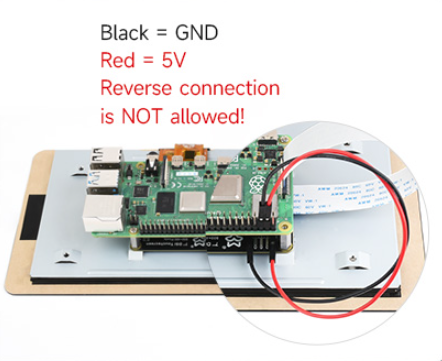
- Connect the power supply.(Standard version)
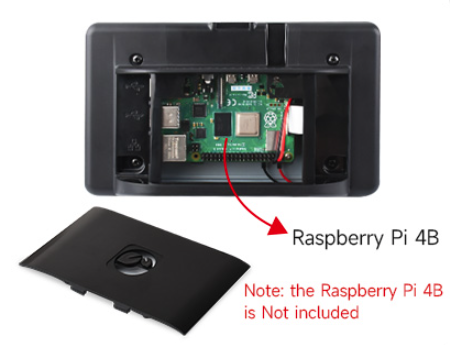
- For the version with case: attach the case and fix it.(with case version)
3.2 Software Setting
Support Raspberry Pi OS/Ubuntu/Kali and Retropie systems.
Connect TF card to PC
Please click Raspberry Pi official website to download the newest image.
Open the Raspberry Pi Imager, select the TF card where the image will be written (Note: It is best to remove other USB devices to prevent accidental erasure of their files).
Pre-configure the system, hold down CTRL+SHIFT+X (or click the small gear icon in the bottom right corner), then click save after settings are completed
Click the burn button to write data to the TF card.
After burning is complete, open the 'config.txt' file under the '/boot/firmware/' directory, add the following statement to the end of the 'config.txt' file, then save and exit.
Note: Due to the Pi5/CM5/CM4/CM3+/CM3 having two MIPI DSI interfaces, please ensure to use the correct DSI interface and command. DSI1 is recommended by default.
dtoverlay=vc4-kms-v3d
#DSI1 Use
dtoverlay=vc4-kms-dsi-7inch
#DSI0 Use (Only Pi5/CM4)
#dtoverlay=vc4-kms-dsi-7inch,dsi0
Insert the TF card into the Raspberry Pi, power it on, and after waiting for a few seconds, the screen should display normally.
3.3 Adjust Backlight Brightness
GUI interface dimming
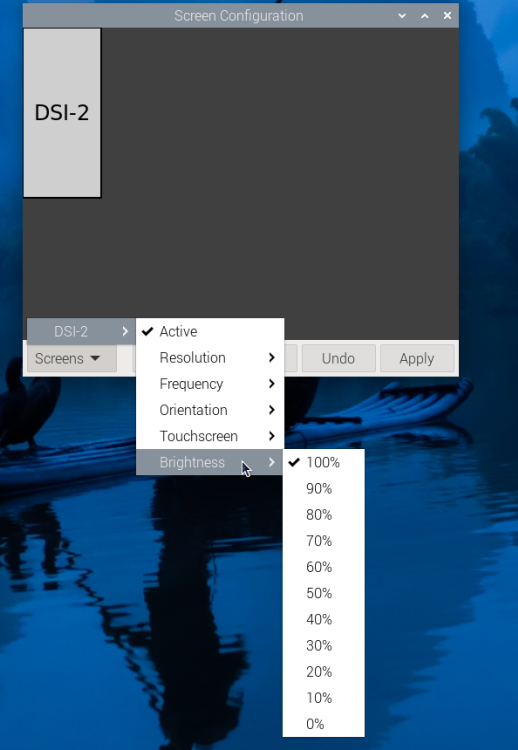
1.Open the "Screen Configuration" application;

2.Go to "Screen" -> "DSI-2" -> "Brightness", check the backlight brightness you need to set, and finally click "Apply" to complete the backlight setting.
Command line dimming
echo X | sudo tee /sys/class/backlight/*/brightness
Where X represents any number from 0 to 255. 0 means the darkest backlight, and 255 means the brightest backlight. For example:
echo 100 | sudo tee /sys/class/backlight/*/brightness
echo 0 | sudo tee /sys/class/backlight/*/brightness
echo 255 | sudo tee /sys/class/backlight/*/brightness
3.4 Touchscreen Rotation
Bookworm system
GUI interface rotation
Open "Screen Configuration" application:

Go to "Screen"->"DSI-1"->"Touchscreen", check "6-0038 generic ft5x06(79)"

Click “Apply” and close the current window. Reboot according to the pop-up prompts, then the touchscreen selection is complete.


Go to "Screen" -> "DSI-1" -> "Orientation," check the direction you want to rotate, and finally click "Apply" to complete the synchronized rotation of the display and touch.

Lite version rotation
Open cmdline.txt file
sudo nano /boot/firmware/cmdline.txtTo add the display rotation command at the beginning of the
cmdline.txtfile on a Raspberry Pi, simply adddisplay_rotate=<angle>.( Note that the command needs to be placed on the same line, with each command separated by a space.)
#Display rotation 90 degrees
video=DSI-1:720x1280M@60,rotate=90

#Display rotation 180 degrees
video=DSI-1:720x1280M@60,rotate=180

#Display rotation 270 degrees
video=DSI-1:720x1280M@60,rotate=270
Note:
- If you are using Pi5/CM5, the actually recognized DSI display number will prevail, for example DSI-2.
- Unable to rotate DSI monitor and HDMI monitor separately using cmdline.txt. When you use both DSI and HDMI simultaneously, they share the same rotation value.
Bullseye/Buster system
GUI interface rotation
Open "Screen Configuration" application:

Go to "Screen"->"DSI-1"->"Orientation", select the rotation direction, and then click on "Apply".


Lite version rotation
Open cmdline.txt file
sudo nano /boot/cmdline.txtAt the beginning of the cmdline.txt file, add the command corresponding to the angle of “display rotation”( Note that the command needs to be placed on the same line, with each command separated by a space.)
#Display rotation 90 degrees
video=DSI-1:720x1280M@60,rotate=90
#Display rotation 180 degrees
video=DSI-1:720x1280M@60,rotate=180
#Display rotation 270 degrees
video=DSI-1:720x1280M@60,rotate=270
Note:
- If you are using CM4, the actually recognized DSI display number will prevail, for example DSI-2.
- Unable to rotate DSI monitor and HDMI monitor separately using cmdline.txt. When you use both DSI and HDMI simultaneously, they share the same rotation value.
Stretch/Jessie system
For some older systems, which do not use the vc4-kms-v3d or vc4-fkms-v3d driver modes, the display rotation method is as follows:
- Add statements to the config.txt file (the config file is located in the root directory of the TF card, i.e. /boot):
display_rotate=1 #1:90;2: 180; 3: 270
- Save and reboot
sudo reboot
3.5 Touch Rotation
Bookworm touch rotation
If you use the graphical interface for rotation, you can check "Touchscreen" in the Screen Layout Editor window to synchronize the touch rotation. Refer to the earlier methods for display rotation. For the command-line rotation method, refer to the following text:
Create a new file named
99-waveshare-touch.rulessudo nano /etc/udev/rules.d/99-waveshare-touch.rulesEdit the file:
#90°:
ENV{ID_INPUT_TOUCHSCREEN}=="1", ENV{LIBINPUT_CALIBRATION_MATRIX}="0 -1 1 1 0 0"

#180°:
#ENV{ID_INPUT_TOUCHSCREEN}=="1", ENV{LIBINPUT_CALIBRATION_MATRIX}="-1 0 1 0 -1 1"

#270°:
#ENV{ID_INPUT_TOUCHSCREEN}=="1", ENV{LIBINPUT_CALIBRATION_MATRIX}="0 1 0 -1 0 1"
Save and reboot
sudo reboot
Bullseye/Buster touch rotation
After display rotation in Bullseye/Buster and some other systems, the touch direction may not be consistent. You need to follow the steps below to rotate the touch accordingly:
Install libinput
sudo apt-get install xserver-xorg-input-libinputIf you are using an Ubuntu system or Jetson Nano, the installation command is:
sudo apt install xserver-xorg-input-synapticsCreate the
xorg.conf.ddirectory under/etc/X11/(if the directory already exists, proceed directly to step 3).sudo mkdir /etc/X11/xorg.conf.dCopy the
40-libinput.conffile to the directory you just created.sudo cp /usr/share/X11/xorg.conf.d/40-libinput.conf /etc/X11/xorg.conf.d/Edit this file
  ```
  sudo nano /etc/X11/xorg.conf.d/40-libinput.conf
  #Locate the touchscreen section, add the corresponding rotation angle command inside, and then save it.
  #90°Right touch rotation:
  Option "CalibrationMatrix" "0 1 0 -1 0 1 0 0 1"
  #180° Inverted touch rotation:
  #Option "CalibrationMatrix" "-1 0 1 0 -1 1 0 0 1"
  #270° Left touch rotation:
  #Option "CalibrationMatrix" "0 -1 1 1 0 0 0 0 1"
  ```
In a location similar to the one shown in the image:

Save and reboot
sudo reboot
3.6 Use Touchscreen Virtual Keyboard
Raspberry Pi OS Bookworm and later versions include Squeekboard on-screen keyboard by default.
When connecting to the touch display, the on-screen keyboard will automatically appear if text input is possible, and it will automatically hide if text input is not possible.
For applications that do not support automatic text input detection, you can manually display or hide the on-screen keyboard by clicking the keyboard icon at the far right of the task bar.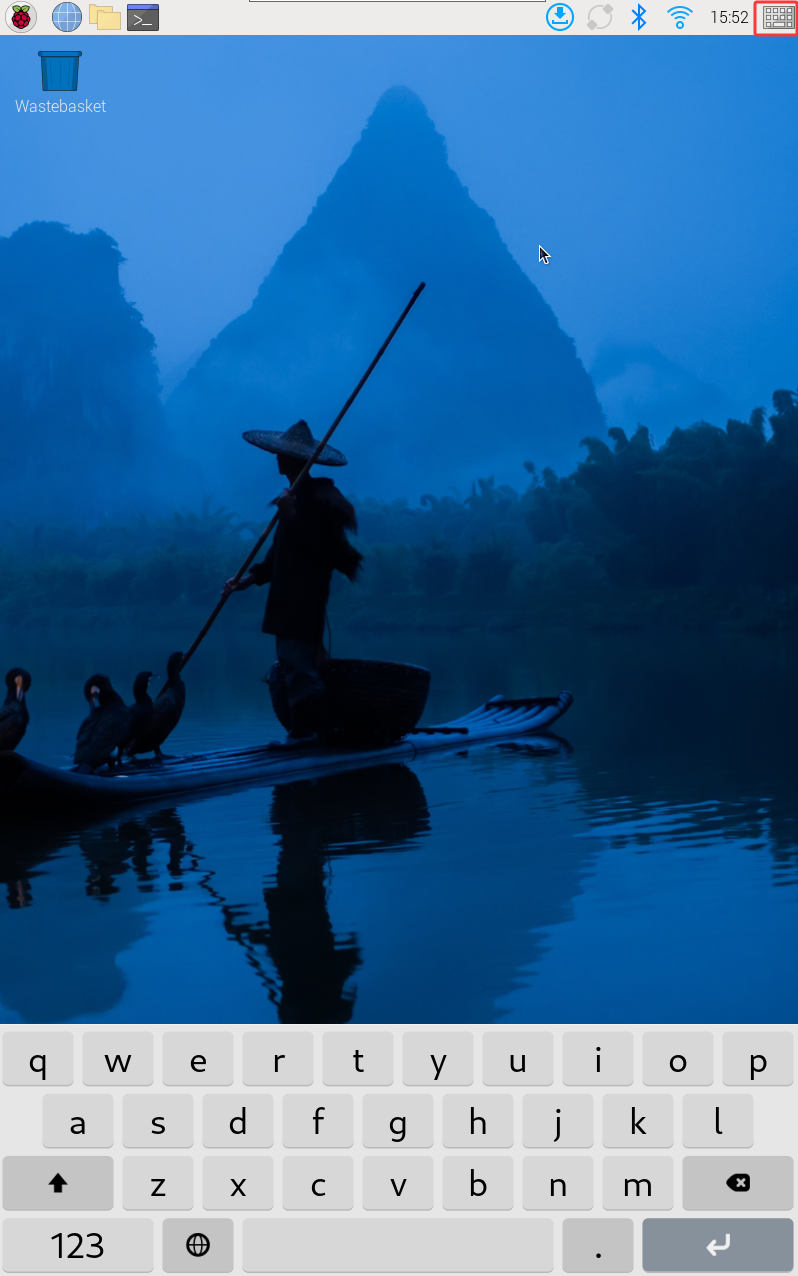
You can also permanently set the display or hide the screen keyboard through the "Display" option under "Raspberry Pi Configuration" or through the "Display" section in raspi-config.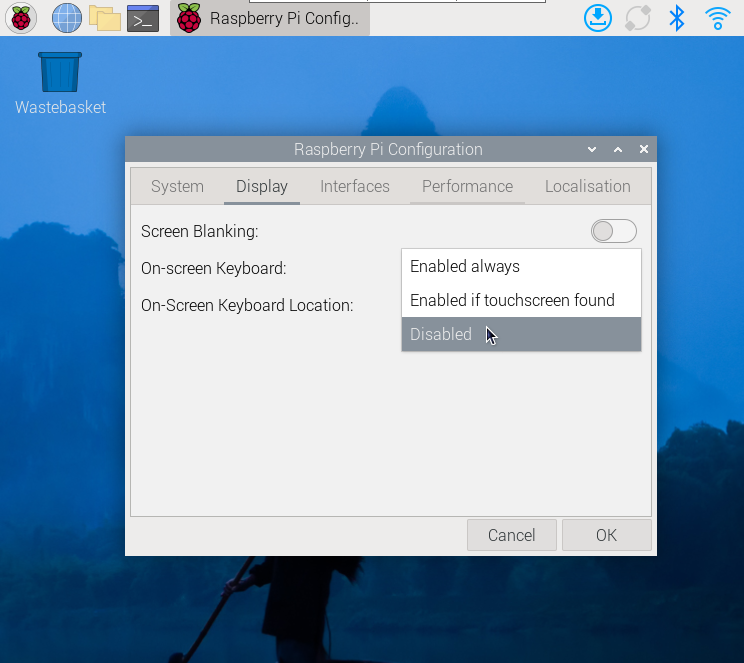
Note:
For versions of Raspberry Pi OS before Bookworm, use matchbox-keyboard. If you are using the wayfire desktop compositor, use wvkbd.
3.7 Touch Mode Selection
The Bookworm system supports two touch modes, which can be switched in the Screen Configuration > Touchscreen menu: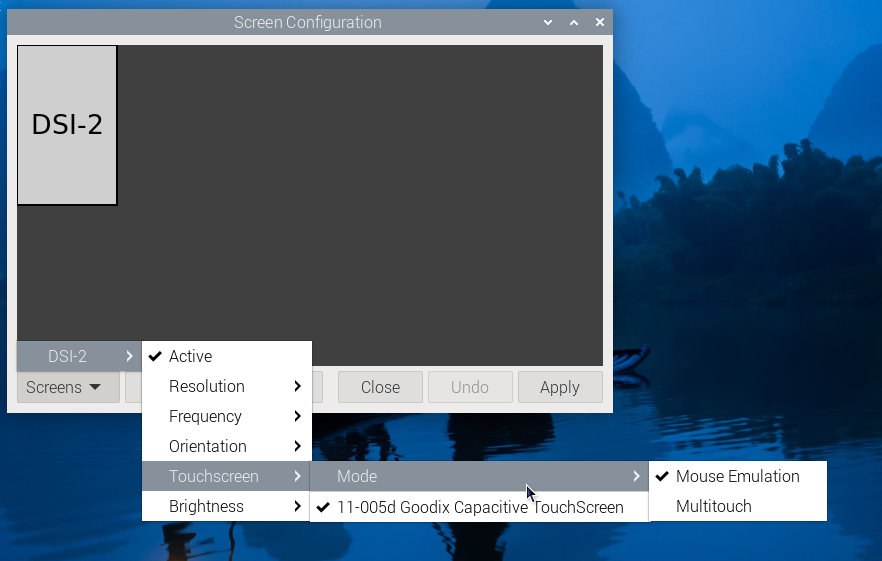
*1.Mouse Emulation (default)
 Click = Left mouse button function
 Long press = Right mouse button function
 Supports double-click
 Does not support swipe page and multi-touch functions
Note: This mode is suitable for scenarios that require mouse operation, such as double clicking to open the file manager and long pressing to achieve right-click functionality.
*2.Multitouch
 Supports multi-touch functionality
 Supports swiping pages
Does not support double-click and right-click long press functions
Note: This mode is suitable for touch-optimized scenarios, such as web browsing and scrolling lists.
Resource
FAQ
Q: Does this screen turn off automatically, or do I need to execute a command to do so?
A: It depends on the system. If the system has hibernation, the screen will be black. If it is the latest official system Bookworm for Raspberry Pi, it does not have hibernation by default.