7-DSI-TOUCH-A
Product Features
- 7-inch DSI touch screen, capacitive 10-point touch control
- IPS display panel with a hardware resolution of 720×1280
- Fully laminated technology for clearer image quality
- Tempered glass touch cover with hardness up to 6H
- AF anti-fingerprint coating, resistant to fingerprints and easy to clean
- DSI interface drives the LCD, refresh rate up to 60Hz
- Backlight brightness controllable via software
- Aluminum alloy back cover with passive heat dissipation design
Electrical Specifications
| Parameter | Min. | Typ. | Max. | Unit | Note |
|---|---|---|---|---|---|
| Input Voltage | 4.75 | 5.00 | 5.30 | V | Note 1 |
| Input Current | - | 0.5 | TBD | A | Note 2 |
| Working Temp. | 0 | 25 | 60 | ℃ | Note 3 |
| Storage Temp. | -10 | 25 | 70 | ℃ | Note 3 |
Note 1: Input voltage exceeding the maximum or improper operation may cause permanent damage to the device.
Note 2: Input current must be ≥0.5A, otherwise it may cause boot failure or abnormal display. Long-term abnormal operation may cause permanent damage to the device.
Note 3: Do not store the screen in high-temperature or high-humidity environments for long periods. Operate within the rated limits to avoid screen damage.
Interface Introduction
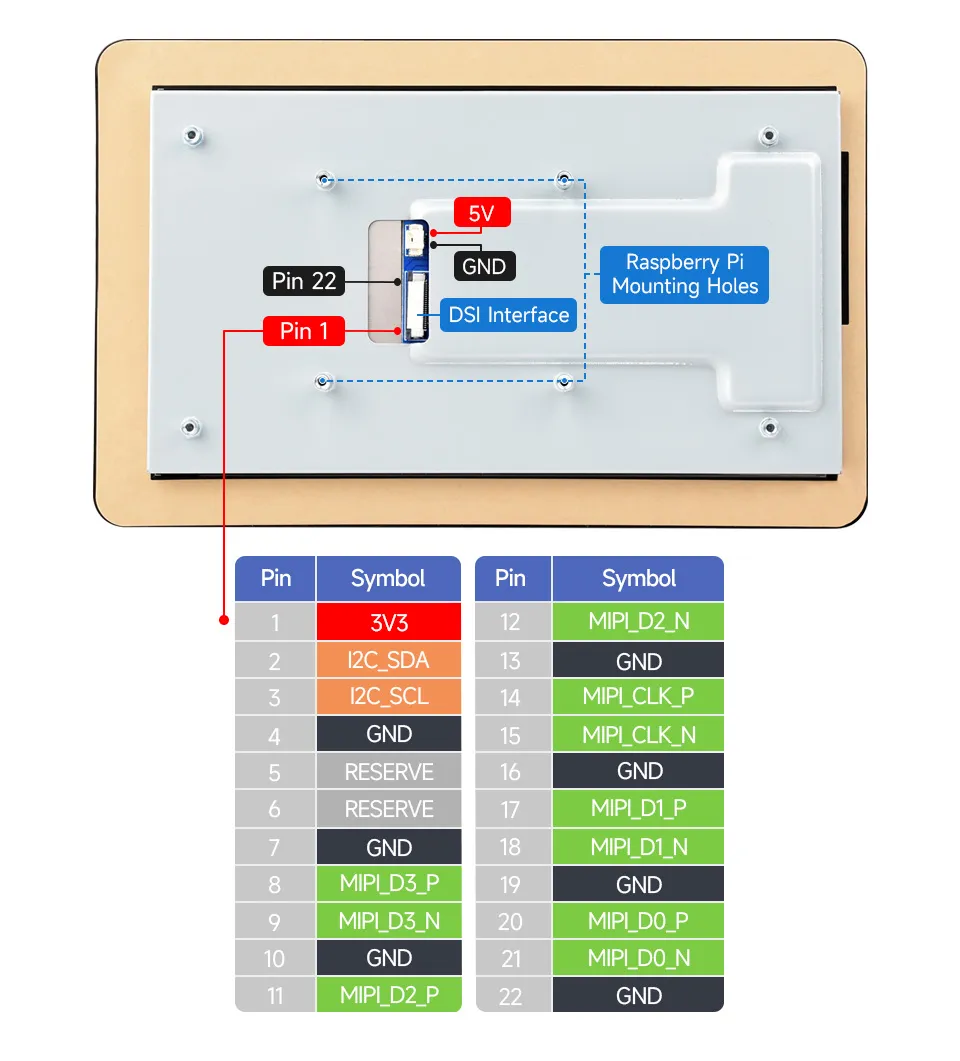
Working with Raspberry Pi
Pi5/CM5/CM4/CM3+/CM3 Hardware Connection
- Use the "FFC Cable 22PIN 200mm (opposite direction)" to connect the DSI port of the display to the 22PIN DSI port of the Raspberry Pi motherboard.
- Use the "GPIO cable" to connect the power connector of the display to the 5V GND pin header of the Raspberry Pi motherboard.

- Secure the Raspberry Pi to the display with M2.5 screws.
Installation Effect:
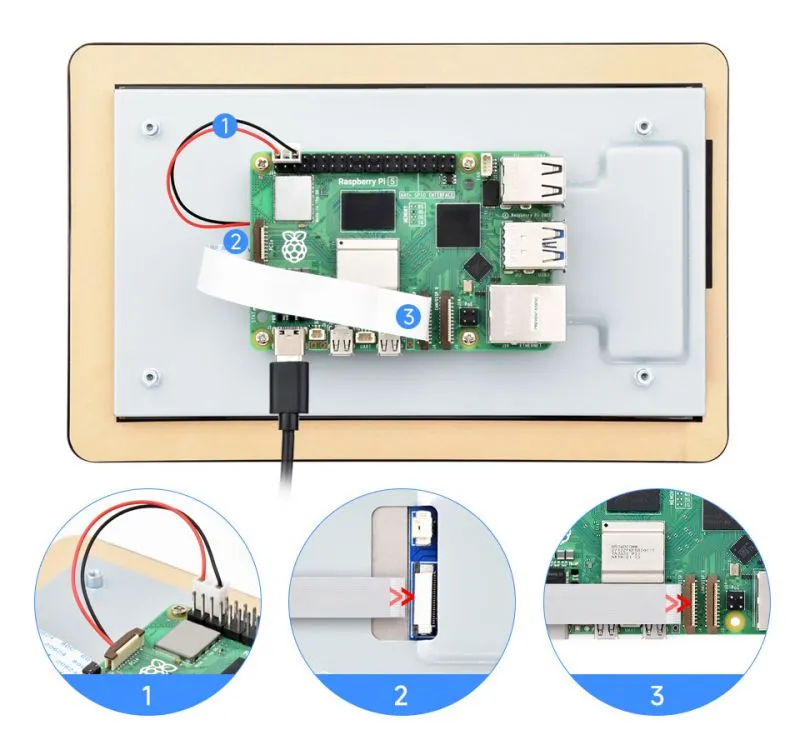
Note: Ensure the DSI cable is connected in the correct direction, and power is supplied via GPIO 5V.
Pi4B/3B+/3B/3A+ Hardware Connection
- Use the "DSI-Cable-12cm" cable to connect the DSI port of the display to the 15PIN DSI port of the Raspberry Pi motherboard.
- Use the "GPIO cable" to connect the power connector of the display to the 5V GND pin header of the Raspberry Pi motherboard.
- Secure the Raspberry Pi to the display with M2.5 screws.
Installation Effect:
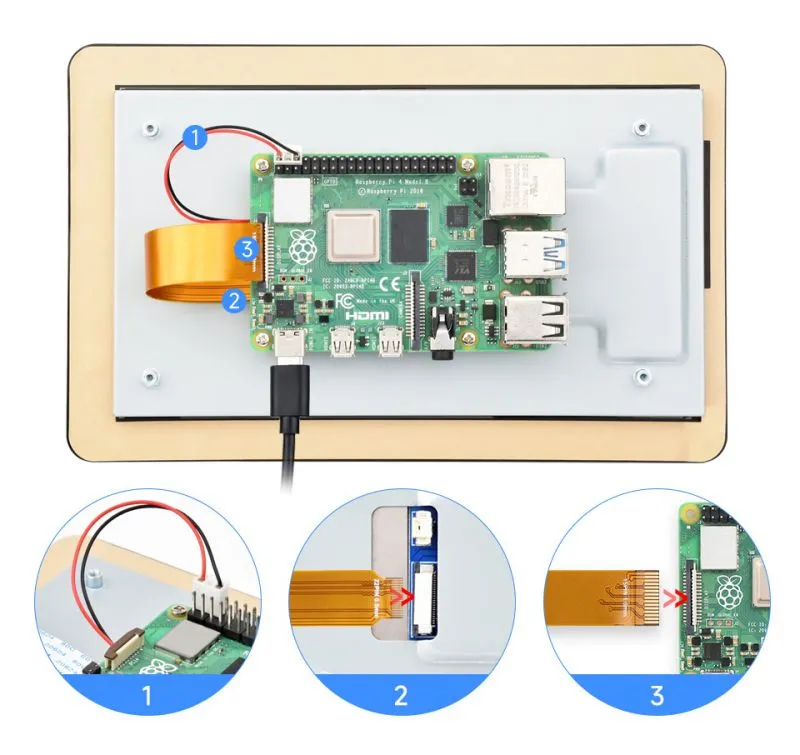
Note: Ensure the DSI cable is connected in the correct direction, and power is supplied via GPIO 5V.
Software Setup
Method 1: Flash Latest Trixie or Bookworm System
- Connect the TF card to a PC, and use the Raspberry Pi Imager to flash the system image.
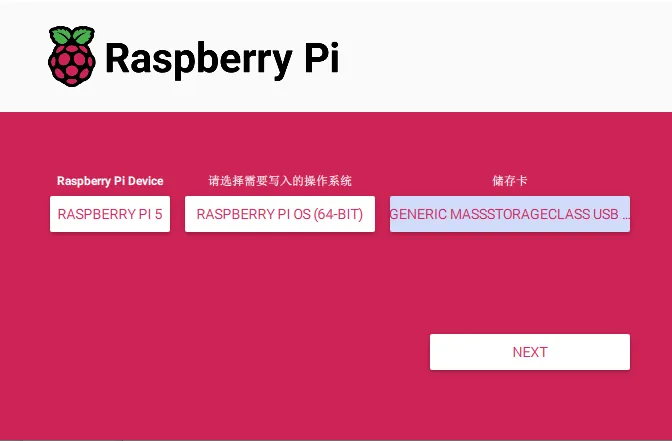
- After the image flashing is completed, open the config.txt file in the root directory of the TF card, add the following code at the end of the config.txt, save and safely eject the TF card.
Note: Since Pi5/CM5/CM4/CM3+/CM3 has two mipi DSI interfaces, please note that the correct DSI interfaces and commands are used, DSI1 is recommended by default.
dtoverlay=vc4-kms-v3d
#DSI1 Use
dtoverlay=vc4-kms-dsi-waveshare-panel-v2,7_0_inch_a
#DSI0 Use
#dtoverlay=vc4-kms-dsi-waveshare-panel-v2,7_0_inch_a,dsi0
- Insert the TF card into the Raspberry Pi, power on the Raspberry Pi, and generally wait for about 30 seconds to enter the display state. The touch function can be used normally after the system boots.
Method 2: Flash Pre-installed Image
- Download and extract the pre-installed image as a .img file 7-DSI-TOUCH-A Pre-installed Image
- After flashing, insert the TF card into the Raspberry Pi and boot it. The display and touch will function normally after about 30 seconds.
Adjust Backlight Brightness
GUI Backlight Adjustment
The following steps are based on the Trixie system:
-
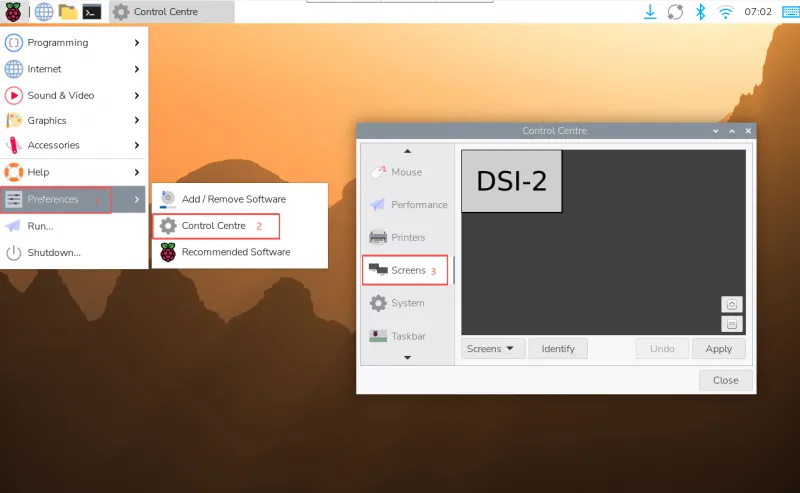
- Click the menu in the upper left corner, then go to Preferences → Control Center, and select Screens;
-
- Go to "Screen" -> "DSI-2" -> "Brightness", check and adjust the desired backlight brightness, and finally click Apply to save the settings.
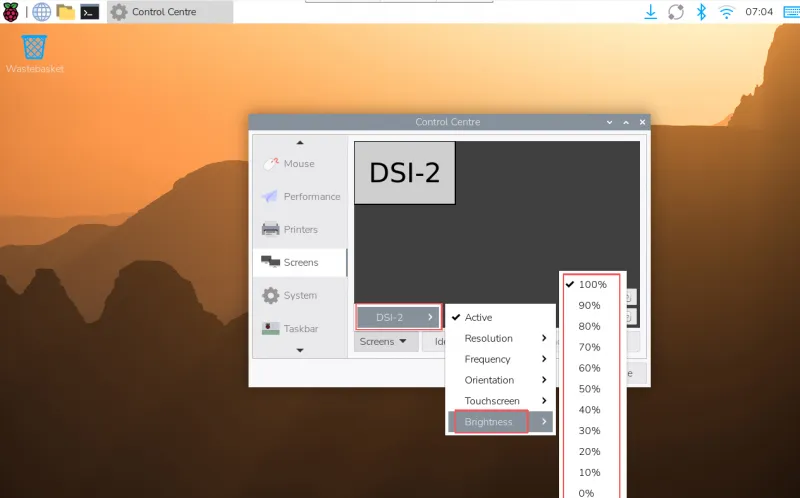
In the Bookworm system, this setting entry is located at Screen Configuration → Screen.
Use Waveshare Backlight Adjustment Application
You can also use the graphical backlight adjustment tool provided by Waveshare (this program is only for Trixie, Bookworm, and Bullseye systems):
wget https://files.waveshare.com/wiki/common/Brightness.zip
unzip Brightness.zip
cd Brightness
sudo chmod +x install.sh
./install.sh
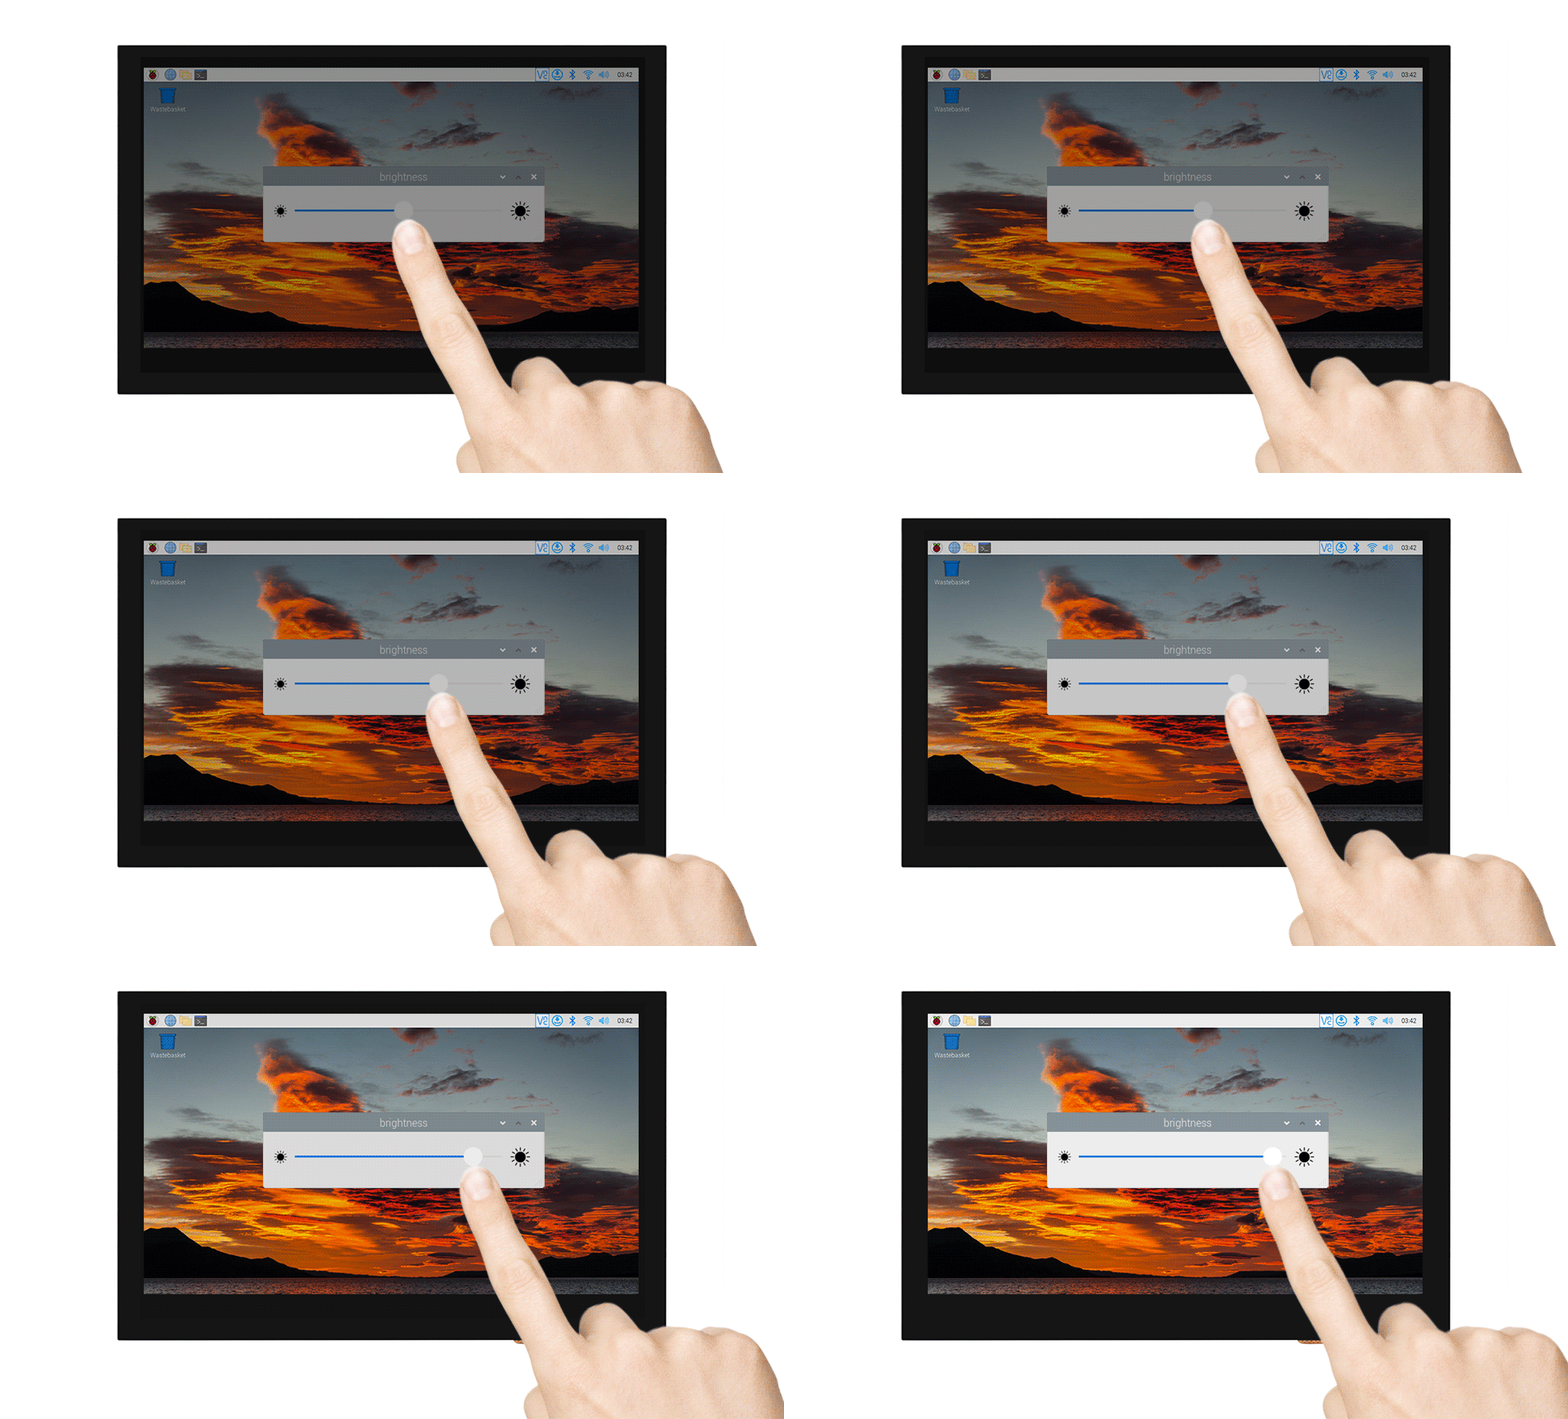
After the installation is completed, you can open the demo in the Start Menu -> Accessories -> Brightness, as shown below:
Adjust Backlight Brightness Using Terminal
echo X | sudo tee /sys/class/backlight/*/brightness
Where X represents any number from 0 to 255. 0 means the darkest backlight, and 255 means the brightest backlight. For example:
echo 100 | sudo tee /sys/class/backlight/*/brightness
echo 0 | sudo tee /sys/class/backlight/*/brightness
echo 255 | sudo tee /sys/class/backlight/*/brightness
Trixie/Bookworm Display Rotation
GUI Interface Rotation
The following steps are based on the Trixie system:
- Click the menu in the upper left corner, then go to Preferences → Control Center, and select Screens;
- Go to Screen - > DSI-1 - > Touchscreen and check "10-0014 Goodix Capacitive TouchScreen";
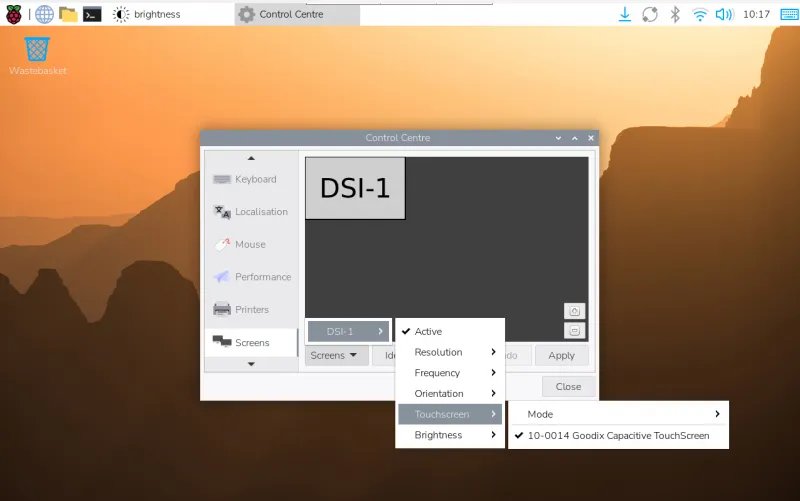
- Go to Screen -> DSI-2 -> Orientation, check the direction you need to rotate, and finally click "Apply" to complete the display and touch synchronous rotation.
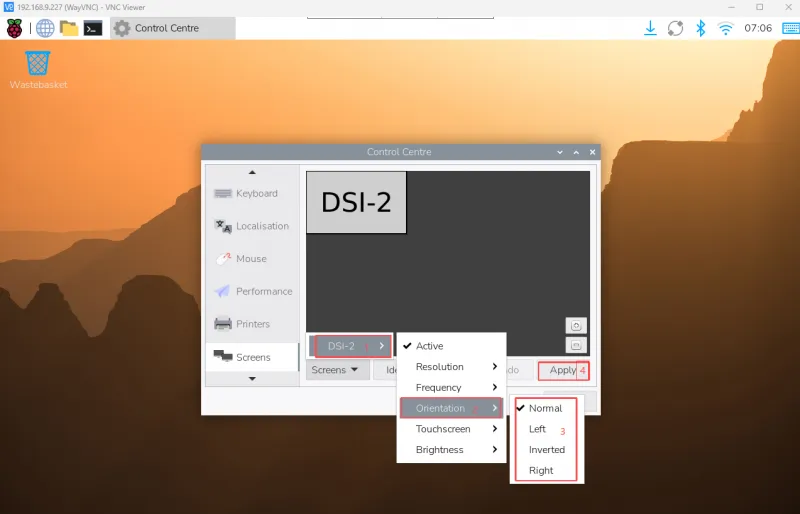
- In the Bookworm system, this setting entry is located at Screen Configuration → Screen.
Note: Only Trixie/Bookworm systems support the above synchronous rotation methods. For Bullseye/Butser systems, after displaying rotation, touch rotation needs to be manually set separately.
lite Version Display Rotation
sudo nano /boot/firmware/cmdline.txt
Add the display resolution and rotation commands at the beginning of the cmdline.txt file to take effect after a reboot
- Rotation commands
# For example, the DSI-1 display has a 720x1280 resolution and the display rotation is 90 degrees
video=DSI-1:720x1280e,rotate=90

# For example, the DSI-1 display has a 720x1280 resolution and the display rotation is 180 degrees
video=DSI-1:720x1280e,rotate=270

# For example, the DSI-1 display has a 720x1280 resolution and the display rotation is 270 degrees
video=DSI-1:720x1280e,rotate=180
Notes:
- Based on actual display resolution.
- If using Pi5/CM5, use the actual DSI display number identified, for example, "DSI-2".
- Unable to rotate DSI monitor and HDMI monitor separately using cmdline.txt. When you use both DSI and HDMI simultaneously, they share the same rotation value.
Touch Rotation
If you use the graphical interface for rotation, you can tick "Touchscreen" in the screen layout editor window to synchronize the touch rotation. Please refer to the previous introduction for how to rotate the screen. For the command line rotation method, please refer to the following text:
- Create a new file named 99-waveshare-touch.rules
sudo nano /etc/udev/rules.d/99-waveshare-touch.rules
- Add the following lines as needed:
# Touch rotate 90°
ENV{ID_INPUT_TOUCHSCREEN}=="1", ENV{LIBINPUT_CALIBRATION_MATRIX}="0 -1 1 1 0 0"

# Touch rotate 270°
ENV{ID_INPUT_TOUCHSCREEN}=="1", ENV{LIBINPUT_CALIBRATION_MATRIX}="0 1 0 -1 0 1"

# Touch rotate 180°
ENV{ID_INPUT_TOUCHSCREEN}=="1", ENV{LIBINPUT_CALIBRATION_MATRIX}="-1 0 1 0 -1 1"

# Save and reboot
sudo reboot
Touch Mode Selection
The systems after Bookworm support two touch modes, which can be switched in the Screen Configuration > Touchscreen menu:
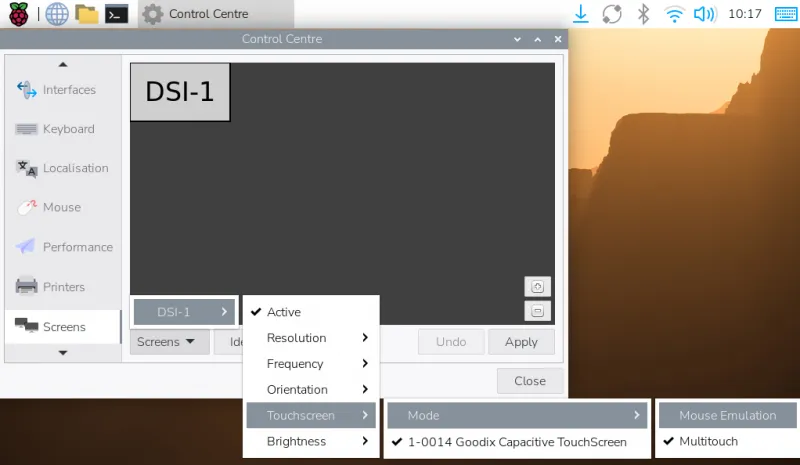
1.Mouse Emulation (default)
 Click = Left mouse button function
 Long press = Right mouse button function
 Supports double-click
 Does not support page swiping and multi-touch functionality
Note: This mode is suitable for scenarios that require mouse operation, such as double clicking to open the file manager and long pressing to achieve right-click functionality.
2.Multitouch
 Supports multi-touch functionality
 Supports swiping pages
 Does not support double-click and long-press right-click functions
Note: This mode is suitable for touch-optimized scenarios, such as web browsing and scrolling lists.
Use Touchscreen Virtual Keyboard
Raspberry Pi OS Bookworm and later versions include Squeekboard on-screen keyboard by default.
- The keyboard system will automatically pop up when text input is available and automatically hide when text input is not available.

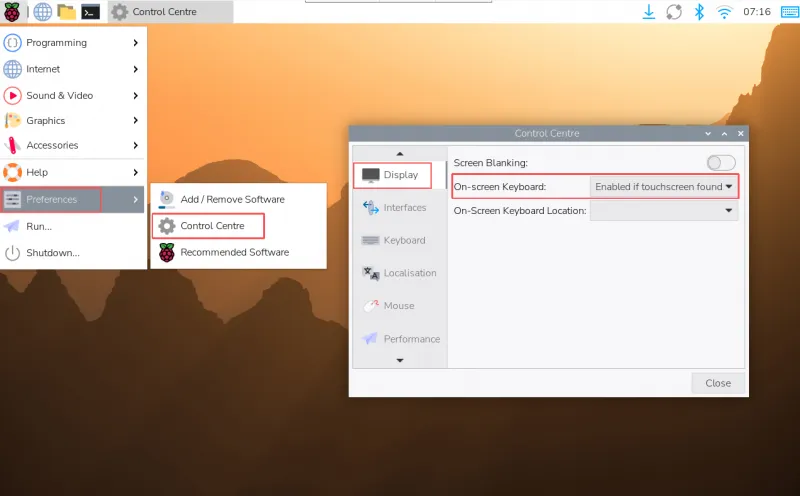
You can also permanently set the display or hiding of the on-screen keyboard through the menu Preferences → Control Centre → Display in the upper left corner.
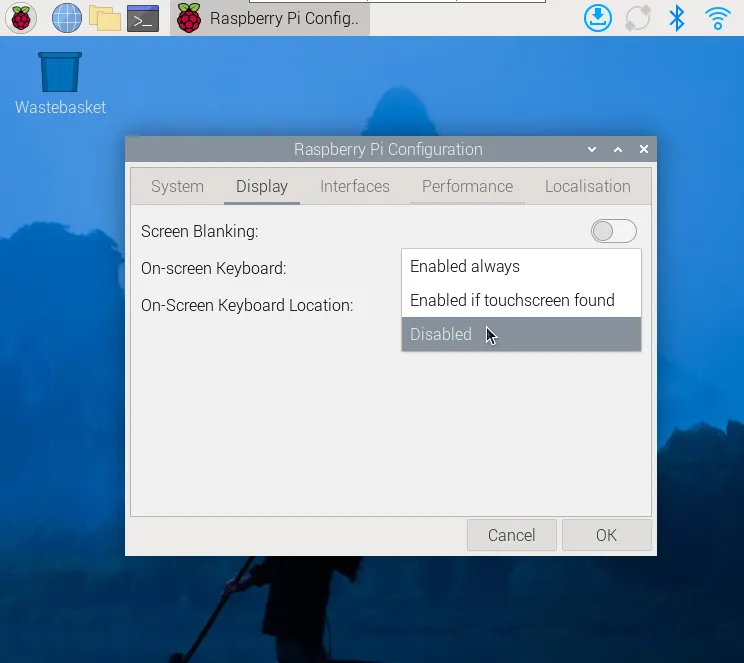
In the Bookworm system, you can set the keyboard to be displayed or hidden via Raspberry Pi Configuration → Display or raspi-config → Display.
Note:
For older versions of Raspberry Pi OS before Bookworm, please use matchbox-keyboard. If you are using the wayfire desktop compositor, use wvkbd.
Working with Luckfox-Omni3576
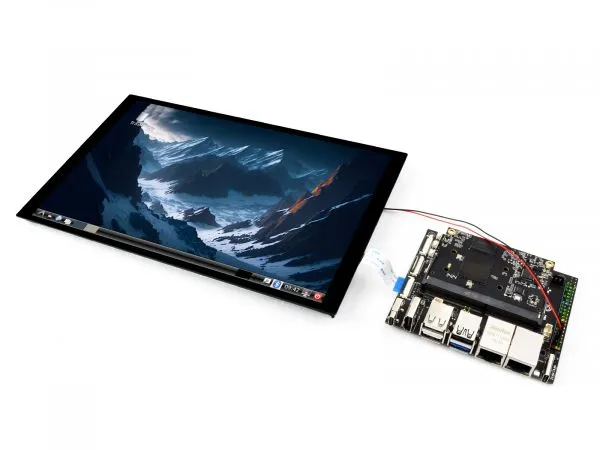
Hardware Connection
-
Use a 22PIN FPC cable to connect the DSI interface of the display to the DSI interface of the Omni3576 mainboard.
-
Use a 2PIN power cable to connect the power port of the display to the 40PIN GPIO interface of the Omni3576 mainboard, as shown in the figure below:
Software Configuration
- Download and flash the image file from the official Luckfox website
- Connect a 5V power supply. Once the system boots, the screen should light up.
View Display Information
- To check the available screen IDs in the current system, run the following command:
sudo cat /sys/kernel/debug/dri/0/summary
- Expected output:
Video Port0: DISABLED
Video Port1: ACTIVE
    Connector:DSI-1     Encoder: DSI-203
        bus_format[100a]: RGB888_1X24
        overlay_mode[0] output_mode[0] SDR[0] color-encoding[BT.709] color-range[Full]
    Display mode: 800x1280p60
        clk[70000] real_clk[69883] type[48] flag[a]
        H: 800 840 860 880
        V: 1280 1300 1304 1324
        Fixed H: 800 840 860 880
        Fixed V: 1280 1300 1304 1324
    Esmart1-win0: ACTIVE
        win_id: 1
        format: XR24 little-endian (0x34325258) pixel_blend_mode[0] glb_alpha[0xff]
        color: SDR[0] color-encoding[BT.601] color-range[Limited]
        rotate: xmirror: 0 ymirror: 0 rotate_90: 0 rotate_270: 0
        csc: y2r[0] r2y[0] csc mode[0]
        zpos: 1
        src: pos[0, 0] rect[800 x 1280]
        dst: pos[0, 0] rect[800 x 1280]
        buf[0]: addr: 0x00000000fe44e000 pitch: 3200 offset: 0
Video Port2: DISABLED
Display Rotation
- Rotation commands:
# Rotate 90 degrees
xrandr -o left

# Rotate 270 degrees
xrandr -o right

# Rotate 180 degrees
xrandr -o inverted

# Rotate 0 degrees (normal)
xrandr -o normal
- These changes are temporary and will reset after reboot. To set rotation at startup, edit the config file:
sudo vim /etc/X11/xorg.conf.d/10-monitor.conf
- Add the following command:
### Valid values for rotation are "normal", "left", "right"
Section "Monitor"
#    Identifier "Default Monitor"
    Identifier  "DSI-1"
    Option      "Rotate" "left"
EndSection
Touchscreen Rotation
- If the display is rotated, but the touch input does not match the orientation, modify the following configuration:
sudo vim /etc/udev/rules.d/99-luckfox-touch.rules
- Add the corresponding line based on your rotation direction, then reboot the device:
90 degrees:
ENV{ID_INPUT_TOUCHSCREEN}=="1", ENV{LIBINPUT_CALIBRATION_MATRIX}="0 -1 1 1 0 0"

180 egrees:
ENV{ID_INPUT_TOUCHSCREEN}=="1", ENV{LIBINPUT_CALIBRATION_MATRIX}="-1 0 1 0 -1 1"

270 degrees:
ENV{ID_INPUT_TOUCHSCREEN}=="1", ENV{LIBINPUT_CALIBRATION_MATRIX}="0 1 0 -1 0 1"
ESP32-P4
Display Driver
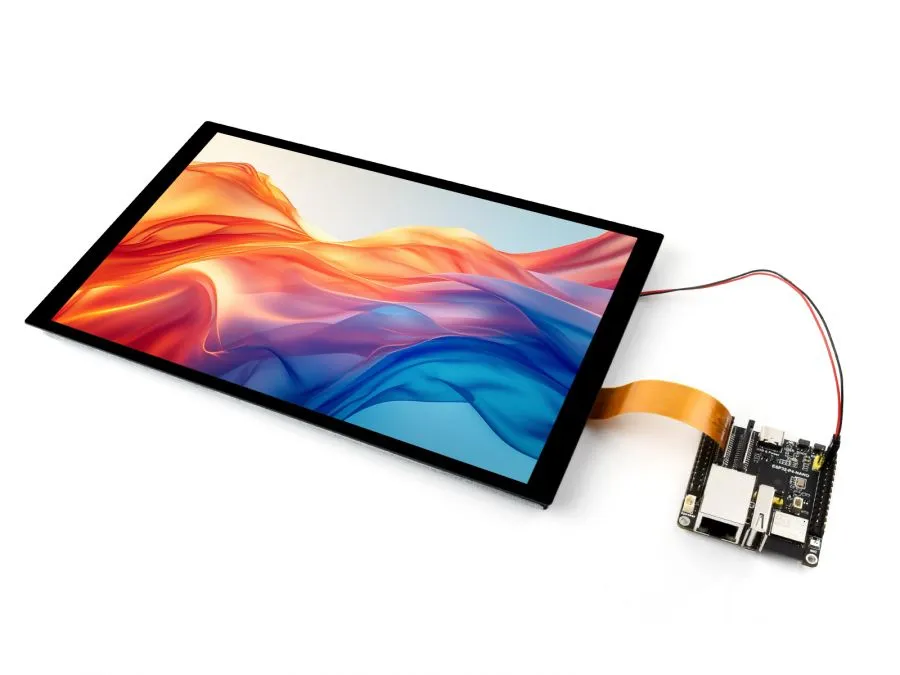
The ESP32-P4-NANO drives the screen via MIPI 2-lane.
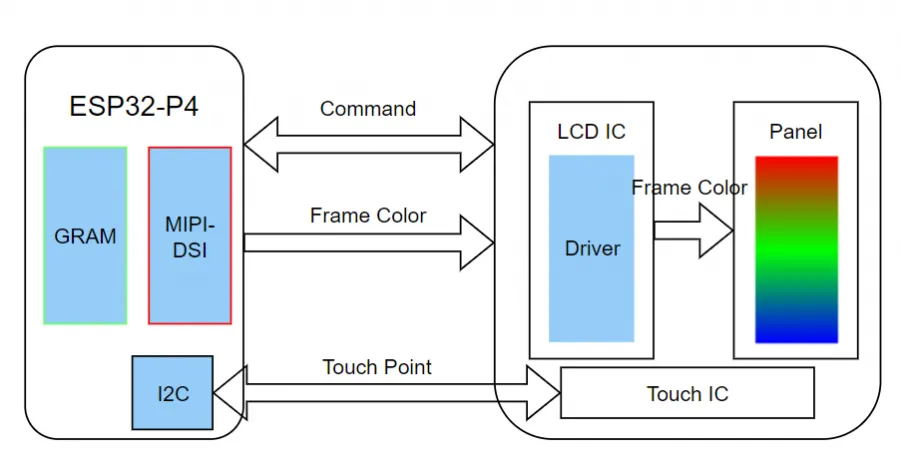
- The screen driver has been packaged as a component, available on the ESP Component Registry Add it to your ESP-IDF project using:
idf.py add-dependency "waveshare/esp_lcd_ili9881c"
- You can also refer to the Wiki for how ESP32-P4-NANO drives the screen:ESP32-P4-NANO_MIPI-DSI
Backlight Control
After connecting the ESP32-P4-NANO using the included FPC cable and power cable, the backlight can be controlled via I2C. Write 0x00~0xFF to register 0x86 of device address 0x45.
If you are using theESP32-P4-NANO BSP Components , you can use the following functions:
bsp_display_brightness_init();   // Initialize backlight
bsp_display_backlight_on();      // Turn on backlight (default full brightness)
bsp_display_backlight_off();     // Turn off backlight
bsp_display_brightness_set(95);  // Set brightness level (0~100)

Resources
2D Drawing
Safety Instructions
To avoid malfunction or damage to this product, please observe the following precautions:
- Before connecting devices, turn off your Raspberry Pi computer and disconnect the external power supply.
- If the cable becomes loose, pull the locking tab on the connector forward, insert the ribbon cable with the metal contacts facing you, then push the locking tab back into place.
- This device should operate in a dry environment within a temperature range of 0–60°C.
- Do not expose the device to water or a humid environment during operation, and do not place it on conductive surfaces.
- Do not expose it to any source of excessive heat.
- Take care not to fold or overstretch the ribbon cable.
- Be cautious when tightening parts. Cross-threading may cause irreparable damage and void the warranty.
- Handle with care to avoid mechanical or electrical damage to the PCB and connectors.
- Store in a cool, dry place.
- Avoid sudden temperature changes, as this may cause moisture buildup inside the device.
- The display surface is fragile and may break.