GPIO
1. GPIO Subsystem
GPIO (General-Purpose Input/Output) is a versatile pin that can be controlled by a microcontroller (MCU) or CPU. It serves various functions, such as detecting high and low signal levels and controlling output. In Linux, GPIO pins can be exported to user space and controlled via the sysfs filesystem. This allows GPIO pins to be used for multiple purposes, including serial communication, I2C, network communication, and voltage detection.
Linux provides a dedicated GPIO subsystem driver framework to handle GPIO devices. Through this framework, users can easily interact with the CPU’s GPIO pins. The driver framework supports basic input and output functionality, including interrupt detection for inputs. This flexibility makes it easy for developers to repurpose GPIO pins for various tasks. For more detailed information on the GPIO subsystem, refer to <Linux kernel source>/Documentation/gpio.
2.GPIO Control (Shell)
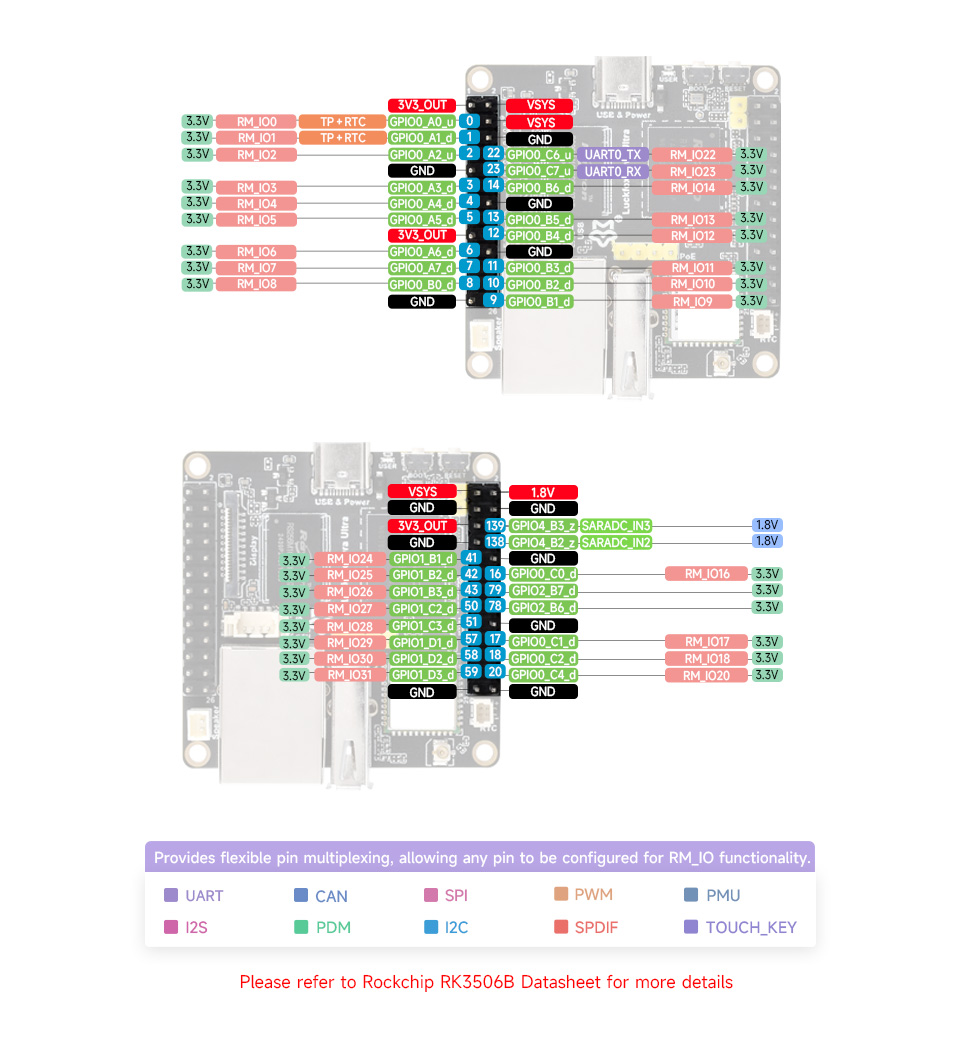
2.1 Pin Layout
To export GPIO pins to user space, the pin number is often required, which can be identified from the interface diagram. Detailed pin functions can be found in the "Data Download" section, including the Datasheet manual.
- Luckfox Lyra Ultra/Ultra W Pin Diagram:
2.2 GPIO Number Calculation
GPIO pin numbers are labeled in the pin diagram, which can be directly used or calculated using the method below.
GPIO has 5 banks: GPIO0~GPIO4, each bank is divided into 4 groups, with a total of 32 pins: A0~A7, B0~B7, C0~C7, D0~D7
GPIO Naming Convention: GPIO pins are named as GPIO{bank}_{group}{X}, such as:
GPIO0_A0 ~ A7
GPIO0_B0 ~ B7
GPIO0_C0 ~ C7
GPIO0_D0 ~ D7

GPIO1_A0 ~ A7
....
GPIO1_D0 ~ D7
....
GPIO4_D0 ~ D7
GPIO Number Calculation Formula:
pin = bank * 32 + number
number = group * 8 + X
pin = bank * 32 + (group * 8 + X)
For example, calculating the pin number for GPIO1_B1:
bank: 1group: 1 (A=0, B=1, C=2, D=3)X: 1
Pin number: 1×32+(1×8+1)=41
2.3 Controlling GPIO via Sysfs
Export GPIO to User Space:
echo 41 > /sys/class/gpio/exportUnexport GPIO from User Space:
echo 41 > /sys/class/gpio/unexport
2.3.1 Device Directory and Attributes
When you write a GPIO number to
/sys/class/gpio/export, the kernel exports this GPIO to user space, making it accessible through the/sys/class/gpio/gpio<N>directory for subsequent operations (e.g., setting direction, setting or reading level).root@luckfox:/home/luckfox# ls /sys/class/gpio
export gpio41 gpiochip0 gpiochip128 gpiochip32 gpiochip509 gpiochip64 gpiochip96 unexportThe
/sys/class/gpio/gpioN(N = 1, 2, 3, 5, ...) directory contains various attributes for GPIO control.cd /sys/class/gpio/gpio41
root@luckfox:/sys/class/gpio/gpio41# ls
active_low device direction edge power subsystem uevent valuedirection: Configure GPIO as input (in) or output (out).value: Read input level or control output level. Writing/reading1sets/reads a high level, while0sets/reads a low level.edge: Configure interrupt trigger type (used only for GPIO set as interrupts):- Rising edge:
rising - Falling edge:
falling - Both edges:
both - Disable interrupt:
none
- Rising edge:
2.3.2 Controlling GPIO Levels
Set Direction
root@luckfox:/sys/class/gpio/gpio41# pwd   # Ensure you're in the target GPIO directory
/sys/class/gpio/gpio41

echo out > direction                      # Set GPIO as output
echo in > direction                       # Set GPIO as input
Control GPIO Level Using the
valueAttribute# Output
echo 1 > value
echo 0 > value
# Input
cat valuePossible Errors
root@luckfox:~# echo 22 > /sys/class/gpio/export
bash: echo: write error: Device or resource busy- This error may occur if the GPIO is already claimed by a driver. Use the following command to check:
mount -t  debugfs none /media
cat /media/gpio

root@luckfox:~# cat /media/gpio
gpiochip0: GPIOs 0-31, parent: platform/ff940000.gpio, gpio0:

gpiochip1: GPIOs 32-63, parent: platform/ff870000.gpio, gpio1:
 gpio-32  (                    |work-led            ) out lo
 gpio-46  (                    |cd                  ) in  lo IRQ ACTIVE LOW

gpiochip2: GPIOs 64-95, parent: platform/ff1c0000.gpio, gpio2:

gpiochip3: GPIOs 96-127, parent: platform/ff1d0000.gpio, gpio3:

gpiochip4: GPIOs 128-159, parent: platform/ff1e0000.gpio, gpio4:- You can also view the output value of IOMUX. If the output is 0, the current pin is multiplexed into the GPIO function, otherwise it is multiplexed into other functions.
# GPO0_C6 is the debug serial port by default

root@luckfox:~# iomux 0 22
mux get (GPIO0-22) = 1
3. Controlling I/O with Python
Toggle an LED Using Python
#!/usr/bin/python3

from periphery import GPIO
import time

LED_Pin = 41

LED_GPIO = GPIO(LED_Pin, "out")

while True:
    try:
        LED_GPIO.write(True)
        time.sleep(0.5)
        LED_GPIO.write(False)
        time.sleep(0.5)
    except KeyboardInterrupt:
        LED_GPIO.write(False)
        break
    except IOError:
        print ("Error")

LED_GPIO.close()
Run the Program
chmod 777 gpio.py
./gpio.py
4.Controlling I/O with C
In the previous section, we demonstrated how to control GPIO using the echo command and Python scripts. Alternatively, you can use the vi editor to modify files directly. However, be mindful of user permissions when making changes. Additionally, C library functions or system calls can be used to read and write device files to control devices. Note that for programs to run on specific embedded systems, cross-compilation tools are typically required to generate executable files compatible with the target development board. Next, let us explore the detailed implementation steps.
4.1 Complete Code
The following program demonstrates how to control the GPIO pin's logic level.
#include <stdio.h>
#include <stdlib.h>
#include <unistd.h>

int main() {
    int gpio_pin;

    printf("Please enter the GPIO pin number: ");
    scanf("%d", &gpio_pin);

    FILE *export_file = fopen("/sys/class/gpio/export", "w");
    if (export_file == NULL) {
        perror("Failed to open GPIO export file");
        return -1;
    }
    fprintf(export_file, "%d", gpio_pin);
    fclose(export_file);

    char direction_path[50];
    snprintf(direction_path, sizeof(direction_path), "/sys/class/gpio/gpio%d/direction", gpio_pin);
    FILE *direction_file = fopen(direction_path, "w");
    if (direction_file == NULL) {
        perror("Failed to open GPIO direction file");
        return -1;
    }
    fprintf(direction_file, "out");
    fclose(direction_file);

    char value_path[50];
    char cat_command[100];
    snprintf(value_path, sizeof(value_path), "/sys/class/gpio/gpio%d/value", gpio_pin);
    snprintf(cat_command, sizeof(cat_command), "cat %s", value_path);
    FILE *value_file = fopen(value_path, "w");
    if (value_file == NULL) {
        perror("Failed to open GPIO value file");
        return -1;
    }

    for (int i = 0; i < 3; i++) {
        fprintf(value_file, "1");
        fflush(value_file);

        system(cat_command);
        sleep(1);

        fprintf(value_file, "0");
        fflush(value_file);

        system(cat_command);
        sleep(1);
    }

    fclose(value_file);

    FILE *unexport_file = fopen("/sys/class/gpio/unexport", "w");
    if (unexport_file == NULL) {
        perror("Failed to open GPIO unexport file");
        return -1;
    }
    fprintf(unexport_file, "%d", gpio_pin);
    fclose(unexport_file);

    return 0;
}
4.2 Exporting Pins to User Space
This code reads the pin number input by the user, opens the /sys/class/gpio/export file, and writes the pin number to export the GPIO pin for user-space operations.
printf("Please enter the GPIO pin number: ");
scanf("%d", &gpio_pin);

FILE *export_file = fopen("/sys/class/gpio/export", "w");
if (export_file == NULL) {
    perror("Failed to open GPIO export file");
    return -1;
}
fprintf(export_file, "%d", gpio_pin);
fclose(export_file);
4.3 Configuring GPIO Direction
This code opens the /sys/class/gpio/gpiox/direction file and writes "out" to configure the GPIO pin as output. To configure it as input, write "in".
char direction_path[50];
snprintf(direction_path, sizeof(direction_path), "/sys/class/gpio/gpio%d/direction", gpio_pin);
FILE *direction_file = fopen(direction_path, "w");
if (direction_file == NULL) {
    perror("Failed to open GPIO direction file");
    return -1;
}
fprintf(direction_file, "out");
fclose(direction_file);
4.4 Controlling Pin Output Levels
This code controls the GPIO pin's logic level. First, the /sys/class/gpio/gpiox/value file is opened, which allows setting the GPIO pin's value. Inside a loop, the code alternately writes "1" and "0" to the file to toggle the pin state. The cat command is used to check if the value was written successfully.
Note: Standard C libraries often use buffers to optimize file operations. This means that even though fprintf is called to write data, the data might be temporarily stored in a buffer and not immediately written to the file. To ensure data is written immediately, you can use the fflush function to flush the buffer or follow the pattern of opening, writing, and closing the file for each operation.
char value_path[50];
char cat_command[100];
snprintf(value_path, sizeof(value_path), "/sys/class/gpio/gpio%d/value", gpio_pin);
snprintf(cat_command, sizeof(cat_command), "cat %s", value_path);
FILE *value_file = fopen(value_path, "w");
if (value_file == NULL) {
    perror("Failed to open GPIO value file");
    return -1;
}

for (int i = 0; i < 3; i++) {
    fprintf(value_file, "1");
    fflush(value_file);

    system(cat_command);
    sleep(1);

    fprintf(value_file, "0");
    fflush(value_file);

    system(cat_command);
    sleep(1);
}

fclose(value_file);
4.5 Unexporting Pins
This code opens the /sys/class/gpio/unexport file and writes the GPIO pin number to unexport the pin from user space.
FILE *unexport_file = fopen("/sys/class/gpio/unexport", "w");
if (unexport_file == NULL) {
    perror("Failed to open GPIO unexport file");
    return -1;
}
fprintf(unexport_file, "%d", gpio_pin);
fclose(unexport_file);
4.6 Cross Compilation
First, set the environment variables for the cross-compilation toolchain. If you want the changes to persist, edit the configuration file (e.g.,
.bashrcor.profile).vim ~/.bashrcAdd the toolchain path by appending the cross-compilation toolchain's path to the system's
PATHenvironment variable:export PATH=/home/ubuntu/luckfox-lyra-sdk/prebuilts/gcc/linux-x86/arm/gcc-arm-10.3-2021.07-x86_64-arm-none-linux-gnueabihf/bin:$PATH- Note: Replace with the actual SDK path as applicable.
Update the environment variables to apply the changes:
source ~/.bashrcCompile the program using the cross-compiler:
arm-none-linux-gnueabihf-gcc gpio.c -o gpioFinally, transfer the executable file to the development board.
scp gpio root@192.168.10.103:/root
或
adb push gpio /- Note: Replace with the actual IP address as applicable.
Run the program. Modify the permissions of the
gpiofile as needed before executing.# chmod 777 gpio
# ./gpioExperiment Observation,Successfully achieve GPIO pin toggling:
