LVGL User Guide
In this article, we will introduce the basic concepts of Framebuffer (FB) devices and the LittlevGL (LVGL) graphics user interface library. Using the Luckfox Pico Plus development board and the Pico-LCD-1.3 display, we will demonstrate how to configure the FB device, create applications with the LVGL library, and finally display the interface on the LCD.
Luckfox Pico and Luckfox Pico Plus can enable the FB device driver by flashing the latest image provided in the cloud drive and configuring it with the Luckfox-config tool. Since the Luckfox Pico Mini cannot be directly connected to the Pico-1.3-LCD, it is not included in the Luckfox-config settings. You can download the following images for use:
| Version | Description | Download |
|---|---|---|
| Luckfox Pico Mini A/B | Firmware with FB support | Baidu Netdisk Link |
| LVGL.zip | LVGL test program | LVGL.zip |
Quick Start
-
Download the package. Its contents:
LVGL/├── image ------------------------------- Image files├── lvgl_demo --------------------------- Project directory├── demo -------------------------------- Executable file└── rv1103g-luckfox-pico-plus.dts ------- Device tree file└── rv1103g-luckfox-pico-mini-a.dts / rv1103g-luckfox-pico-mini-b.dts ---- Device tree files -
Transfer the
demofrom the compressed package to the development board viaadborscp, then run the program:chmod +x demo./demo -
If you want to modify and compile the program yourself, you can change the CC in the Makefile to your SDK toolchain path, for example:
CC = /home/luckfox/luckfox-pico/tools/linux/toolchain/arm-rockchip830-linux-uclibcgnueabihf/bin/arm-rockchip830-linux-uclibcgnueabihf-gccmake- After compilation, an executable file demo will be generated in the /build/bin directory. Copy this file to the development board to run directly.
1. Framebuffer (FB) Device
In the Linux kernel, the two commonly used graphics display driver frameworks are DRM (Direct Rendering Manager) and FBDEV (Framebuffer Device). In the Framebuffer driver framework, users can directly access the video memory of the display device through the /dev/fbX interface, performing standard file operations such as read, write, and ioctl. User-space programs can use these device nodes and ioctl calls to control the framebuffer device. Framebuffer provides basic 2D graphics operations such as drawing points, lines, and rectangles, and supports multiple pixel formats and resolutions.
1.1 Kernel Settings
For detailed usage of kernel setup, refer to the SDK Environment Deployment section.
-
Enter the kernel directory.
cd /SDK目录/sysdrv/source/kernelcp ./arch/arm/configs/luckfox_rv1106_linux_defconfig .configmake ARCH=arm menuconfig -
Enable FB-related drivers in the kernel:
CONFIG_VT_CONSOLE=yCONFIG_FRAMEBUFFER_CONSOLE=yCONFIG_FONTS=y -
Save the configuration:
make ARCH=arm savedefconfigcp defconfig arch/arm/configs/luckfox_rv1106_linux_defconfig
1.2 Device Tree File
To drive the LCD, in addition to enabling FB-related drivers in the kernel, you must also ensure that all the pins communicating with the LCD are functioning correctly. Before this, we need to confirm the connection pins between the Pico-LCD-1.3 and Luckfox Pico Pro/Max. The device tree is used to describe hardware resources, so the device tree needs to be modified accordingly.
1.2.1 Related Pins
It should be noted that the Pico-LCD-1.3 internal circuit includes a forced level conversion, converting the input voltage (VSYS) into a stable 3.3V supply, so VSYS can be used as the power input. For more pin details, please refer to the Wiki tutorial of Pico-LCD-1.3.
| LCD | Luckfox Pico Plus | Function |
|---|---|---|
| VCC | VSYS | Power input |
| GND | GND | Ground |
| DIN | SPI0_MOSI_M0 | SPI MOSI pin, data input from device |
| CLK | SPI0_CLK_M0 | SPI SCK pin, clock input from device |
| CS | SPI0_CS0_M0 | SPI chip select (active low) |
| DC | GPIO1_A2_d | Data/command control (high: data, low: cmd) |
| RST | GPIO1_C3_d | External reset (active low) |
| BL | GPIO0_A4_d | Backlight control |
| A | GPIO1_D1_d | User button A |
| B | GPIO3_A7_d | User button B |
| X | GPIO3_A4_d | User button X |
| Y | GPIO3_A3_d | User button Y |
| UP | GPIO1_C7_d | Joystick up |
| DOWM | GPIO3_A5_d | Joystick down |
| LEFT | GPIO3_A6_d | Joystick left |
| RIGHT | GPIO3_A2_d | Joystick right |
| CTRL | GPIO1_C6_d | Joystick press |
| LCD | Luckfox Pico Mini A/B | Function |
|---|---|---|
| VCC | 3V3(OUT) | Power input |
| GND | GND | Ground |
| DIN | SPI0_MOSI_M0 | SPI MOSI pin, data input from device |
| CLK | SPI0_CLK_M0 | SPI SCK pin, clock input from device |
| CS | SPI0_CS0_M0 | SPI chip select (active low) |
| DC | GPIO1_C4_d | Data/command control (high: data, low: cmd) |
| RST | GPIO1_C3_d | External reset (active low) |
| BL | GPIO1_C5_d | Backlight control |
1.2.2 Device Tree Configuration
-
In the default device tree, the default function of GPIO1_C7_d is PWM. In the program, however, we want to detect button status by reading the pin level, so this pin needs to be configured as a general-purpose IO. Open:
<SDK Path>/sysdrv/source/kernel/arch/arm/boot/dts/rv1106g-luckfox-pico-pro-max.dts/{gpio1pc7:gpio1pc7 {compatible = "regulator-fixed";pinctrl-names = "default";pinctrl-0 = <&gpio1_pc7>;regulator-name = "gpio1_pc7";regulator-always-on;};};&pinctrl {gpio1-pc7 {gpio1_pc7:gpio1-pc7 {rockchip,pins = <1 RK_PC7 RK_FUNC_GPIO &pcfg_pull_up>;};};};- For the full device tree, please download from the provided link. Only a partial example is shown here.
-
The SPI configuration requires disabling spidev@0, otherwise the fb cannot be initialized.
/**********SPI**********//* SPI0_M0 */&spi0 {status = "okay";pinctrl-0 = <&spi0m0_clk &spi0m0_mosi &spi0m0_cs0>;spidev@0 {status = "disabled";spi-max-frequency = <50000000>;};fbtft@0{compatible = "sitronix,st7789v";reg = <0>;spi-max-frequency = <20000000>;fps = <30>;buswidth = <8>;debug = <0x7>;led-gpios = <&gpio1 RK_PC3 GPIO_ACTIVE_LOW>;//BLdc = <&gpio1 RK_PC4 GPIO_ACTIVE_HIGH>; //DCreset = <&gpio1 RK_PC5 GPIO_ACTIVE_LOW>; //RES};}; -
After modifying the device tree, compile the image and test with:
cat /dev/urandom > /dev/fb0 # Random pattern on screencat /dev/zero > /dev/fb0 # Clear screen
2.Porting LVGL(PC)
2.1 LittlevGL Overview
LVGL (LittlevGL) is a lightweight, open-source embedded graphics library focused on providing flexible and easy-to-use graphical user interface (GUI) solutions. With LVGL, developers can create rich graphical interfaces, including common GUI components such as buttons, sliders, and text boxes, as well as features like animations and touch interactions. As an open-source library, LVGL is widely used across various embedded systems and is favored by developers for its lightweight nature. LVGL supports multiple display devices, including the Framebuffer, allowing developers to easily build attractive user interfaces on embedded systems.
2.2 Required Resources
| Resource Name | Repository Address | Description |
|---|---|---|
| lvgl | https://github.com/lvgl/lvgl.git | Source code of LVGL graphics controls and a few examples |
| lv_drivers | https://github.com/lvgl/lv_drivers.git | Driver interface source code for driving LVGL graphics interface |
| lv_demos | https://github.com/lvgl/lv_demos.git | LVGL examples |
| lv_port_linux_frame_buffer | https://github.com/lvgl/lv_port_linux_frame_buffer.git | Interface for adapting to Linux systems with Framebuffer |
2.3 Fetch Resources
-
Create a folder in the root directory to store the official source code:
luckfox@luckfox:~$ mkdir lvglluckfox@luckfox:~$ cd lvgl -
Fetch the resources:
git clone -b v8.1.0 https://github.com/lvgl/lvgl.gitgit clone -b v8.1.0 https://github.com/lvgl/lv_drivers.gitgit clone -b v8.1.0 https://github.com/lvgl/lv_demos.gitgit clone --branch release/v8.2 --single-branch https://github.com/lvgl/lv_port_linux_frame_buffer.git -
After successful fetching, create a project directory in the root directory and create a project:
luckfox@luckfox:~$ mkdir -p lvgl_project/project_01luckfox@luckfox:~$ cd lvgl_project/project_01/
2.4 Copy Files
- Copy the lvgl and lv_drivers directories from the root directory
- Copy main.c and Makefile from lv_port_linux_frame_buffer
- Copy lv_conf_template.h from lvgl and rename it to lv_conf.h
- Copy lv_drv_conf_template.h from lv_drivers and rename it to lv_drv_conf.h
cp -r ~/lvgl/lvgl ./
cp -r ~/lvgl/lv_drivers ./
cp ~/lvgl/lvgl/lv_conf_template.h ./lv_conf.h
cp ~/lvgl/lv_drivers/lv_drv_conf_template.h  ./lv_drv_conf.h
cp ~/lvgl/lv_port_linux_frame_buffer/main.c ./
cp ~/lvgl/lv_port_linux_frame_buffer/Makefile ./
Check the project_01 project directory:
luckfox@luckfox:~/lvgl_project/project_01$ ls -l
total 64
-rw-rw-r--  1 luckfox luckfox 29023 12月 27 19:14 lv_conf.h
drwxrwxr-x 12 luckfox luckfox  4096 12月 27 19:14 lv_drivers
-rw-rw-r--  1 luckfox luckfox 15184 12月 27 19:14 lv_drv_conf.h
drwxrwxr-x 12 luckfox luckfox  4096 12月 27 19:14 lvgl
-rw-rw-r--  1 luckfox luckfox  2350 12月 27 19:14 main.c
-rw-rw-r--  1 luckfox luckfox  2321 12月 27 19:14 Makefile
2.5 Modify Files
lv_conf.h
-
Enable
Change
#if 0to#if 1at the beginning/* clang-format off */#if 1 /*Set it to "1" to enable content*/ -
Allocate VRAM
Enable
LV_MEM_CUSTOMand choose to allocate VRAM manually/*1: use custom malloc/free, 0: use the built-in `lv_mem_alloc()` and `lv_mem_free()`*/#define LV_MEM_CUSTOM 1 -
Refresh time
Change the original 30ms to 10ms
/*Default display refresh period. LVG will redraw changed areas with this period time*/#define LV_DISP_DEF_REFR_PERIOD 10 /*[ms]*//*Input device read period in milliseconds*/#define LV_INDEV_DEF_READ_PERIOD 10 /*[ms]*/ -
TICK Configuration
Enable
LV_TICK_CUSTOMand choose to customize the Tick timer configuration function in the applicationOriginal content:
#define LV_TICK_CUSTOM 0#if LV_TICK_CUSTOM#define LV_TICK_CUSTOM_INCLUDE "Arduino.h" /*Header for the system time function*/#define LV_TICK_CUSTOM_SYS_TIME_EXPR (millis()) /*Expression evaluating to current system time in ms*/#endif /*LV_TICK_CUSTOM*/Change to:
#define LV_TICK_CUSTOM 1#if LV_TICK_CUSTOM#define LV_TICK_CUSTOM_INCLUDE <stdint.h> /*Header for the system time function*/#define LV_TICK_CUSTOM_SYS_TIME_EXPR (custom_tick_get()) /*Expression evaluating to current system time in ms*/#endif /*LV_TICK_CUSTOM*/
lv_drv_conf.h
-
Enable
Change
#if 0to#if 1at the beginning/* clang-format off */#if 1 /*Set it to "1" to enable the content*/ -
Support devices
Enable
USE_FBDEVto support Framebuffer devices/*-----------------------------------------* Linux frame buffer device (/dev/fbx)*-----------------------------------------*/#ifndef USE_FBDEV# define USE_FBDEV 1#endif#if USE_FBDEV# define FBDEV_PATH "/dev/fb0"#endif
Makefile
Replace the original content of the Makefile, and modify <SDK Directory\> in the Makefile to your SDK path, e.g., /home/luckfox/luckfox-pico/
#
# Makefile
#
CC = <SDK Directory>/tools/linux/toolchain/arm-rockchip830-linux-uclibcgnueabihf/bin/arm-rockchip830-linux-uclibcgnueabihf-gcc
LVGL_DIR_NAME 	?= lvgl
LVGL_DIR 		?= .

WARNINGS		:= -Wall -Wshadow -Wundef -Wmissing-prototypes -Wno-discarded-qualifiers -Wall -Wextra -Wno-unused-function -Wno-error=strict-prototypes -Wpointer-arith \
					-fno-strict-aliasing -Wno-error=cpp -Wuninitialized -Wmaybe-uninitialized -Wno-unused-parameter -Wno-missing-field-initializers -Wtype-limits -Wsizeof-pointer-memaccess \
					-Wno-format-nonliteral -Wno-cast-qual -Wunreachable-code -Wno-switch-default -Wreturn-type -Wmultichar -Wformat-security -Wno-ignored-qualifiers -Wno-error=pedantic \
					-Wno-sign-compare -Wno-error=missing-prototypes -Wdouble-promotion -Wclobbered -Wdeprecated -Wempty-body -Wtype-limits -Wshift-negative-value -Wstack-usage=2048 \
					-Wno-unused-value -Wno-unused-parameter -Wno-missing-field-initializers -Wuninitialized -Wmaybe-uninitialized -Wall -Wextra -Wno-unused-parameter \
					-Wno-missing-field-initializers -Wtype-limits -Wsizeof-pointer-memaccess -Wno-format-nonliteral -Wpointer-arith -Wno-cast-qual -Wmissing-prototypes \
					-Wunreachable-code -Wno-switch-default -Wreturn-type -Wmultichar -Wno-discarded-qualifiers -Wformat-security -Wno-ignored-qualifiers -Wno-sign-compare -std=c99
CFLAGS 			?= -O3 -g0 -I$(LVGL_DIR)/ $(WARNINGS)
LDFLAGS 		?= -lm
BIN 			= demo
BUILD_DIR 		= ./build
BUILD_OBJ_DIR 	= $(BUILD_DIR)/obj
BUILD_BIN_DIR 	= $(BUILD_DIR)/bin

prefix 			?= /usr
bindir 			?= $(prefix)/bin

#Collect the files to compile
MAINSRC = $(wildcard ./*.c)

include $(LVGL_DIR)/lvgl/lvgl.mk
include $(LVGL_DIR)/lv_drivers/lv_drivers.mk

# CSRCS 			+=$(LVGL_DIR)/mouse_cursor_icon.c

OBJEXT 			?= .o

AOBJS 			= $(ASRCS:.S=$(OBJEXT))
COBJS 			= $(CSRCS:.c=$(OBJEXT))

MAINOBJ 		= $(MAINSRC:.c=$(OBJEXT))

SRCS 			= $(ASRCS) $(CSRCS) $(MAINSRC)
OBJS 			= $(AOBJS) $(COBJS) $(MAINOBJ)
TARGET 			= $(addprefix $(BUILD_OBJ_DIR)/, $(patsubst ./%, %, $(OBJS)))

## MAINOBJ -> OBJFILES

all: default

$(BUILD_OBJ_DIR)/%.o: %.c
	@mkdir -p $(dir $@)
	@$(CC)  $(CFLAGS) -c $< -o $@
	@echo "CC $<"

default: $(TARGET)
	@mkdir -p $(dir $(BUILD_BIN_DIR)/)
	$(CC) -o $(BUILD_BIN_DIR)/$(BIN) $(TARGET) $(LDFLAGS)

clean:
	rm -rf $(BUILD_DIR)

install:
	install -d $(DESTDIR)$(bindir)
	install $(BUILD_BIN_DIR)/$(BIN) $(DESTDIR)$(bindir)

uninstall:
	$(RM) -r $(addprefix $(DESTDIR)$(bindir)/,$(BIN))
main.c
-
Comment out header files
// #include "lvgl/demos/lv_demos.h"// #include "lv_drivers/indev/evdev.h" -
Modify screen resolution
#define DISP_BUF_SIZE (240 * 240)...disp_drv.hor_res = 240;disp_drv.ver_res = 240; -
Comment out the following code
No external input device, comment out the following code:
evdev_init();static lv_indev_drv_t indev_drv_1;lv_indev_drv_init(&indev_drv_1); /*Basic initialization*/indev_drv_1.type = LV_INDEV_TYPE_POINTER;/*This function will be called periodically (by the library) to get the mouse position and state*/indev_drv_1.read_cb = evdev_read;lv_indev_t *mouse_indev = lv_indev_drv_register(&indev_drv_1);Mouse style not ported, comment out the following code:
/*Set a cursor for the mouse*/LV_IMG_DECLARE(mouse_cursor_icon)lv_obj_t * cursor_obj = lv_img_create(lv_scr_act()); /*Create an image object for the cursor */lv_img_set_src(cursor_obj, &mouse_cursor_icon); /*Set the image source*/lv_indev_set_cursor(mouse_indev, cursor_obj); /*Connect the image object to the driver*/Not using official demo, comment out the following code:
/*Create a Demo*/lv_demo_widgets();
2.6 Compile and Run
After modifying the above files, enter the make command in the command line to compile the project. After compiling, an executable file demo will be generated in the /build/bin directory. The compiled directory structure is as follows:
project_01/
├── build
│   ├── bin
│   │	└── demo
│   └── obj
│		├── lv_drivers
│		├── lvgl
│		└── ...
├── lv_conf.h
├── lv_drivers
├── lv_drv_conf.h
├── lvgl
├── main.c
└── Makefile
You only need to copy demo to the development board to run the program. You can later modify the main.c file and add files according to your requirements to achieve the desired display effect.
2.7 Official Demo
If you need to use the examples provided by the official, follow these steps:
-
Copy files
-
Copy the lv_demos directory from the root directory
-
Copy lv_demo_conf_template.h from lv_demos and rename it to lv_demo_conf.h
cp -r ~/lvgl/lv_demos ./cp ~/lvgl/lv_demos/lv_demo_conf_template.h ./lv_demo_conf.h
-
-
Modify lv_demo_conf.h
-
Enable
/* clang-format off */#if 1 /*Set it to "1" to enable the content*/ -
Enable widget demo
/*Show some widget*/#define LV_USE_DEMO_WIDGETS 1
-
-
Modify lv_conf.h
Enable
LV_FONT_MONTSERRAT_12andLV_FONT_MONTSERRAT_16#define LV_FONT_MONTSERRAT_12 1#define LV_FONT_MONTSERRAT_16 1 -
Makefile
include $(LVGL_DIR)/lvgl/lvgl.mkinclude $(LVGL_DIR)/lv_drivers/lv_drivers.mk#Add lv_demo.mk:include $(LVGL_DIR)/lv_demos/lv_demo.mk -
Modify main.c
-
Add header files
#include "lv_demos/lv_demo.h" -
Call interface functions
lv_demo_widgets();while(1) {lv_timer_handler();usleep(5000);}
-
3. Example Program
3.1 Project Directory
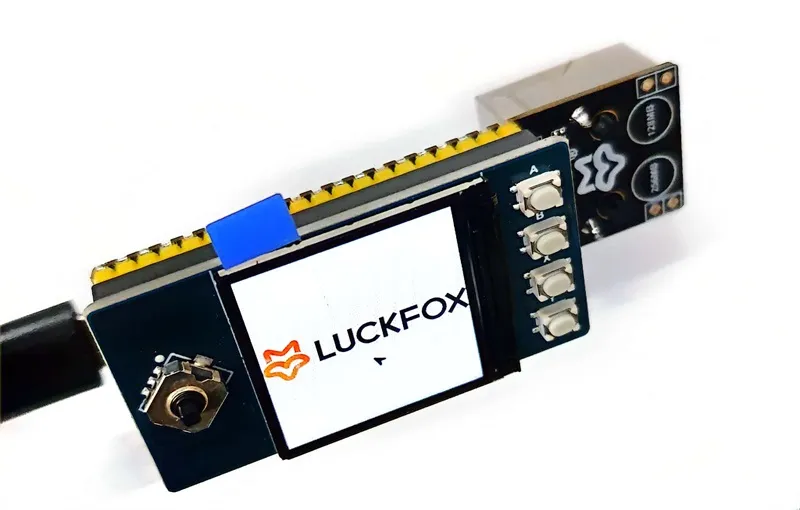
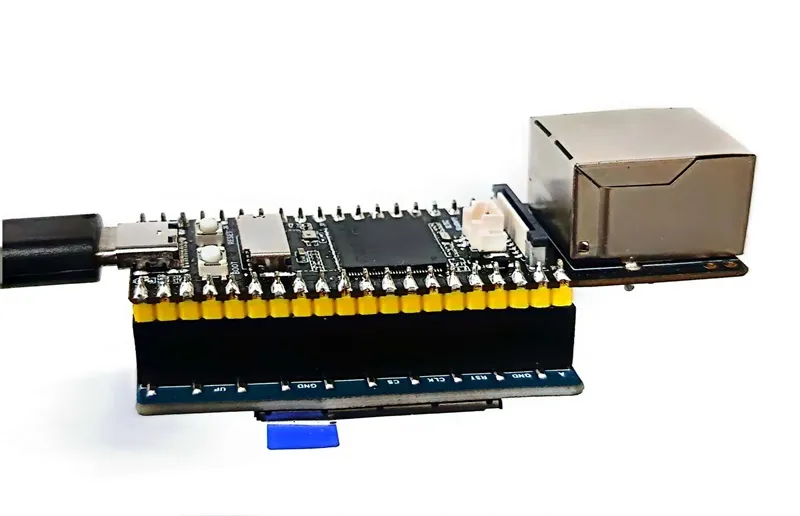
After burning the image and creating the project files, you can start modifying the program yourself. Here, we use the Luckfox Pico Pro/Max development board and Pico-LCD-1.3 display screen to implement interface display. The modified project directory is as follows:
lvgl_demo/
├── cat.c -------------------- File obtained after converting the image
├── galaxy.c ----------------- File obtained after converting the image
├── Luckfox.c ---------------- File obtained after converting the image
├── saint.c ------------------ File obtained after converting the image
├── main.c ------------------- Main program file
├── Debug.h ------------------ Debug information header file
├── DEV_Config.c ------------- GPIO control interface file
├── DEV_Config.h ------------- GPIO control interface header file
├── sysfs_gpio.c ------------- sysfs GPIO control implementation file
├── sysfs_gpio.h ------------- sysfs GPIO control header file
└── ...
3.2 Display Custom Images
-
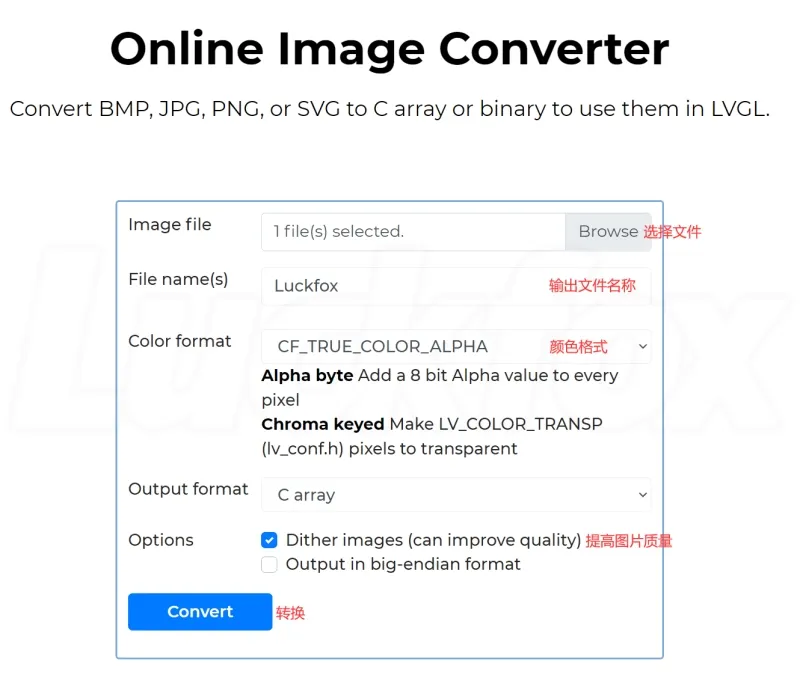
Convert online
-
Convert images
Note that for PNG images, choose the CF_TRUE_COLOR_ALPHA color format, and for JPG images, choose CF_TRUE_COLOR. After conversion, copy the C file to the project directory
-
Modify main.c
Add declarations
LV_IMG_DECLARE(Luckfox);Display images
lv_obj_t *scr = lv_disp_get_scr_act(NULL);lv_obj_t *img = lv_img_create(scr);lv_show_img(img,Luckfox);lv_obj_center(img);
3.3 Main Program
main.c
#include "lvgl/lvgl.h"
#include "DEV_Config.h"
#include "lv_drivers/display/fbdev.h"
#include <unistd.h>
#include <pthread.h>
#include <time.h>
#include <sys/time.h>
#define DISP_BUF_SIZE (240 * 240)
/*Image declare*/
LV_IMG_DECLARE(Luckfox);
LV_IMG_DECLARE(cat);
LV_IMG_DECLARE(galaxy);
LV_IMG_DECLARE(saint);
void fbdev_flush(lv_disp_drv_t * drv, const lv_area_t * area, lv_color_t * color_p);
/**
* A meter with multiple arcs
*/
void lv_show_img(lv_obj_t * img,const lv_img_dsc_t img_dat){
lv_obj_clean(img);
lv_img_set_src(img, &img_dat);
lv_obj_center(img);
}
int main(void)
{
/*LittlevGL init*/
lv_init();
/*Linux frame buffer device init*/
fbdev_init();
/*A small buffer for LittlevGL to draw the screen's content*/
static lv_color_t buf[DISP_BUF_SIZE];
/*Initialize a descriptor for the buffer*/
static lv_disp_draw_buf_t disp_buf;
lv_disp_draw_buf_init(&disp_buf, buf, NULL, DISP_BUF_SIZE);
/*Initialize and register a display driver*/
static lv_disp_drv_t disp_drv;
lv_disp_drv_init(&disp_drv);
disp_drv.draw_buf = &disp_buf;
disp_drv.flush_cb = fbdev_flush;
disp_drv.hor_res = 240;
disp_drv.ver_res = 240;
lv_disp_drv_register(&disp_drv);
/*Initialize pin*/
DEV_ModuleInit();
/*Show an image*/
lv_obj_t *scr = lv_disp_get_scr_act(NULL);
lv_obj_t *img = lv_img_create(scr);
lv_show_img(img,Luckfox);
lv_obj_center(img);
/*Create a cursor*/
lv_obj_t *cursor = lv_img_create(scr);
lv_img_set_src(cursor, LV_SYMBOL_GPS);
lv_obj_set_pos(cursor, 70, 120);
int x=70,y=120,move=0;
/*Handle LitlevGL tasks (tickless mode)*/
while(1) {
lv_timer_handler();
usleep(5000);
/*Key*/
if(GET_KEYA == 0){
lv_show_img(img,Luckfox);
}
else if(GET_KEYB == 0){
lv_show_img(img,cat);
}
else if(GET_KEYX == 0){
lv_show_img(img,galaxy);
}
else if(GET_KEYY == 0){
lv_show_img(img,saint);
}
/*Joystick*/
if(GET_KEY_UP == 0){
x += 1;
if(x > 226)x = 226;
move =1;
}
else if(GET_KEY_DOWN == 0){
x -= 1;
if(x < 0)x = 0;
move =1;
}
else if(GET_KEY_LEFT == 0){
y -= 1;
if(y < 0)y = 0;
move =1;
}
else if(GET_KEY_RIGHT == 0){
y += 1;
if(y > 224)y = 224;
move =1;
}
else if(GET_KEY_PRESS == 0){
x = 70;
y = 120;
move =1;
}
if(move == 1){
lv_obj_set_pos(cursor, x, y);
move = 0;
}
}
return 0;
}
/*Set in lv_conf.h as `LV_TICK_CUSTOM_SYS_TIME_EXPR`*/
uint32_t custom_tick_get(void)
{
static uint64_t start_ms = 0;
if(start_ms == 0) {
struct timeval tv_start;
gettimeofday(&tv_start, NULL);
start_ms = (tv_start.tv_sec * 1000000 + tv_start.tv_usec) / 1000;
}
struct timeval tv_now;
gettimeofday(&tv_now, NULL);
uint64_t now_ms;
now_ms = (tv_now.tv_sec * 1000000 + tv_now.tv_usec) / 1000;
uint32_t time_ms = now_ms - start_ms;
return time_ms;
}
Code analysis:
Image Declarations
Sequentially declare the images that will be used in the program
/*Image declare*/
LV_IMG_DECLARE(Luckfox);
LV_IMG_DECLARE(cat);
LV_IMG_DECLARE(galaxy);
LV_IMG_DECLARE(saint);
Pin Initialization
Call the interface to initialize the control pins of the LCD
/*Initialize pin*/
DEV_ModuleInit();
Display Images
This code segment is used to display an image in the LVGL graphics interface and center the image on the currently active screen.
/*Show an image*/
lv_obj_t *scr = lv_disp_get_scr_act(NULL);
lv_obj_t *img = lv_img_create(scr);
lv_show_img(img,Luckfox);
lv_obj_center(img);
lv_disp_get_scr_act(NULL): Get the currently active screen object.lv_obj_t *scrpoints to this screen object.lv_img_create(scr): Create an image object on the screen object.lv_obj_t *imgpoints to the created image object.lv_show_img(img, Luckfox): Display the image namedLuckfoxon the created image object.lv_obj_center(img): Center the image object on the screen.
When the user presses buttons A, B, X, and Y separately, control the LCD to display different images.
/*Key*/
if(GET_KEYA == 0){
    lv_show_img(img,Luckfox);
}
else if(GET_KEYB == 0){
    lv_show_img(img,cat);
}
else if(GET_KEYX == 0){
    lv_show_img(img,galaxy);
}
else if(GET_KEYY == 0){
    lv_show_img(img,saint);
}
Display Cursor
The purpose of this code is to create a cursor object, set the position and image source of the cursor.
/*Create a cursor*/
lv_obj_t *cursor = lv_img_create(scr);
lv_img_set_src(cursor, LV_SYMBOL_GPS);
lv_obj_set_pos(cursor, 70, 120);
int x=70,y=120,move=0;
lv_img_create(scr): Creates an image object on the screen.lv_obj_t *cursorpoints to the created image object, which will be used as a cursor.lv_img_set_src(cursor, LV_SYMBOL_GPS): Sets the image source of the cursor to the GPS symbol.LV_SYMBOL_GPSis a GPS symbol defined in the LVGL library.lv_obj_set_pos(cursor, 70, 120): Sets the position of the cursor to(70, 120).int x = 70, y = 120, move = 0;: Defines three variables representing the initial horizontal coordinatex, vertical coordinatey, and the movement flagmoveof the cursor.
This code segment enables the control of the cursor position on the screen using a joystick. When the user operates the joystick, the x and y values change based on the direction. The move flag is then set to 1. Subsequently, when the move flag is 1, the cursor position is updated, achieving the effect of moving the cursor.
/*Joystick*/
if(GET_KEY_UP == 0){
    x += 1;
    if(x > 226)x = 226;
    move =1;
}
else if(GET_KEY_DOWN == 0){
    x -= 1;
    if(x < 0)x = 0;
    move =1;
}
else if(GET_KEY_LEFT == 0){
    y -= 1;
    if(y < 0)y = 0;
    move =1;
}
else if(GET_KEY_RIGHT == 0){
    y += 1;
    if(y > 224)y = 224;
    move =1;
}
else if(GET_KEY_PRESS == 0){
    x = 70;
    y = 120;
    move =1;
}
if(move == 1){
    lv_obj_set_pos(cursor, x, y);
    move = 0;
}
3.4 Implementation Results
- Hardware Connection
- Display Effect