System Image Flashing
1. Overview
LuckFox Pico Zero boards come preloaded with a factory test image on the built-in eMMC for production-level functional verification. Before actual deployment, users must flash the desired operating system to the board's eMMC to ensure proper operation of tools such as luckfox-config and adb.
2. Driver Installation
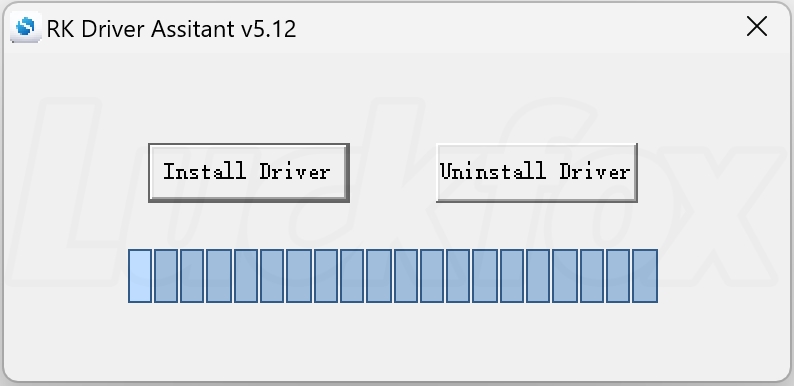
- Download the RK DriverAssitant(click here to download).
- Open the RK Driver Assistant to install the USB driver. There is no need to connect during this process. After the installation is complete, restart the computer.
3. Image Download
Officially Supported Image Download
The Luckfox Pico Ultra series provides images based on Buildroot. Users can download the image files according to their needs.
| Version | Description | Download |
|---|---|---|
| Buildroot | Luckfox Pico Zero: Flash Luckfox_Pico_Zero_EMMC_250802 firmware | Google Driver |
Please ensure you flash the latest image version. The example image Luckfox_Pico_Zero_EMMC_250802 (where 250802 indicates the image date) may not be the most recent version.
4. Flashing the Image (Windows Environment)
The SocToolKit software supports two flashing modes for eMMC or Flash:
One-click full image flashing: This mode uses a pre-packaged full system image containing all required partitions. It is suitable for rapid deployment and enables quick system setup.
Selective partition flashing: This allows updating specific system modules, offering a flexible flashing solution for users with advanced customization needs.
- These two flashing modes are independent. Choose the one that fits your needs — only one is required during the actual operation.
- If the development board is successfully connected via ADB, you can directly execute the command
reboot loaderto quickly enter flashing mode without manually pressing any buttons.
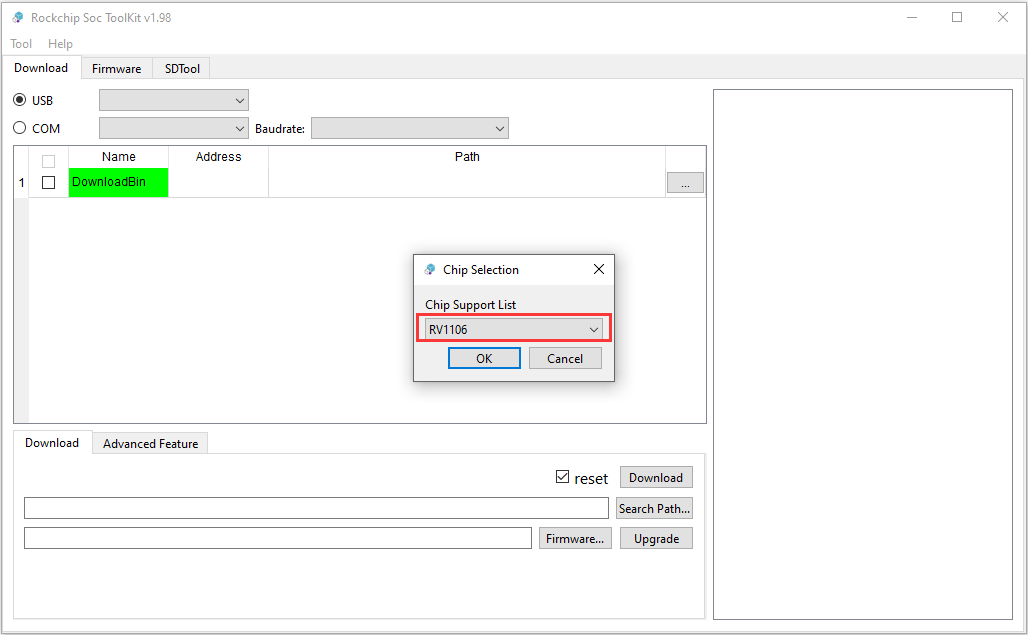
- Download and extract the SocToolKit flashing tool(Click here to download).
- Open the software(right-click and run as administrator),then select RV1106.
- Device connection and partition image flashing:
① While holding down the BOOT button, connect the board to your PC. Release the BOOT button once the Rockchip flashing tool displays aMaskRomdevice (device number may vary).
② Click Search Path to select the firmware directory, check all the partitions you want to flash, then click the Download button to start flashing.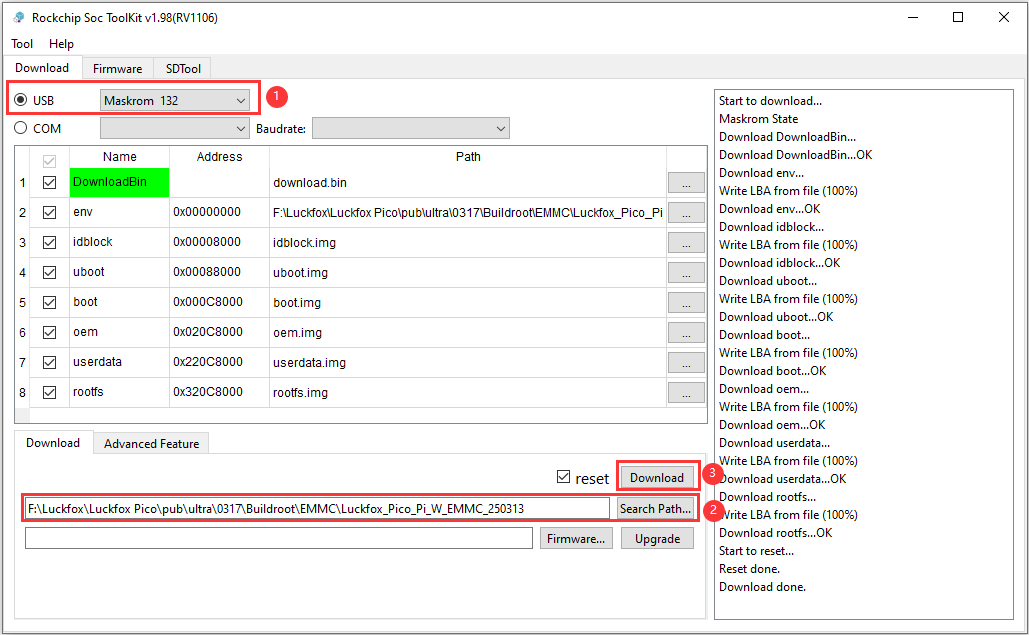
- Device connection and one-click full image flashing:
① While holding down the BOOT button, connect the board to your PC. Release the BOOT button once the Rockchip flashing tool displays aMaskRomdevice (device number may vary).
② Click Firmware to select the firmware directory, then click the Upgrade button to start flashing.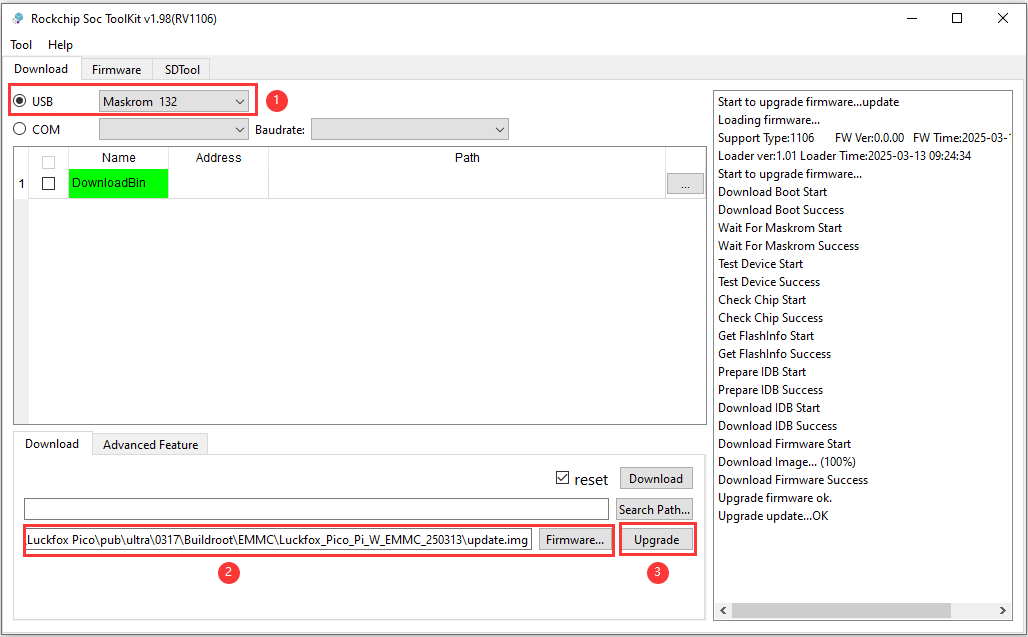
5. Image Flashing (Linux Environment)
- Currently supported only on Ubuntu 22.04 x86_64. Other platforms or architectures are not compatible at this time.
- upgrade_tool is a closed-source command-line flashing utility provided by Rockchip, supporting only SPI NAND Flash and eMMC as target storage media.
5.1 Entering Flash Mode on the Development Board
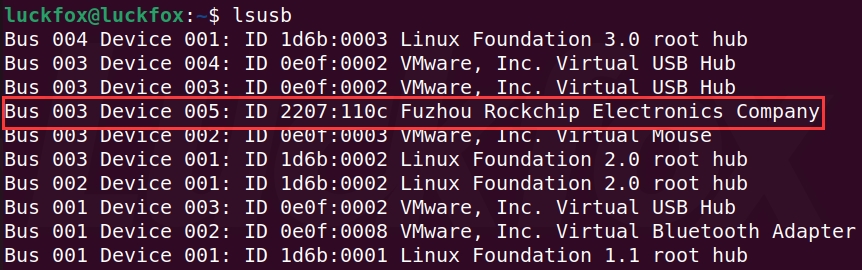
Press and hold the BOOT button while connecting the board to the host PC to enter flash mode.
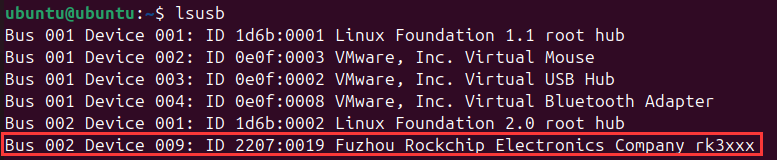
After running the lsusb command, you can compare the device recognition results between flash mode and normal operating mode, as shown below:
- Board in flash mode:
- Board successfully booted into the system:
If the virtual machine cannot recognize the board, it is usually caused by one of the following reasons:
- Faulty USB cable: If replugging the cable causes no response and no system or VMware popup appears, the cable is likely damaged or has a poor connection. Try replacing the USB cable and reconnecting the board.
- Device not assigned in VMware popup: When plugging in the board, VMware will prompt you to choose whether to connect the device to the “Host” or “Virtual Machine.”
If no selection is made before the popup disappears and VMware’s auto-connect policy is not properly configured, the device remains unassigned, meaning it is neither controlled by the host nor mounted to the VM.
In this case, replug the device to reassign control.
5.2 Flashing Standalone Image (Without SDK)
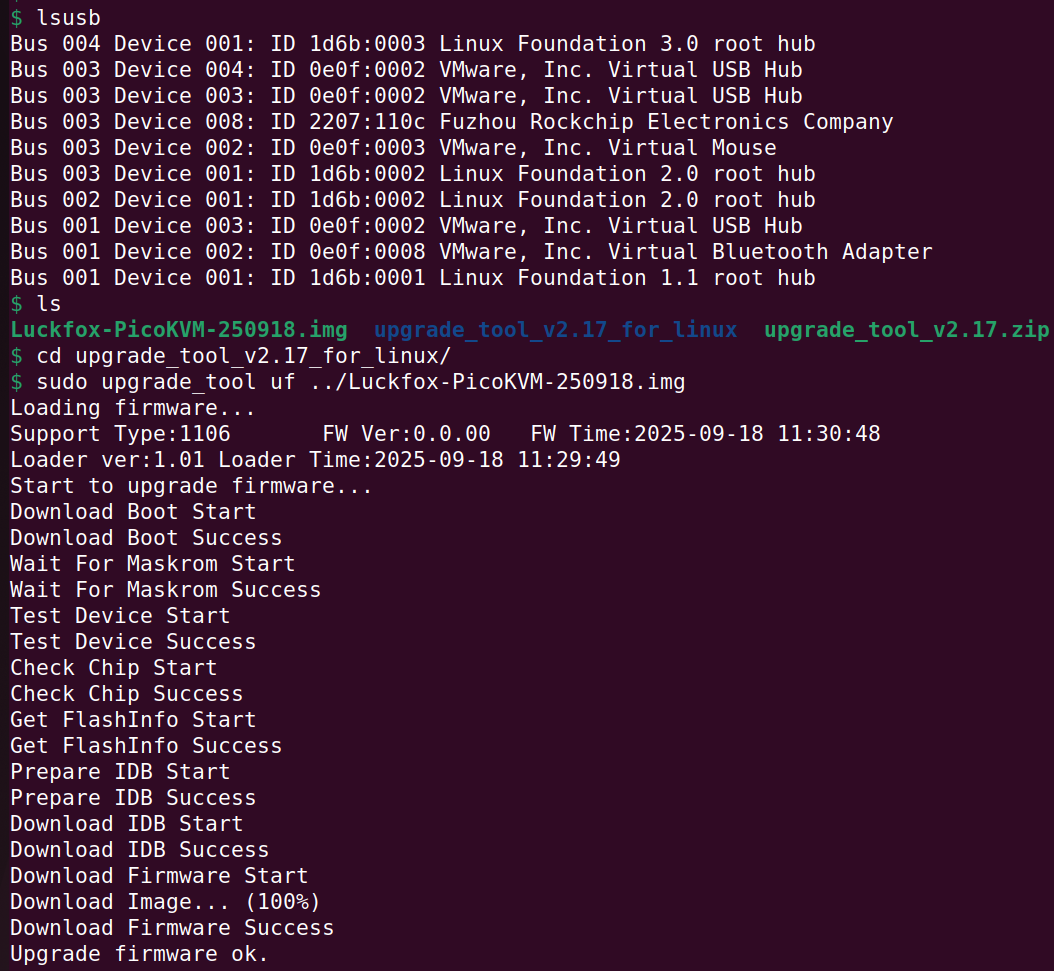
Download, extract, and install upgrade_tool :
sudo unzip upgrade_tool_v2.17.zip
cd upgrade_tool_v2.17_for_linux/
sudo cp upgrade_tool /usr/local/bin
sudo chmod +x /usr/local/bin/upgrade_tool
Verify installation success:
ubuntu@ubuntu:~$ sudo upgrade_tool -v
Upgrade Tool v2.17
Run the tool to flash the firmware:
luckfox@luckfox:~$ sudo upgrade_tool uf update.img
Loading firmware...
Support Type:1106   FW Ver:0.0.00   FW Time:2023-11-16 16:24:18
Loader ver:1.01 Loader Time:2023-11-16 16:22:58
Start to upgrade firmware...
Download Boot Start
Download Boot Success
Wait For Maskrom Start
Wait For Maskrom Success
Test Device Start
Test Device Success
Check Chip Start
Check Chip Success
Get FlashInfo Start
Get FlashInfo Success
Prepare IDB Start
Prepare IDB Success
Download IDB Start
Download IDB Success
Download Firmware Start
Download Image... (100%)
Download Firmware Success
Upgrade firmware ok.
Result preview:
5.3 Flashing the Image via SDK Script
The output/image directory must contain the update.img file, which is automatically generated when compiling the SDK. If you have not compiled the SDK yet, manually create the output/image directory and place the downloaded firmware inside it, renaming the file to update.img.
- Ensure the board is in flash mode before proceeding.
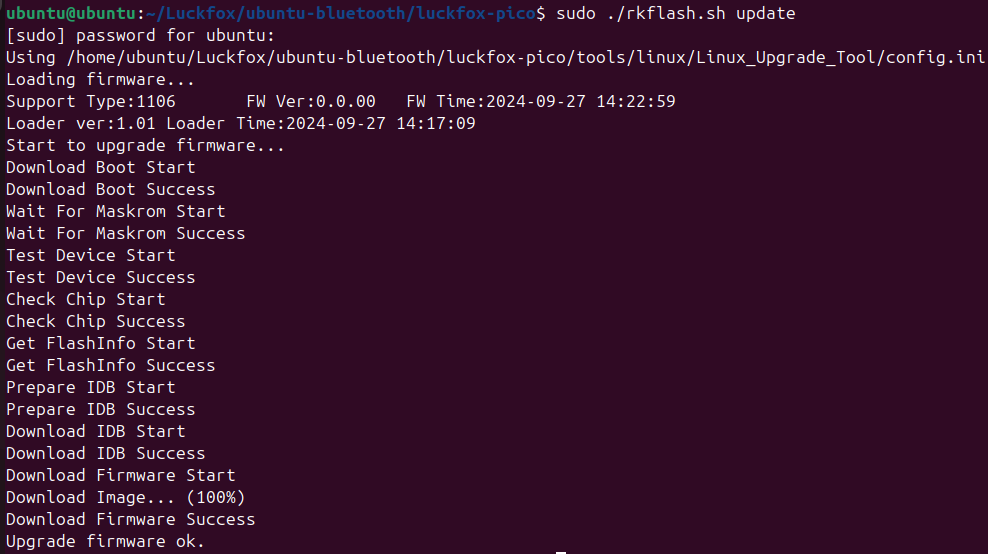
- Run the flashing script with administrator privileges:
$ sudo ./rkflash.sh update
 [sudo] password for ubuntu:
 Using /home/ubuntu/Luckfox/ubuntu-bluetooth/luckfox-pico/tools/linux/Linux_Upgrade_Tool/config.ini
 Loading firmware...
 Support Type:1106   FW Ver:0.0.00   FW Time:2024-09-27 14:22:59
 Loader ver:1.01 Loader Time:2024-09-27 14:17:09
 Start to upgrade firmware...
 Download Boot Start
 Download Boot Success
 Wait For Maskrom Start
 Wait For Maskrom Success
 Test Device Start
 Test Device Success
 Check Chip Start
 Check Chip Success
 Get FlashInfo Start
 Get FlashInfo Success
 Prepare IDB Start
 Prepare IDB Success
 Download IDB Start
 Download IDB Success
 Download Firmware Start
 Download Image... (100%)
 Download Firmware Success
Upgrade firmware ok - Result preview:
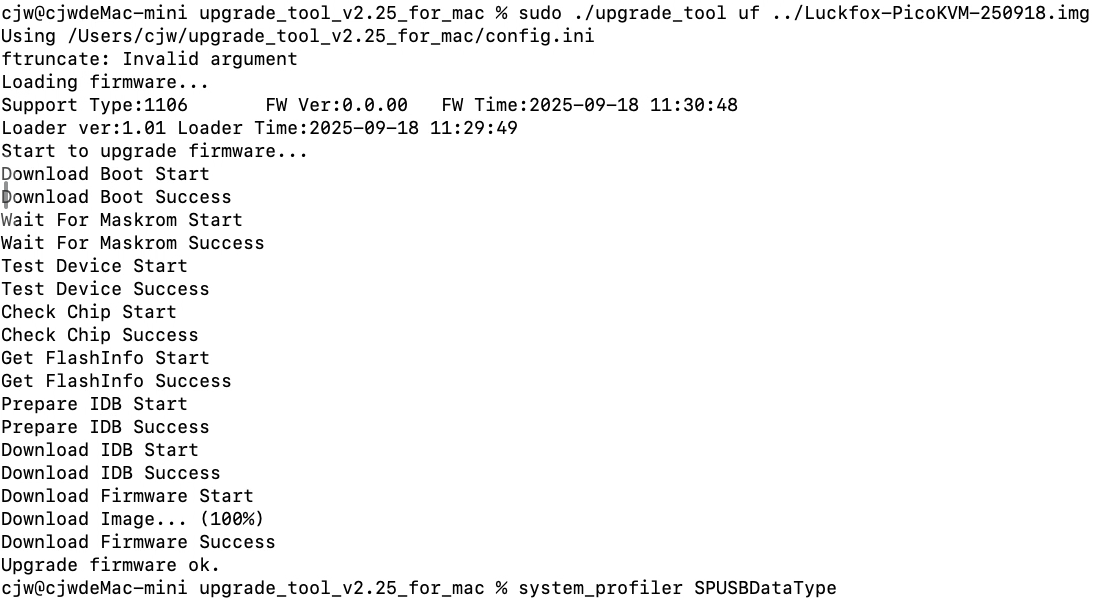
6. Image Flashing (macOS Environment)
The upgrade_tool is available not only for Linux but also supports the macOS platform.
- Download and extract the Upgrade_Tool flashing tool(Click here to download).
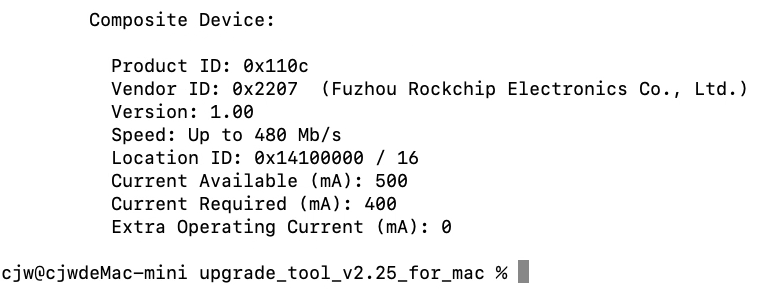
- Run the system_profiler SPUSBDataType command to check whether the development board is correctly detected by the system.
- Run the tool to flash the firmware (please modify the path according to the actual location of your image):
$ cd upgrade_tool_v2.44_mac
sudo ./upgrade_tool uf Luckfox-xxx-xxx.img - The expected output is as follows: