DSI 屏幕
1. 简介
DSI(Display Serial Interface)是一种用于显示面板与显示控制器之间的高速串行通信接口,主要由移动设备、嵌入式系统、平板电脑和其他需要高性能显示的系统广泛使用。它由MIPI(移动行业处理器接口,Mobile Industry Processor Interface)联盟制定,是一种标准化的接口协议,旨在减少设备的引脚数量并优化功耗。
2. 兼容屏幕
Luckfox Lyra 系列开发板默认支持的 DSI 屏幕型号为 10.1-DSI-TOUCH-A。此外,我们还适配了幸狐官方、树莓派以及微雪的 DSI 屏幕,确保其显示和触摸功能正常工作。
2.1 树莓派官方 DSI 屏幕 V1 及同驱动屏幕 (分辨率 800 x 480)
| 型号 | 使用说明 |
|---|---|
| 4.3inch DSI LCD | https://www.waveshare.net/wiki/4.3inch_DSI_LCD |
| 5inch DSI LCD | https://www.waveshare.net/wiki/5inch_DSI_LCD |
| 7inch DSI LCD | https://www.waveshare.net/wiki/7inch_DSI_LCD |
| 8inch DSI LCD | https://www.waveshare.net/wiki/8inch_DSI_LCD |
2.2 微雪 DSI 屏幕
| 型号 | Wiki 地址 |
|---|---|
| 10.1inch DSI LCD (C) | https://www.waveshare.net/wiki/10.1inch_DSI_LCD_(C) |
| 8inch DSI LCD (C) | https://www.waveshare.net/wiki/8inchDSI_LCD(C) |
| 7inch DSI LCD (C) | https://www.waveshare.net/wiki/7inch_DSI_LCD_(C) |
| 5inch DSI LCD (C) | https://www.waveshare.net/wiki/5inch_DSI_LCD_(C) |
| 2.8inch DSI LCD | https://www.waveshare.net/wiki/2.8inch_DSI_LCD |
| 4inch DSI LCD | https://www.waveshare.net/wiki/4inch_DSI_LCD |
| 7.9inch DSI LCD | https://www.waveshare.net/wiki/7.9inch_DSI_LCD |
| 8.8inch DSI LCD | https://www.waveshare.net/wiki/8.8inch_DSI_LCD |
| 11.9inch DSI LCD | https://www.waveshare.net/wiki/11.9inch_DSI_LCD |
| 3.4inch DSI LCD (C) | https://www.waveshare.net/wiki/3.4inch_DSI_LCD_(C) |
| 4inch DSI LCD (C) | https://www.waveshare.net/wiki/4inch_DSI_LCD_(C) |
| 5inch DSI LCD (D) | https://www.waveshare.net/wiki/5inch_DSI_LCD_(D) |
| 6.25inch DSI LCD | https://www.waveshare.net/wiki/6.25inch_DSI_LCD |
| 10.1-DSI-TOUCH-A | https://www.waveshare.net/wiki/10.1-DSI-TOUCH-A |
3. 硬件连接
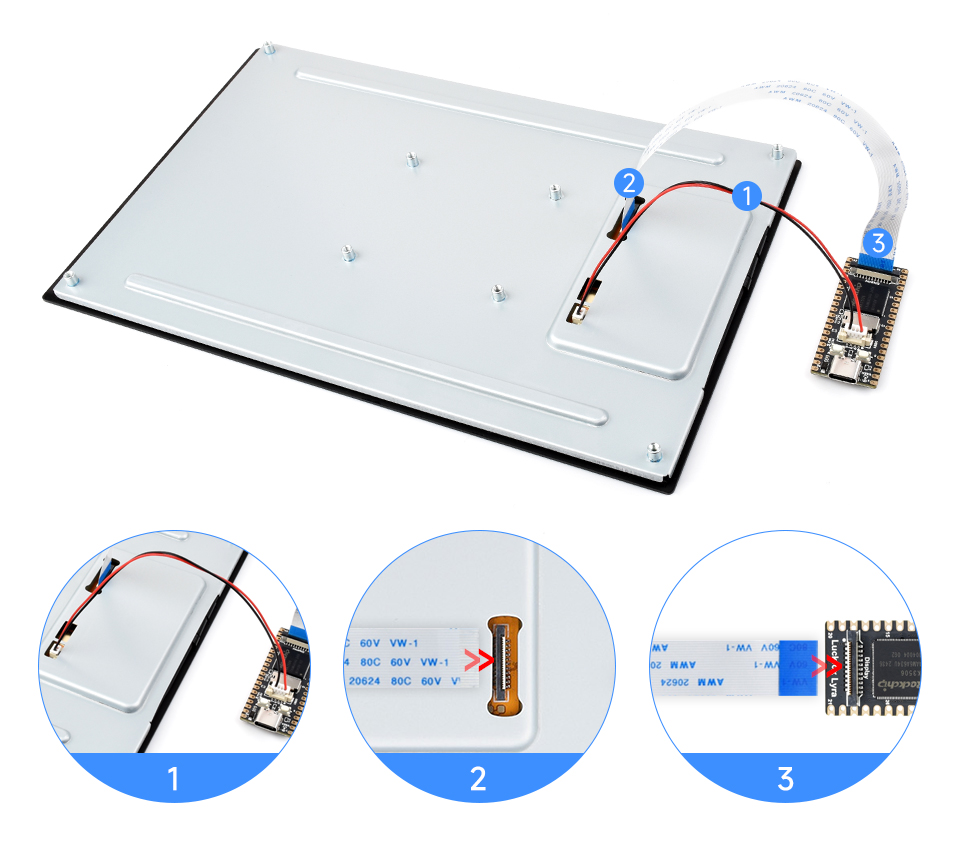
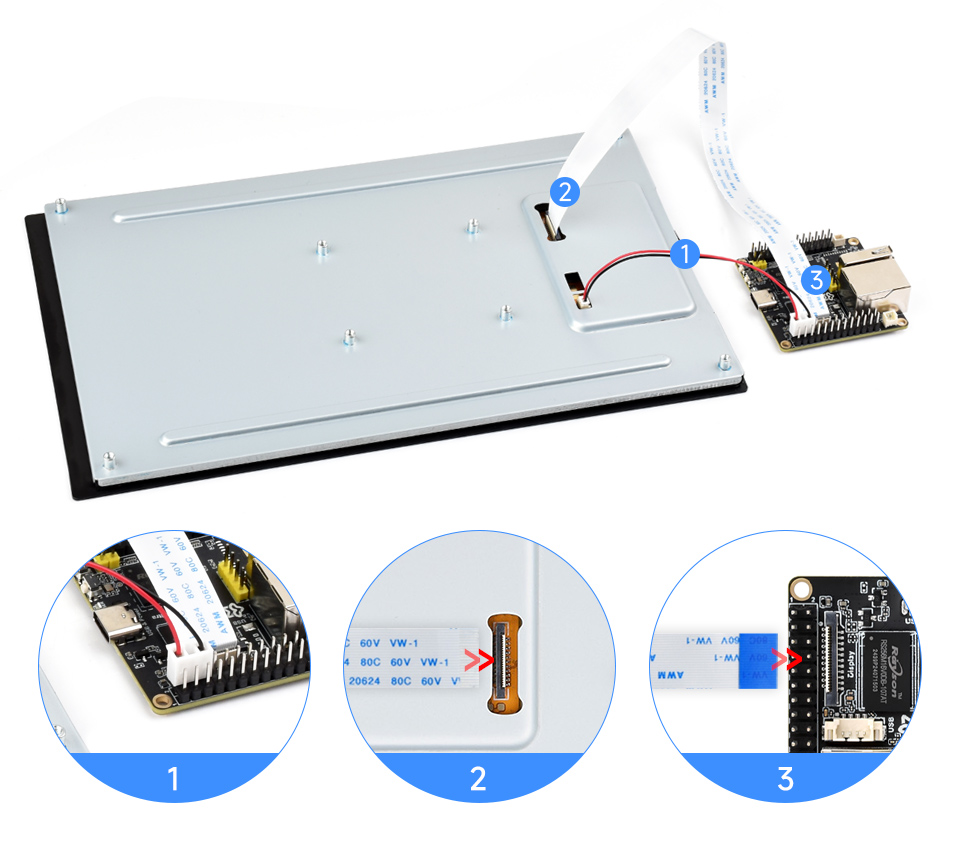
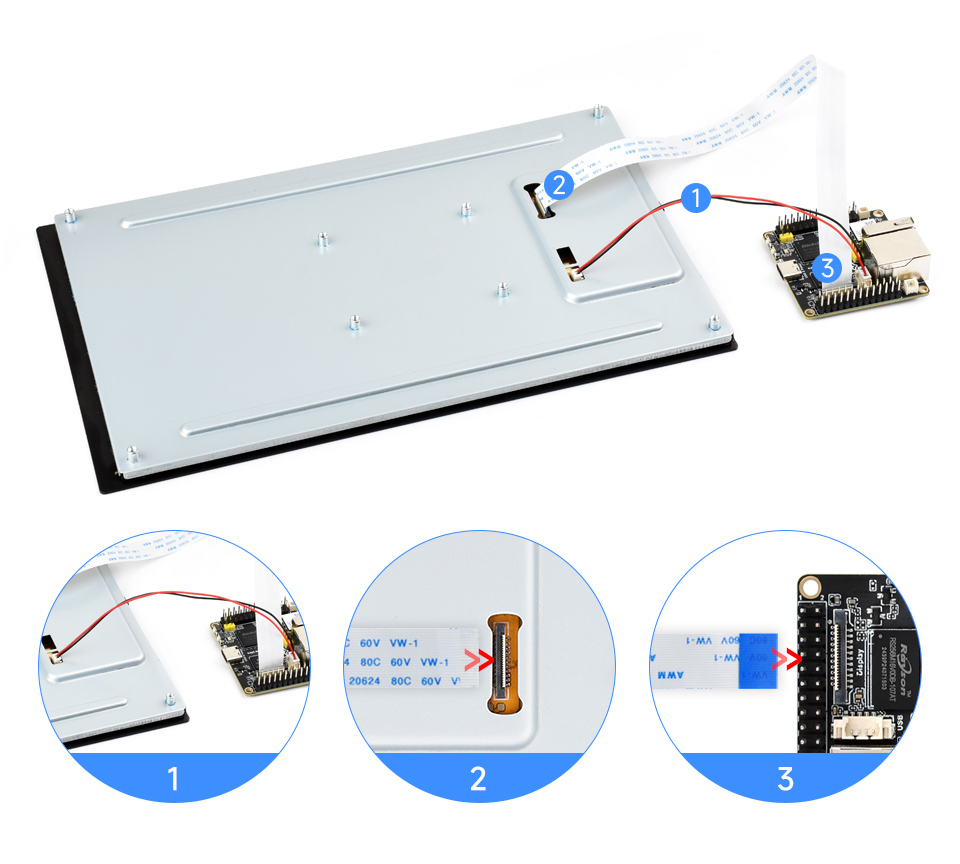
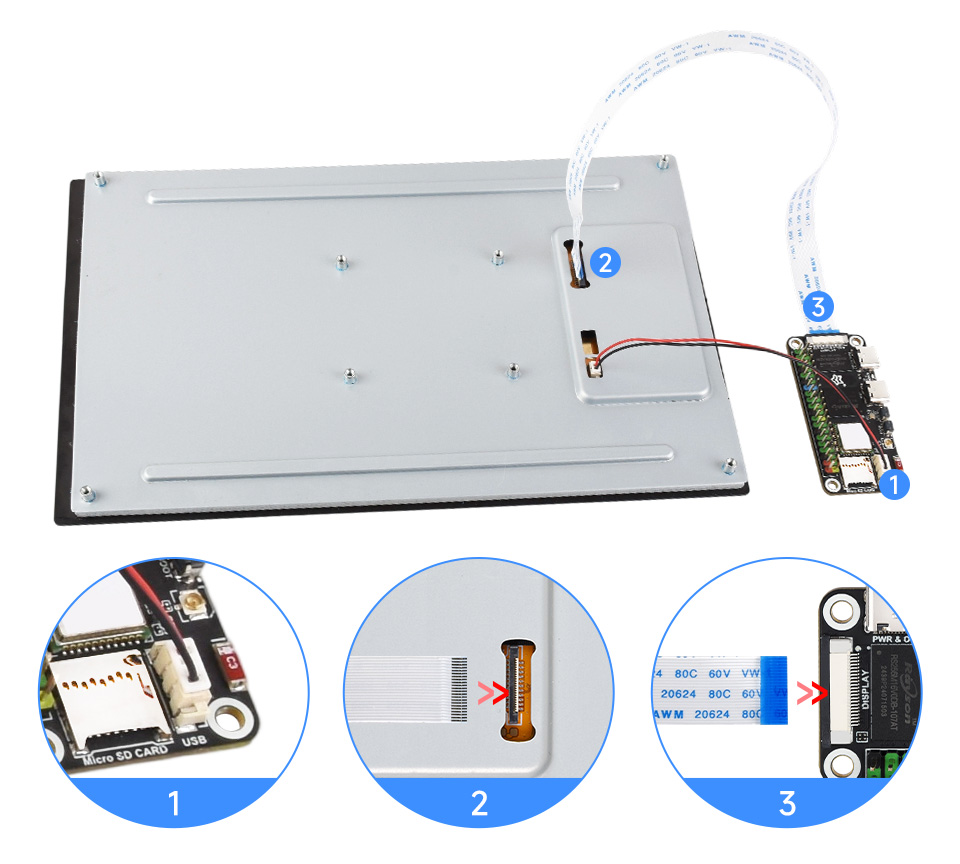
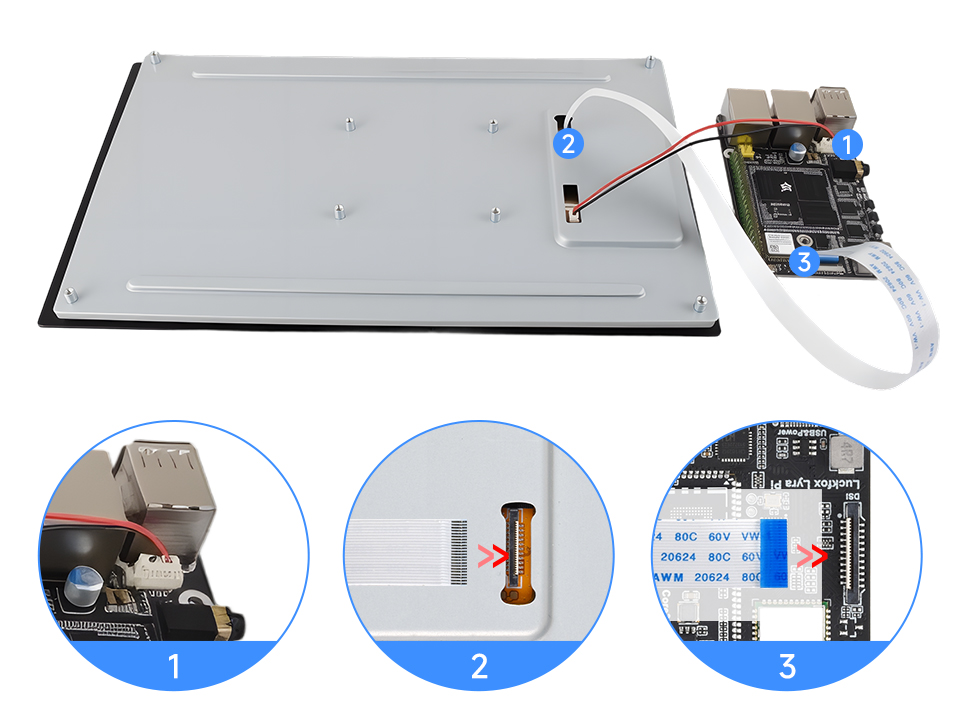
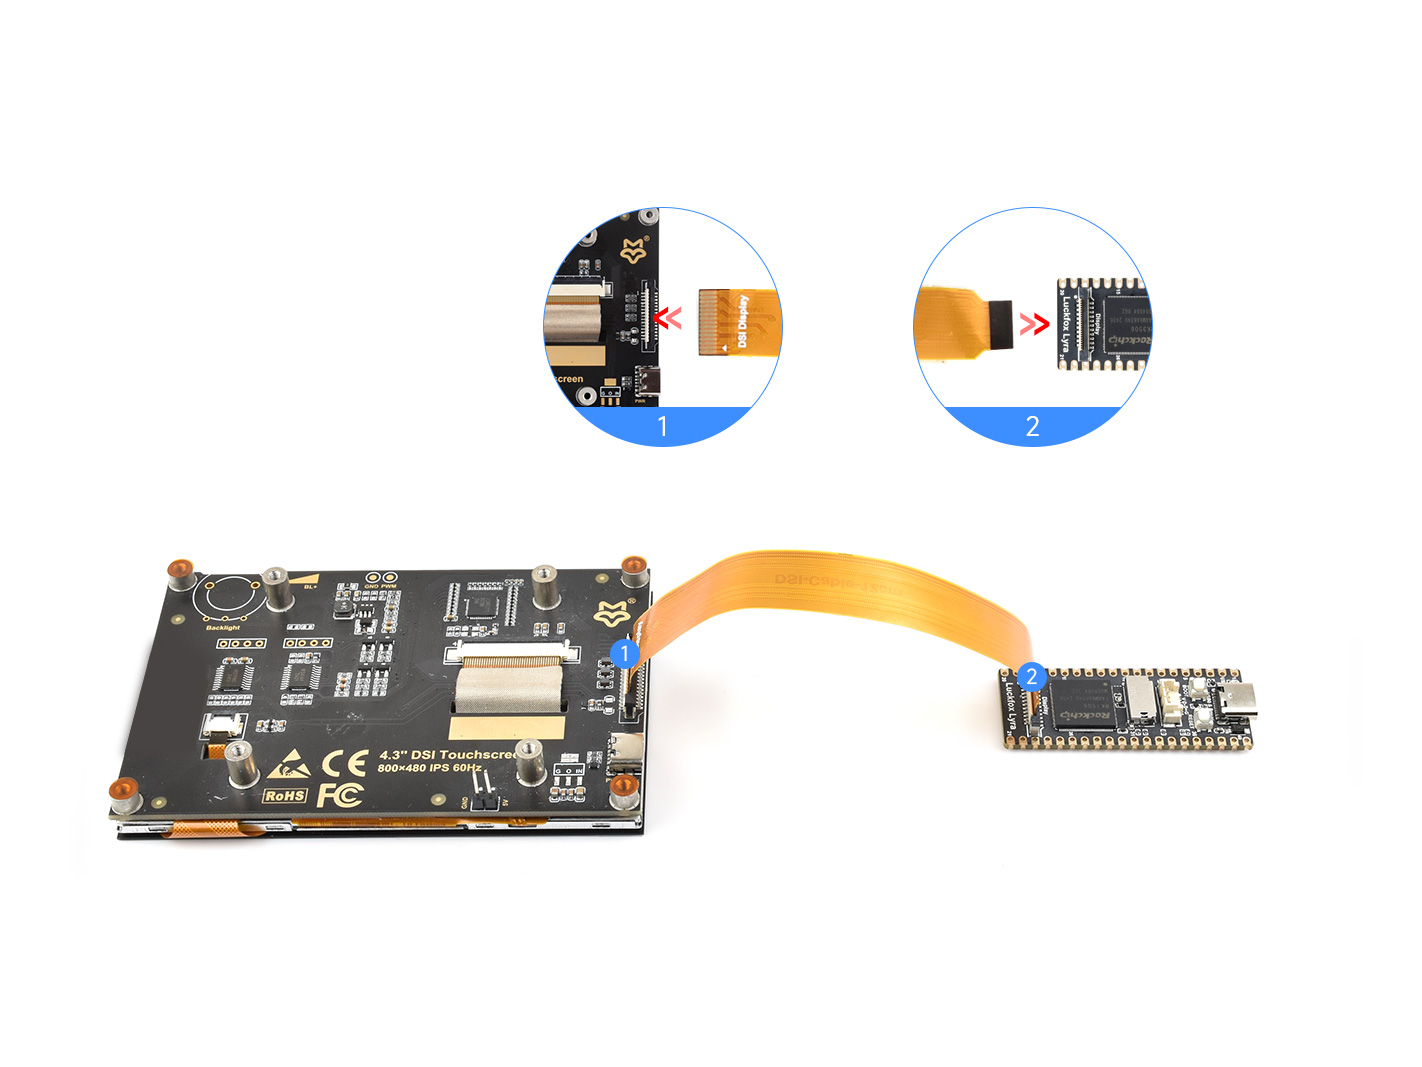
3.1 Luckfox Lyra 连接 10.1-DSI-TOUCH-A 屏幕
请根据所使用的开发板型号正确连接排线。如切换屏幕后未能第一时间点亮,请立即断电,并检查接线是否正确,以避免设备损坏或其他异常情况。
- 使用 22PIN 的 FPC 排线,将显示屏 DSI 接口连接到 Luckfox-Lyra 主板的 DSI 接口。
- 使用 MX1.25 2PIN 转 4PIN 连接线,将显示屏的电源接口连接到 Luckfox-Lyra 主板的 USB MX1.25 4P 接口。如下图所示:
- Luckfox Lyra/Lyra Plus:
- Luckfox Lyra Ultra/Ultra W :
- Luckfox Lyra Zero W:
- Luckfox Lyra Pi:
- Luckfox Lyra/Lyra Plus:
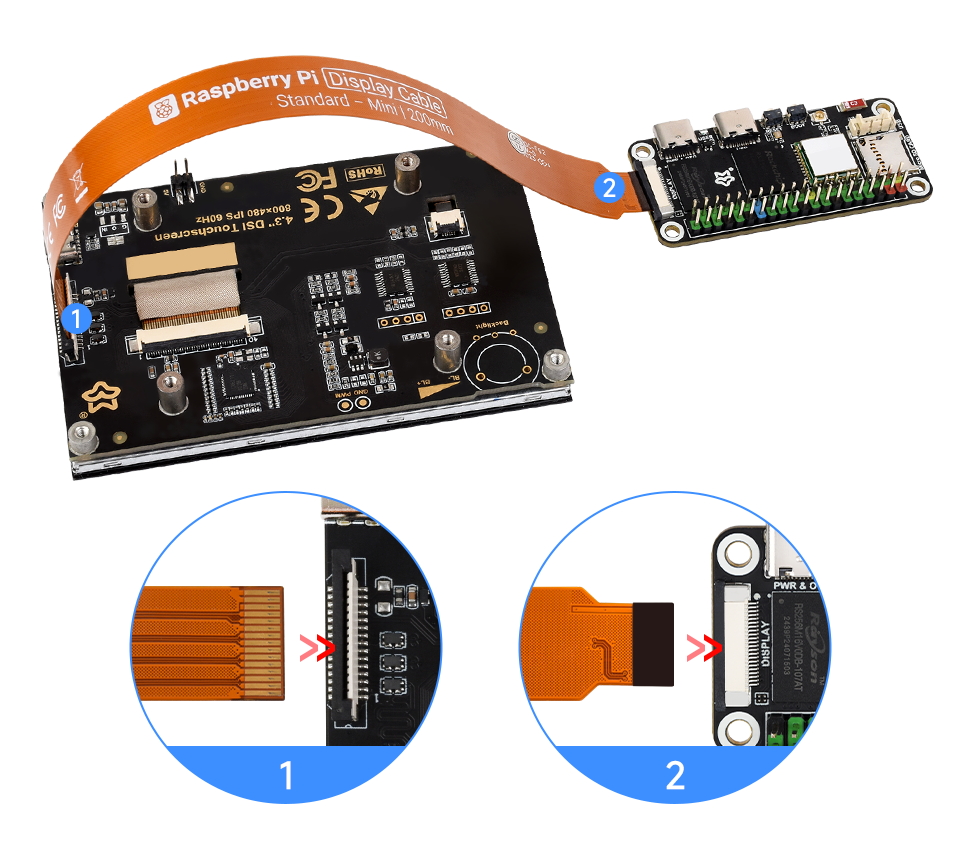
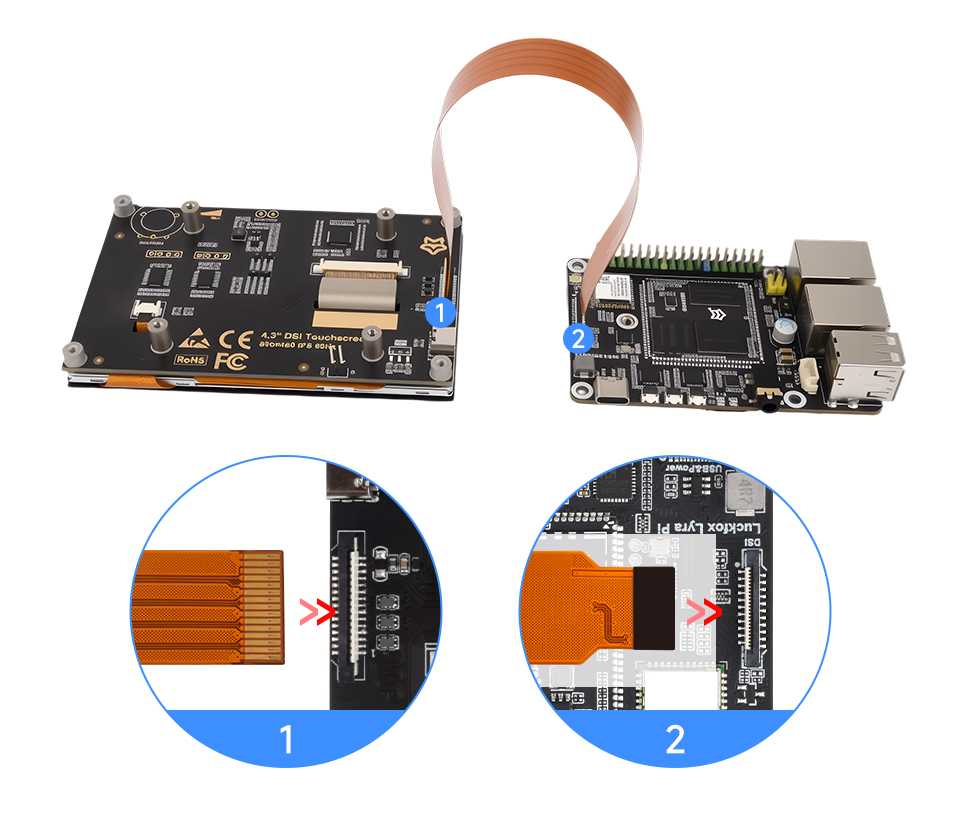
3.2 Luckfox Lyra 连接树莓派 DSI屏幕
- 使用 15PIN 转 22PIN 的 FPC 排线Pi5-Display-Cable。
- Luckfox Lyra/Lyra Plus:
- Luckfox Lyra/Lyra Plus:

- Luckfox Lyra Zero W:
- Luckfox Lyra Pi:
- Luckfox Lyra/Lyra Plus:
4. 软件设置
针对个人开发者,我们提供了更便捷的屏幕切换方案——通过开发板内置工具 luckfox-config 进行选择,无需手动修改设备树,即可快速切换目标屏幕型号。详见:luckfox-config《3.6 DSI配置》
用户也可以需自行修改相关设备树配置,详见SDK 环境部署《6.设备树配置》
5. 查看屏幕信息
当前系统中可用的屏幕 ID 可通过以下命令查看:
cat /sys/kernel/debug/dri/0/summary输出:
VOP [ff600000.vop]: ACTIVE
    Connector: DSI-1
        bus_format[100a]: RGB888_1X24
        overlay_mode[0] output_mode[0]color-encoding[1] color-range[1]
    Display mode: 800x1280p60
        dclk[70000 kHz] real_dclk[69475 kHz] aclk[294912 kHz] type[48] flag[a]
        H: 800 840 860 880
        V: 1280 1310 1314 1324
    win1-0: ACTIVE
        format: XR24 little-endian (0x34325258) SDR[0] color-encoding[0] color-range[0]
        csc: y2r[0] r2r[0] r2y[0] csc mode[0]
        zpos: 0
        src: pos[0x0] rect[800x1280]
        dst: pos[0x0] rect[800x1280]
        buf[0]: addr: 0x06100000 pitch: 3200 offset: 0
    post: sdr2hdr[0] hdr2sdr[0]
    pre : sdr2hdr[0]
    post CSC: r2y[0] y2r[0] CSC mode[2]
6. 显示测试
在 Lyra 上使用 modetest 进行彩条测试,以验证显示输出:
竖条测试(标准模式):
modetest -M rockchip -s 74@71:800x1280斜条测试(启用 tile 格式):
modetest -M rockchip -s 74@71:800x1280 -Ftiles
7. 触摸测试
使用
evtest命令进行触摸屏测试,检查触摸输入设备的响应。执行以下命令:evtest运行该命令后,正常情况下会显示类似以下的输出,入“0”回车后触摸屏幕开始测试,终端会打印触摸操作触发的事件数值:
No device specified, trying to scan all of /dev/input/event*
Available devices:
/dev/input/event0:      2-005d Goodix Capacitive TouchScreen
Select the device event number [0-0]:
8. 背光控制
其他适配屏幕共用同一个驱动,支持0~255级背光控制,背光控制的命令为:
# brightness level:0 ~ 255
echo <brightness level> > /sys/class/backlight/waveshare_bl/brightness