I2C
1.I2C子系统
在 Linux 操作系统中,I2C 子系统是一个关键的驱动框架,用于管理和控制通过 I2C 总线连接的各种外部设备,有关 I2C 子系统的更多详细信息可以在 <Linux内核源码>/Documentation/i2c 目录中找到。I2C 子系统的关键组成部分:
- sysfs 接口:I2C 子系统通过 sysfs 文件系统提供用户空间接口,以便用户可以访问和配置与 I2C 设备相关的信息。其中
/sys/bus/i2c/devices目录用于管理和配置 I2C 设备的属性和状态信息。用户可以通过读写 sysfs 文件来获取设备信息或控制设备。 - I2C 设备节点:在
/dev目录下,通常会创建类似/dev/i2c-3的字符设备节点,这些节点允许用户在用户空间与特定的 I2C 设备或 I2C 适配器进行通信。通过这些节点,用户可以发送和接收数据,以实现对 I2C 设备的操作。
2.I2C测试(Shell)
2.1 引脚分布
LuckFox Omni3576 引脚图: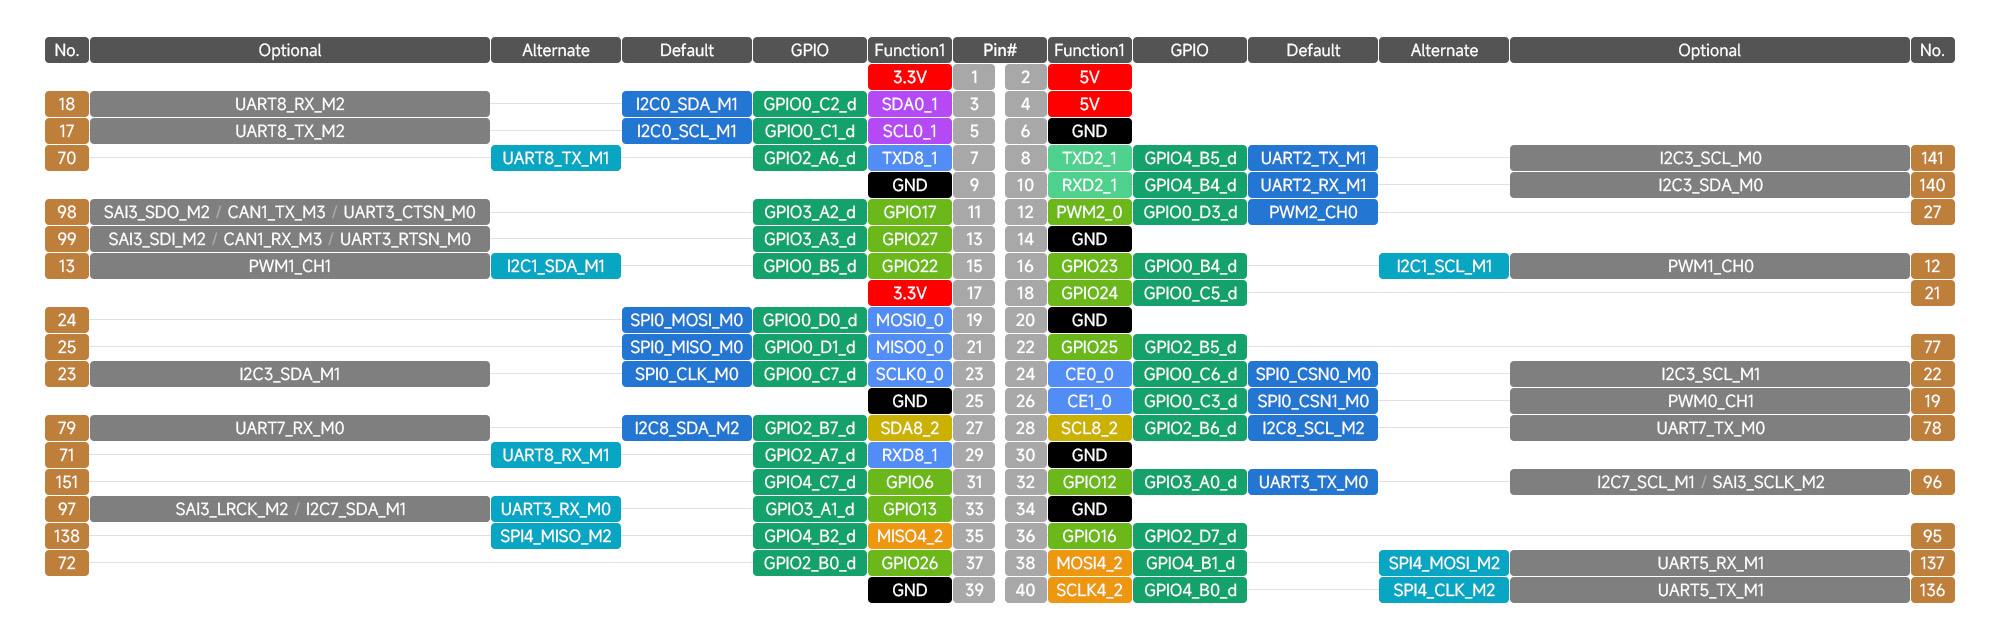
2.2 查看设备
在 /sys/bus/i2c/devices 目录中,每个 I2C 设备都有自己的文件夹。这些文件夹的名称通常包含 i2c 和设备编号,例如 /sys/bus/i2c/devices/i2c-0 表示 I2C 总线编号为 0 的设备。如果您想查看系统存在的 I2C 总线,可以使用如下命令:
root@luckfox:/home/luckfox# ls /sys/bus/i2c/devices/
1-0023  2-0010  2-004e  2-0051  4-0037  5-0037  5-005d  i2c-0  i2c-1  i2c-10  i2c-11  i2c-2  i2c-4  i2c-5
2.3 I2C测试
查看 i2c-0 接口上的设备。
i2cdetect -a -y 0

root@luckfox:/home/luckfox# i2cdetect -a -y 0
     0  1  2  3  4  5  6  7  8  9  a  b  c  d  e  f
00: -- -- -- -- -- -- -- -- -- -- -- -- -- -- -- --
10: -- -- -- -- -- -- -- -- -- -- -- -- -- -- -- --
20: -- -- -- -- -- -- -- -- -- -- -- -- -- -- -- --
30: -- -- -- -- -- -- -- -- -- -- -- -- -- 3d -- --
40: -- -- -- -- -- -- -- -- -- -- -- -- -- -- -- --
50: -- -- -- -- -- -- -- -- -- -- -- -- -- -- -- --
60: -- -- -- -- -- -- -- -- -- -- -- -- -- -- -- --
70: -- -- -- -- -- -- -- -- -- -- -- -- -- -- -- --
读取指定设备的全部寄存器的值
i2cdump -f -y 0 0x68读取指定 IIC 设备的某个寄存器的值,如下读取地址为
0x3d器件中的0x01寄存器值i2cget -f -y 0 0x68 0x01
3.I2C通讯(Python 程序)
完整代码:
import smbus
import time

# I2C 总线 (根据你的设备实际情况选择 0 或 1)
I2C_BUS = 0

# 从设备地址
I2C_ADDR = 0x3d

# 寄存器地址(根据你需要的从设备寄存器)
REG_ADDR = 0x00  # 例如,读取第一个寄存器的数据

def i2c_read():
    # 创建 SMBus 实例
    bus = smbus.SMBus(I2C_BUS)

    try:
        # 读取从设备的寄存器值
        data = bus.read_byte_data(I2C_ADDR, REG_ADDR)
        print(f"Data read from device 0x{I2C_ADDR:02x}: 0x{data:02x}")
    except Exception as e:
        print(f"Error reading from device: {e}")
    finally:
        bus.close()

if __name__ == "__main__":
    i2c_read()
运行程序:
root@luckfox:/home/luckfox# python3 i2c_test.py
Data read from device 0x3d: 0x41
4.I2C通讯(C 程序)
完整代码:
#include <stdio.h>
#include <stdlib.h>
#include <fcntl.h>
#include <unistd.h>
#include <sys/ioctl.h>
#include <linux/i2c-dev.h>
#include <stdint.h>
#define I2C_BUS "/dev/i2c-0" // I2C 总线 (根据你的设备选择 i2c-0 或 i2c-1)
#define I2C_ADDR 0x3d // 从设备地址
int i2c_read(int file, uint8_t reg_addr) {
uint8_t buf[1] = {0};
// 写入寄存器地址
if (write(file, ®_addr, 1) != 1) {
perror("Failed to write register address");
return -1;
}
// 读取从设备数据
if (read(file, buf, 1) != 1) {
perror("Failed to read from device");
return -1;
}
printf("Data read from device 0x%02x: 0x%02x\n", I2C_ADDR, buf[0]);
return buf[0];
}
int main() {
int file;
// 打开 I2C 总线
if ((file = open(I2C_BUS, O_RDWR)) < 0) {
perror("Failed to open I2C bus");
return 1;
}
// 设置从设备地址
if (ioctl(file, I2C_SLAVE, I2C_ADDR) < 0) {
perror("Failed to set I2C address");
close(file);
return 1;
}
// 读取寄存器 0x00 的数据
i2c_read(file, 0x00);
// 关闭 I2C 设备
close(file);
return 0;
}编译运行程序:
gcc i2c_test.c  -o i2c_test
./i2c_test
5. 设备树简介
I2C DTS 源文件在
kernel-6.10/arch/arm64/boot/dts/rockchip/rk3576.dtsi已经定义,我们可以直接调用。i2c0: i2c@27300000 {
compatible = "rockchip,rk3576-i2c", "rockchip,rk3399-i2c";
reg = <0x0 0x27300000 0x0 0x1000>;
clocks = <&cru CLK_I2C0>, <&cru PCLK_I2C0>;
clock-names = "i2c", "pclk";
interrupts = <GIC_SPI 88 IRQ_TYPE_LEVEL_HIGH>;
pinctrl-names = "default";
pinctrl-0 = <&i2c0m0_xfer>;
resets = <&cru SRST_I2C0>, <&cru SRST_P_I2C0>;
reset-names = "i2c", "apb";
#address-cells = <1>;
#size-cells = <0>;
status = "disabled";
};设备文件路径位于
kernel-6.1/arch/arm64/boot/dts/rockchip/luckfox-omni3576.dts,开启i2c0的代码片段如下:&i2c0 {
status= "okay";
pinctrl-0 = <&i2c0m1_xfer>;
clock-frequency = <400000>;
};
&pinctrl {
i2c0_demo: i2c0_demo {
rockchip,pins =<0 RK_PC1 9 &pcfg_pull_up>,
<0 RK_PC2 9 &pcfg_pull_up>;
};
};