Alpine Linux Porting (Part 2)
Original Source: Adapting Alpine Linux for LuckFox Pico – Detailed Steps for Alpine Linux Adaptation
Image Download: AlpineLinux.zip
1. Brief Analysis of Linux Boot Process
To adapt the rootfs, it's essential to understand the common startup process of Linux development boards. We won't delve into the detailed startup process here, as it has been well explained by other experts. In simple terms, after powering on the development board, the bootloader is the first to start, with different boards having different processes. After UBoot finishes its startup, it passes startup parameters to the kernel and jumps to the kernel. The kernel, upon startup, attempts to load the rootfs and looks for the init program in a specific directory. The init program then begins running programs that initialize system services (our image uses OpenRC), and OpenRC is responsible for starting various services.
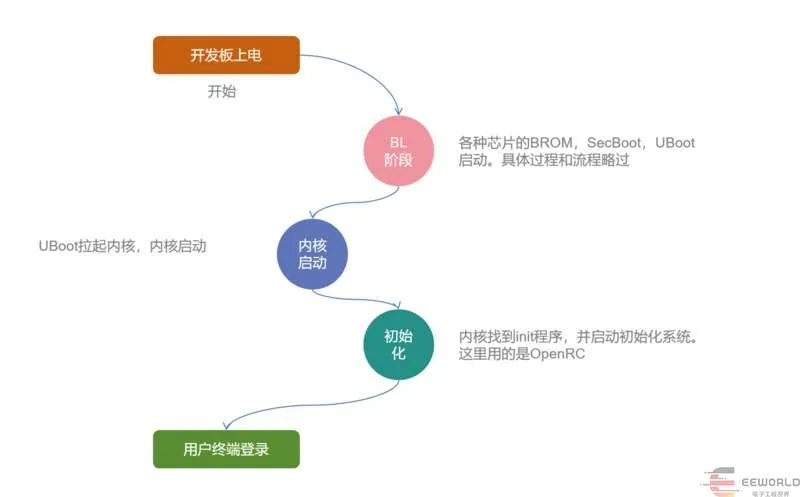
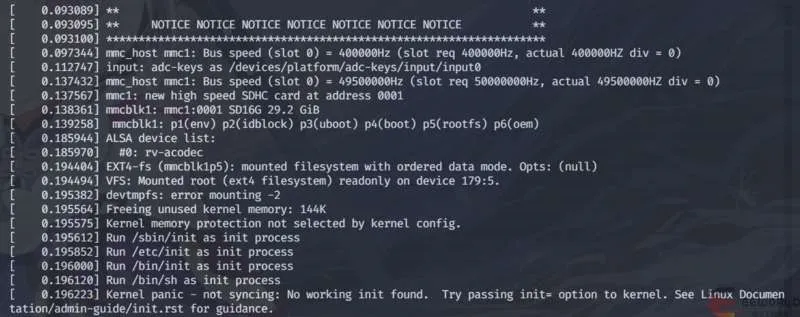
For example, if a problematic rootfs is passed to the kernel, and the kernel cannot find the init program, an error occurs.
2. Running Alpine Linux Container with Docker
Docker serves as an excellent rootfs extraction tool, widely available for various distribution platforms. It offers fast downloads, version flexibility, and enables the pre-processing of desired software packages and sources on the computer before integrating into the SDK. Without further ado, let's get started.
2.1 Create a temporary 100M file to store the new rootfs
dd if=/dev/zero of=rootfs.ext4 bs=1M count=100
2.2 Format the temporary file
mkfs.ext4 rootfs.ext4
2.3 Mount the temporary file system to /tmp/my-rootfs
mkdir /tmp/my-rootfs sudo mount rootfs.ext4 /tmp/my-rootfs
2.4 Enable virtualization support (if WSL or the computer is restarted, start from this step)
docker run --rm --privileged multiarch/qemu-user-static --reset --persistent yes
2.5 Create a container named armv7alpine
docker run -it \
--name armv7alpine \
--net=host \
-v /tmp/my-rootfs:/my-rootfs \
arm32v7/alpine
All subsequent operations are performed within this armv7alpine container until the creation of the Alpine root file system compression package is complete.
3. Modify Sources
Due to the slow speed of the official source, it is necessary to replace Alpine Linux's official source with the Aliyun source. After modifying, use the apk update command to test.
sed -i 's/dl-cdn.alpinelinux.org/mirrors.aliyun.com/g' /etc/apk/repositories
apk update
4. Install Boot Services Software and Configure Serial Port
4.1 Install OpenRC
As explained in the first section, understanding the Linux startup process simplifies the installation of OpenRC. Just enter the following command:
apk add openrc
After installing OpenRC, some configurations are still needed. Let's continue.
4.2 Start necessary services
rc-update add devfs boot
rc-update add procfs boot
rc-update add sysfs boot
4.3 Set up automatic login for serial port
Before setting up, confirm the default serial port device used by the kernel. You can use the cat /proc/cmdline command to confirm. Additionally, you can check the default enabled serial ports by entering ls /dev/tty* in the official SDK.

In this case, ttyFIQ0 is used, and other ports are ignored.
4.3.1 Add the serial port to the configuration file responsible for managing which serial port can log in as the root user
echo ttyFIQ0 > /etc/securetty
4.3.2 Modify the /etc/inittab file, which manages the startup services on the serial port
Delete lines starting from tty1 to tty6. This step is crucial; otherwise, the serial port startup will get stuck trying to find ttyX.
Add the following line to allow automatic login via the serial port:
ttyFIQ0::respawn:/sbin/agetty --autologin root ttyFIQ0 vt100
Modified content:
# /etc/inittab

::sysinit:/sbin/openrc sysinit
::sysinit:/sbin/openrc boot
::wait:/sbin/openrc default

# Set up a couple of getty's Delete the lines below this

# Put a agetty on the serial port Modify the line below like this, others unchanged
ttyFIQ0::respawn:/sbin/agetty --autologin root ttyFIQ0 vt100

# Stuff to do for the 3-finger salute
::ctrlaltdel:/sbin/reboot

# Stuff to do before rebooting
::shutdown:/sbin/openrc shutdown
With these changes, the rootfs can now be started. However, network package installation is not yet possible.
5. Configure Network
5.1 Add network interface configuration
Similar to many distributions, to permanently configure network settings, edit the /etc/network/interfaces file. If this file does not exist, create it using the following command:
vi /etc/network/interfaces
Copy the following content into the file, ensuring to replace it with your IP, corresponding subnet, and gateway. It's recommended to use a static IP for easier management.
auto eth0
iface eth0 inet static
address 192.168.50.59
netmask 255.255.255.0
gateway 192.168.50.1
Remember to add the networking service to the default startup queue. If the board lacks an IP, check if the networking service is running correctly.
rc-update add networking default
5.2 Modify Domain Name Resolution Server
Edit the /etc/resolv.conf file and replace the IP address of the DNS server with your local server's IP. Note that this file will be restored after restarting the Docker container or the computer.
# This file was automatically generated by WSL. To stop automatic generation of this file, add the following entry# [network]
# generateResolvConf = false
nameserver 202.103.224.68
5.3 Modify Hostname
Edit the /etc/hostname file and replace its content with the hostname, for example, changing it to "Luckfox." The hostname is displayed when accessing the shell via SSH or serial login, serving as an identifier for the host.
6. Install and Configure SSH Service
6.1 Install the openssh package
Simply use the following command to install openssh:
apk add openssh
6.2 Configure SSH
Open the /etc/ssh/sshd_config file and modify lines 32 and 57 as follows:
# Authentication:

#LoginGraceTime 2m
PermitRootLogin yes
#StrictModes yes
#MaxAuthTries 6
#MaxSessions 10

#PubkeyAuthentication yes

# To disable tunneled clear text passwords, change to no here!
PasswordAuthentication yes
6.3 Add sshd to the default runlevel queue for automatic startup
rc-update add sshd default
7. Configure Boot-Time ntpd for Network Time Synchronization
7.1 Create a local startup service script
Create the /etc/local.d/crond.start file with the following content. This startup script performs three tasks: ntp network time synchronization, starting crond scheduled tasks, and turning off the board's LED.
#!/bin/bash

ntpd -d -q && crond
echo 0 > /sys/class/leds/workbr/ightness
Save the script and give it executable permissions.
chmod a+x /etc/local.d/crond.start
7.2 Configure ntp server
Create the /etc/ntp.conf file and add ntp servers. Here, Aliyun's time servers are used. The file content is as follows:
erver ntp.aliyun.com iburst
server ntp0.aliyun.com iburst
server ntp1.aliyun.com iburst
server ntp2.aliyun.com iburst
7.3 Add local to the default runlevel queue
rc-update add local default
7.4 Set the timezone
Alpine Linux does not include multi-language and timezone support by default. Install the tzdata package, copy the Shanghai timezone data, and then remove the package to save space.
apk add tzdata && cp /usr/share/zoneinfo/Asia/Shanghai /etc/localtime && \
echo "Asia/Shanghai" > /etc/timezone && apk del tzdata
At this point, the boot-time synchronization service is completed. However, if the board needs to be turned on for an extended period, and accurate time is required throughout, follow the next steps to add scheduled ntp time synchronization configuration.
7.5 Set up crond scheduled tasks
Note: This step should be done after burning to the board, as doing it now won't be effective. The exact reason has not been investigated and analyzed.
7.5.1 Create the /var/spool/cron/crontabs directory to store scheduling configurations
mkdir -p /var/spool/cron/crontabs
7.5.2 Edit scheduled tasks using the crontab -e command
crontab -e
Copy the following content and save:
# do daily/weekly/monthly maintenance
# min hour day month weekday command
0 */6 * * * ntpd -d -q
8. Install Required Software Packages
At this point, the customization of the rootfs is mostly completed. Install some needed software packages into the rootfs based on your requirements. It is recommended to install util-linux, btop, and bash.
apk add util-linux
apk add sqlite btop
apk add bash bash-completion
Modify the default shell for the root user to bash. Open the /etc/passwd file and change the ash at the end of the root line to bash, as shown below:
root:x:0:0:root:/root:/bin/bash
bin:x:1:1:bin:/bin:/sbin/nologin
daemon:x:2:2:daemon:/sbin:/sbin/nologin
adm:x:3:4:adm:/var/adm:/sbin/nologin
9. Package the Rootfs and Integrate it into the SDK for Image Building
9.1 Package the rootfs
Execute the following commands in the / directory:
for d in bin etc lib root sbin usr; do tar c "$d" | tar x -C /my-rootfs; done
for dir in dev proc run sys var; do mkdir /my-rootfs/${dir}; done
cd /my-rootfs/ && tar czf alpine.tar.gz *
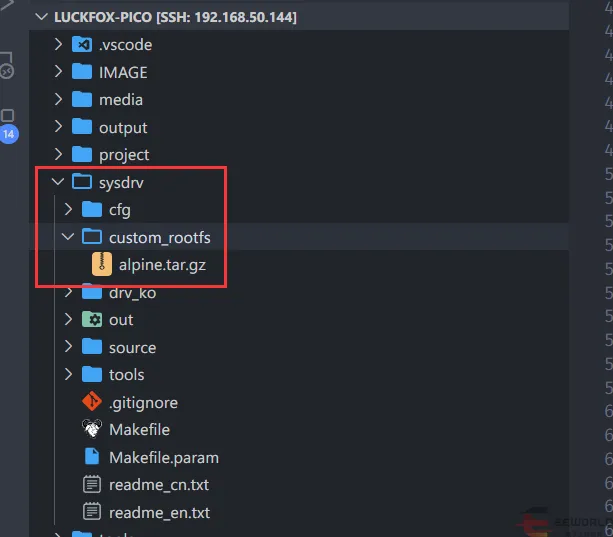
Once completed, you'll see an alpine.tar.gz file in the /tmp/my-rootfs directory. Copy this file to the sysdrv/custom_rootfs directory under Luckfox's official SDK (create the directory if necessary).
9.2 Modify the build.sh file in the SDK root directory
Open the SDK's build.sh file and find the function __PACKAGE_ROOTFS() around line 1044. Replace the content before build_get_sdk_version with the following:
function __PACKAGE_ROOTFS()
{
local rootfs_tarball _target_dir _install_dir

if [ -f $rootfs_tarball ]; then
if [ -z $RK_CUSTOM_ROOTFS ]; then
rootfs_tarball="$RK_PROJECT_PATH_SYSDRV/rootfs_${RK_LIBC_TPYE}_${RK_CHIP}.tar"
tar xf $rootfs_tarball -C $RK_PROJECT_OUTPUT
else
rootfs_tarball="$RK_CUSTOM_ROOTFS"
if [ ! -d $RK_PROJECT_PACKAGE_ROOTFS_DIR ]; then
mkdir $RK_PROJECT_PACKAGE_ROOTFS_DIR
fi
tar xf $rootfs_tarball -C $RK_PROJECT_PACKAGE_ROOTFS_DIR
fi
else
msg_error "Not found rootfs tarball: $rootfs_tarball"
exit 1
fi

build_get_sdk_version
9.3 Modify the .BoardConfig.mk file in the SDK root directory
Add the following content to the end of the file:
# Configure custom image directory
export RK_CUSTOM_ROOTFS=../sysdrv/custom_rootfs/alpine.tar.gz
Now, execute the following commands to delete the output/out/rootfs_uclibc_rv1106 directory:
rm -rf output/out/rootfs_uclibc_rv1106 This directory is a temporary rootfs generated by the build system. Deleting it ensures that our rootfs takes effect.
Then, rerun the build.sh command to generate the image. After the image is generated, burn it to the Nand Flash using the standard procedure. The TF card image handling is still under investigation; after burning, the root partition size cannot be expanded.
./build.sh
Cleaning Up Temporary File System
If you rarely use it in the future and don't want to tinker with the file system yourself, you can follow these steps.
Close the Docker container:
docker stop armv7alpine
Unmount:
sudo umount /tmp/my-rootfs
Delete files:
rm rootfs.ext4