3.5-RPi-LCD-CTP
1. 介绍
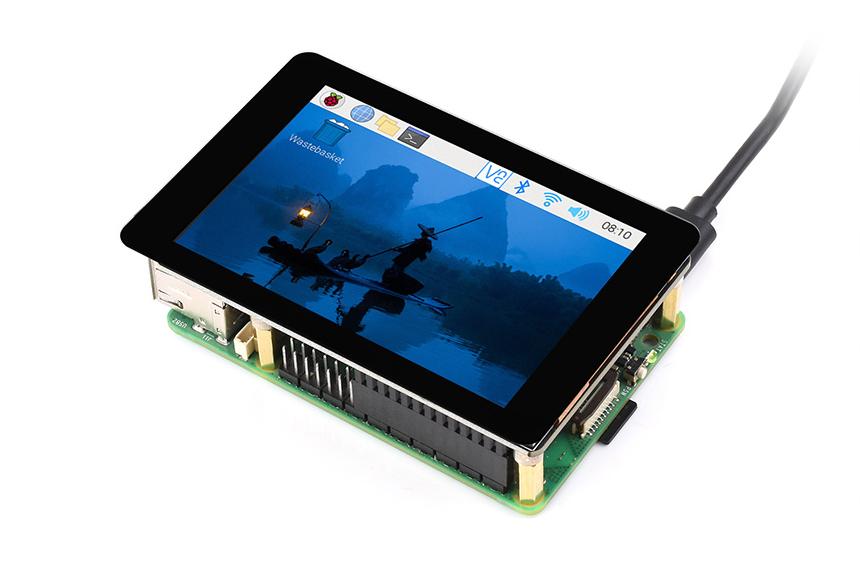
3.5-RPi-LCD-CTP 是一款基于 SPI 和 I2C 接口通信的触摸显示模块,搭载 ST7796S 显示驱动与 GT911 触控芯片,具备 320×480 分辨率、IPS 高亮显示及灵敏电容触控,兼具稳定性与美观性。
2. 产品参数
📋 参数表
| 项目 | 描述 |
|---|---|
| 产品型号 | 3.5-RPi-LCD-CTP |
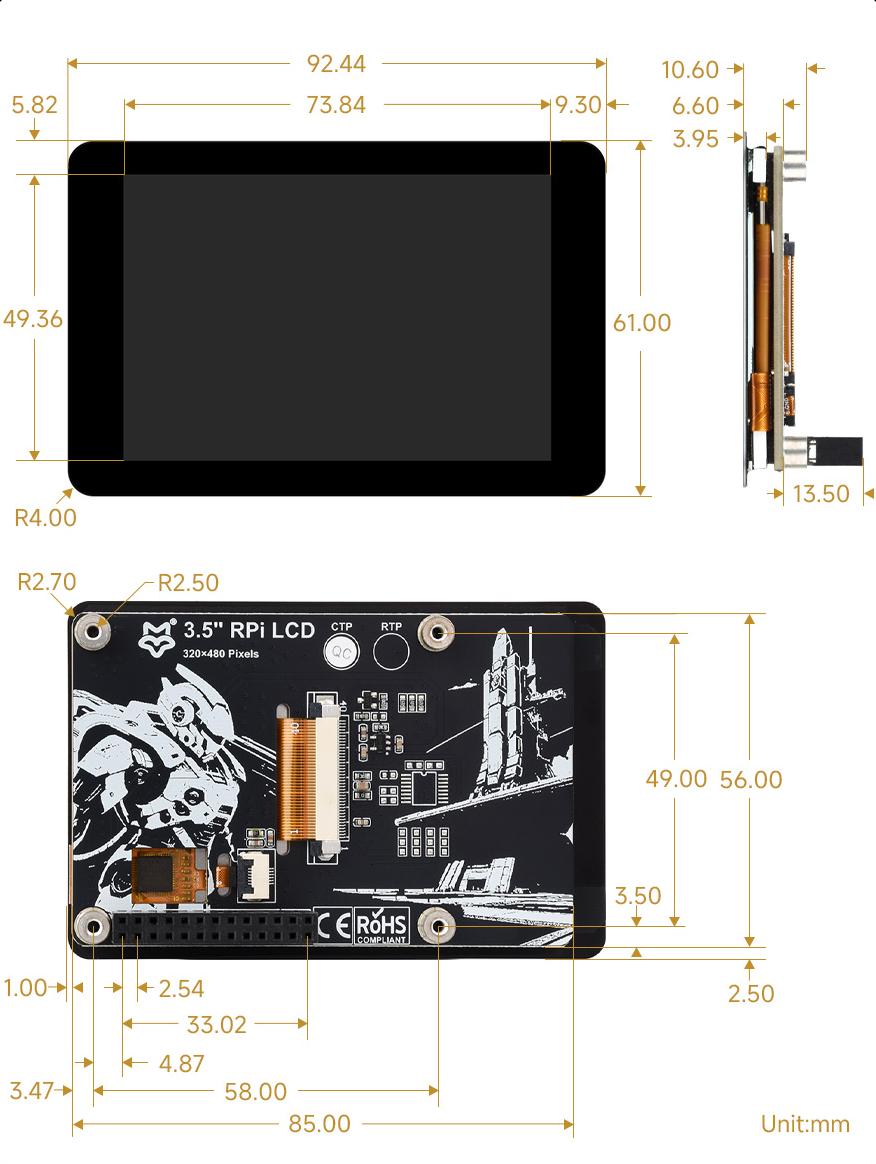
| 盖板尺寸 | 61.00 (H) × 92.44 (V) mm |
| 显示区域 | 49.36 (H) × 73.84 (V) mm |
| 分辨率 | 320 (H) x 480 (V) |
| 屏幕类型 | IPS |
| 触摸类型 | 电容 |
| 可视角度 | 170° |
| 色域 | 65% NTSC |
| 最大亮度 | 200cd/m² |
| 对比度 | 1000:1 |
| 背光调节 | PWM调光 |
| 刷新率 | 60Hz |
| 功耗 | 0.8W |
| 供电电压 | 5V |
| 逻辑电压 | 3.3V |
| 通信接口 | Display:SPI Touch:I2C |
| 控制芯片 | Display:ST7796S Touch:GT911 |
3. 引脚定义
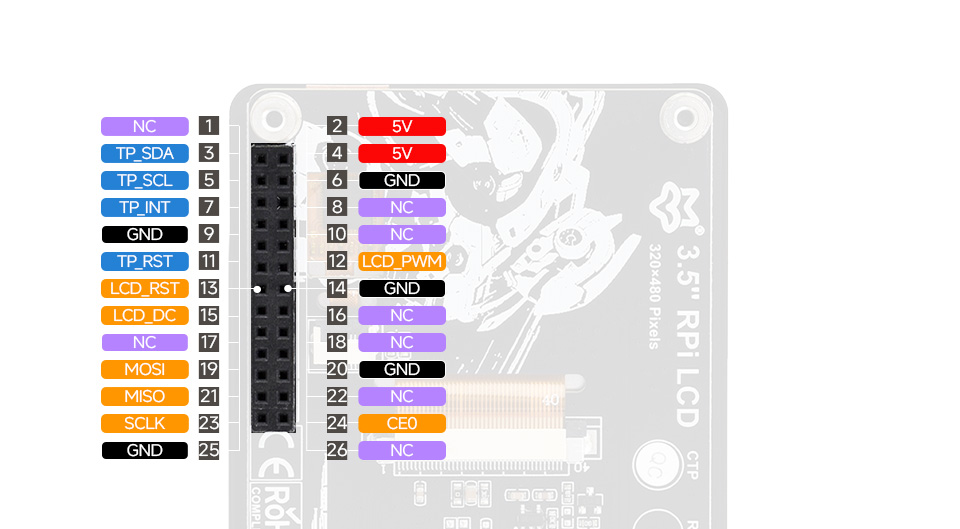
| 引脚号 | 标识 | 描述 |
|---|---|---|
| 1 | NC | 无连接 |
| 2, 4 | 5V | 电源正极(5V) |
| 3 | TP_SDA | 触控芯片 I2C 数据引脚 |
| 5 | TP_SCL | 触控芯片 I2C 时钟引脚 |
| 6, 9, 14, 20, 25 | GND | 电源地 |
| 7 | TP_INT | 触控芯片中断引脚 |
| 11 | TP_RST | 触控芯片复位引脚(低电平有效) |
| 12 | LCD_PWM | 背光 PWM 控制引脚 |
| 13 | LCD_RST | 显示芯片复位引脚(低电平有效) |
| 15 | LCD_DC | 数据/命令控制引脚(高电平为数据,低电平为命令) |
| 19 | MOSI | SPI 主输出/从输入 |
| 21 | MISO | SPI 主输入/从输出 |
| 23 | SCLK | SPI 时钟引脚 |
| 24 | CE0 | SPI 片选引脚(低电平有效) |
| 16–18, 8, 10, 22, 26 | NC | 无连接 |
4. 产品尺寸
5. 硬件连接
- 将模块 26 针插座对齐连接至 Raspberry Pi GPIO 40 排针。
- 推荐使用铜柱固定,避免松动。
6. 软件设置
6.1. 开启SPI与I2C接口
打开终端,执行以下命令启用相关接口:
sudo raspi-config nonint do_spi 0
sudo raspi-config nonint do_i2c 0
6.2 安装依赖库
sudo apt-get update
sudo apt-get install python3-pip
sudo apt-get install python3-pil
sudo apt-get install python3-numpy
sudo apt-get install python3-spidev
sudo apt install python3-smbus2
6.3 示例程序
wget https://files.luckfox.com/wiki/Luckfox/Display/3inch5-RPi-LCD-CTP/3inch5-RPi-LCD-CTP-RPI-Demo.zip
unzip 3inch5-RPi-LCD-CTP-RPI-Demo.zip
cd 3inch5-RPi-LCD-CTP-RPI-Demo
sudo python ./main.py
7. Bookworm 系统桌面显示设置
方法一:配置设备树驱动屏幕(推荐)
wget https://files.luckfox.com/wiki/Luckfox/Display/3inch5-RPi-LCD-CTP/St7796s.zip
unzip St7796s.zip
sudo cp st7796s.bin /lib/firmware/
编辑 config.txt:
sudo nano /boot/firmware/config.txt
在 [all] 末尾添加以下语句:
dtparam=spi=on
dtoverlay=mipi-dbi-spi,speed=48000000
dtparam=compatible=st7796s\0panel-mipi-dbi-spi
dtparam=width=320,height=480,width-mm=49,height-mm=79
dtparam=reset-gpio=27,dc-gpio=22,backlight-gpio=18
dtoverlay=goodix,addr=0x5d
重启生效:
sudo reboot
方法二:安装内核模块与 DTBO 驱动
📌 注意:Bookworm 系统需使用官方正式版本 6.6.51 及以上内核版本。
安装驱动模块
- 确定当前内核版本
uname -a
示例输出(Raspberry Pi 5):
Linux raspberrypi 6.12.47+rpt-rpi-2712 #1 SMP PREEMPT Debian 1:6.12.47-1+rpt1 (2025-09-16) aarch64 GNU/Linux
说明:
内核版本号:6.12.47+rpt-rpi-2712
架构:64位ARM(AArch64)
- 下载安装 st7796 驱动模块
# 下载并解压驱动文件
wget https://files.luckfox.com/wiki/Luckfox/Display/3inch5-RPi-LCD-CTP/Luckfox-st7796s.zip
unzip Luckfox-st7796s.zip
cd Luckfox-st7796s

# 进入对应内核版本的文件夹(以例子为准)
cd 6.12.47/64/rpi-2712-RPi5

# 复制内核模块
sudo cp st7796s.ko /lib/modules/$(uname -r)/kernel/drivers

# 添加模块到开机自动加载
sudo nano /etc/modules
# 在文件末尾添加:
st7796s
如下图: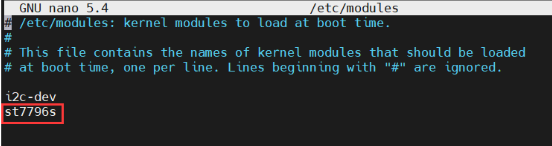 处理内核模块依赖:
sudo depmod -a
- 配置驱动设备树
cd
wget https://files.luckfox.com/wiki/Luckfox/Display/3inch5-RPi-LCD-CTP/Luckfox35CTP.dtbo
sudo cp Luckfox35CTP.dtbo /boot/overlays/
对于 RPi4 & RPi5
- 需要先参考前文步骤安装驱动模块
- 编辑 config.txt 文件
sudo nano /boot/firmware/config.txt
注释掉双屏相关配置。
在 [all] 末尾添加以下语句:
dtparam=i2c_arm=on
dtparam=i2c_arm_baudrate=50000
dtparam=spi=on
dtoverlay=Luckfox35CTP,fps=60,speed=48000000,rotate=90,ts_rotate_90
hdmi_force_hotplug=1
max_usb_current=1
hdmi_group=2
hdmi_mode=87
hdmi_cvt 480 320 60 6 0 0 0
hdmi_drive=2
- 创建 X11 配置文件
sudo nano /etc/X11/xorg.conf.d/98-spi-screen.conf
添加以下内容:
Section "Device"
    Identifier "SPI Screen"
    Driver "fbdev"
    Option "fbdev" "/dev/fb0"
EndSection
🔧 整个流程操作完成之后。如果不显示,请尝试将 /dev/fb0 修改为 /dev/fb1,然后重启。 4. 切换到 X11 显示系统
sudo raspi-config nonint do_wayland W1
sudo reboot
对于所有 Raspberry Pi 版本(需使用 Bookworm Lite)
⚠️ 仅适用于以下版本:
64位 Lite
32位 Lite
- 编辑 config.txt 文件
sudo nano /boot/firmware/config.txt
注释掉 KMS 及双屏配置。
在 [all] 末尾添加以下语句:
dtparam=i2c_arm=on
dtparam=i2c_arm_baudrate=50000
dtparam=spi=on
dtoverlay=Luckfox35CTP,fps=60,speed=48000000,rotate=90,ts_rotate_90
hdmi_force_hotplug=1
max_usb_current=1
hdmi_group=2
hdmi_mode=87
hdmi_cvt 480 320 60 6 0 0 0
hdmi_drive=2
- 安装必要软件
#X11 服务
sudo apt-get install --no-install-recommends xserver-xorg -y
sudo apt-get install --no-install-recommends xinit -y

#桌面管理器与 GUI
sudo apt install lightdm -y
sudo apt install raspberrypi-ui-mods -y

#Git 与浏览器(可选)
sudo apt install git -y
sudo apt install chromium-browser -y

#VLC 播放器(可选)
sudo apt install vlc -y
- 下载运行驱动
sudo apt install libraspberrypi-dev -y
sudo apt-get install unzip -y
sudo apt-get install cmake -y

#下载并构建 fbcp
wget https://files.luckfox.com/wiki/Luckfox/Display/3inch5-RPi-LCD-CTP/Rpi-fbcp.zip
unzip ./Rpi-fbcp.zip
cd rpi-fbcp/
sudo rm -rf build
sudo mkdir -m 777 ./build
cd ./build
sudo cmake ..
sudo make -j4
sudo install fbcp /usr/local/bin/fbcp
- 设置自启动startx与fbcp
- 修改 Bash Shell 文件
sudo nano ~/.bashrc
添加以下内容到末尾:
if [ "$(cat /proc/device-tree/model | cut -d ' ' -f 3)" = "5" ]; then
    # RPi 5B 配置
    export FRAMEBUFFER=/dev/fb1
    startx  2> /tmp/xorg_errors
else
    # 非 Pi5 配置
    export FRAMEBUFFER=/dev/fb0
    startx  2> /tmp/xorg_errors
fi
- 创建 fbcp systemd 服务
sudo nano /etc/systemd/system/fbcp.service
添加以下内容:
[Unit]
Description=Framebuffer Copy for Raspberry Pi
After=network.target

[Service]
ExecStartPre=/bin/sleep 20
ExecStart=/usr/local/bin/fbcp
Restart=always
User=root
Group=root

[Install]
WantedBy=multi-user.target
然后执行以下命令:
sudo systemctl daemon-reload
sudo systemctl enable fbcp.service
sudo systemctl start fbcp.service
- 设置 CLI 自动登录
sudo raspi-config nonint do_boot_behaviour B2
sudo raspi-config nonint do_wayland W1
sudo reboot
注意事项 ⚠️ 用户名必须为 pi,否则自动登录将无法正常工作。
🚀 每次重启系统加载时间会变长,SSH 可用时间也会相应延后。
8. 屏幕旋转设置
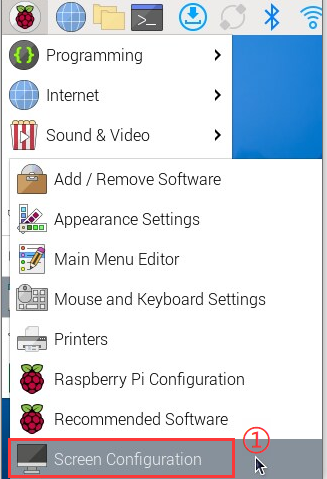
GUI 旋转
打开 Screen Configuration 应用程序
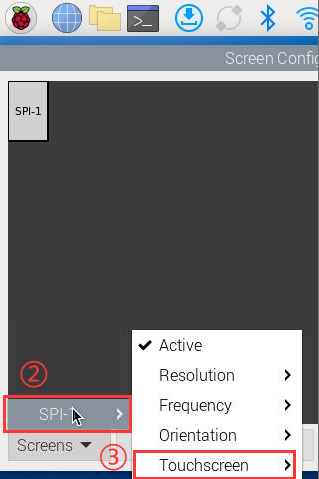
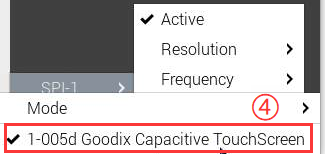
勾选 "Touchscreen"
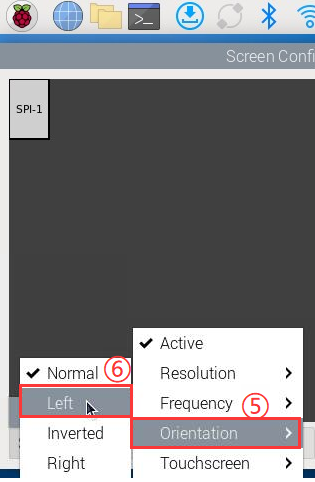
进入Orientation,勾选需要旋转的角度。
命令行旋转
💡 推荐在 Wayland 环境下使用此命令方式,适用于 Raspberry Pi OS Bookworm 及以上系统版本。
- 安装
wlr-randr工具
sudo apt install wlr-randr
- 查看可用输出名称
wlr-randr
输出示例(以 SPI-1 为例):
3. 执行旋转命令
wlr-randr --output SPI-1 --transform 90
📝 支持的旋转参数有:
normal
90
180
270
9. 调节背光
PWM调光
- 安装WiringPi
cd ~
git clone https://github.com/WiringPi/WiringPi.git
cd WiringPi
./build
gpio -v
安装成功会输出gpio version版本,如下所示: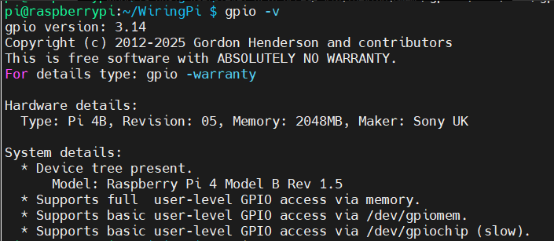
- 手动调节显示器PWM背光
gpio -g mode 18 pwm         #占用管脚为PWM管脚
gpio pwmc 100               #设置 PWM 时钟分频器
gpio -g pwm 18 0            #最暗
gpio -g pwm 18 1023         #最亮
gpio -g mode 18 out         #释放为输出
Pinctrl调光
- 设置亮屏
sudo pinctrl set 18 op dh
- 设置息屏
sudo pinctrl set 18 op dl